


54
GB
D:\CANNES\SONY_HA\JOB 2007\STR-
DG910\IM_910_CEL\Data_CEL\GB_data\GB04AMP_STR-DG910-CEL.fm
masterpage: Left
STR-DG910
3-094-430-31 (1)
Settings for the video
(VIDEO menu)
You can use the VIDEO menu to make various
adjustments for HDMI settings, assign the
composite video input to DMPORT input, etc.
Select “6-VIDEO” in the amplifier menus. For
details on adjusting the parameters, see
“Navigating through menus” (page 44) and
“Overview of the menus” (page 45).
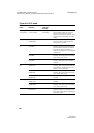
VIDEO menu parameters
x OSD (On-Screen Display on/off)
Lets you view the amplifier menus on the TV
screen and you can adjust the settings easily.
•OSD ON
The on-screen display is turned on so that
the amplifier menus are displayed on the TV
screen.
•OSD OFF
The on-screen display is turned off.
Note
The on-screen display is not output from the
COMPONENT VIDEO MONITOR OUT jack of
the receiver. Be sure to connect the HDMI OUT or
MONITOR VIDEO OUT jack to your TV.
x DMPORT V. (DIGITAL MEDIA
PORT video assign)
Lets you assign the composite video input to
DMPORT input so that you can view the
images on the TV screen. For details, see
“Watching a connected component through
DMPORT connection” (page 75).
x AUDIO (HDMI AUDIO)
a)
Lets you set the HDMI audio output from the
playback component connected to the receiver
via a HDMI connection.
•AMP
The HDMI audio signals from the playback
component is only output to the speakers
connected to the receiver. Multi channel
sound can be played back as it is.
Note
Sound is not output from the TV’s speakers.
• TV+AMP
The sound is output from TV’s speaker and
the speakers connected to the receiver.
Notes
•The sound quality of the playback component
depends on the TV’s sound quality, such as the
number of channels, and the sampling
frequency, etc. When the TV has stereo
speakers, the sound output from the receiver is
also stereo as that of the TV, even if you play
back multi channel software.
•When you connect the receiver to an image
display component (projector, etc.), sound may
not be output from the receiver. In this case,
select “AMP
”.
x CONTROL (HDMI CONTROL)
a)
Lets you turn the HDMI CONTROL function
on or off. For details, refer to the “HDMI
CONTROL Guide” supplied with the receiver.
x COL SYS (Color TV type
selection)
b)
• COL NTSC
•COL PAL
x NAME IN (Naming inputs)
Lets you set the name of inputs. For details,
see “Naming inputs” (page 76).
a)
When you select this parameter, the “HDMI”
flashes on the display.
b)
Models of area code CEL, CEK, E2 only.