14
EN
Preparing and Using the Remote
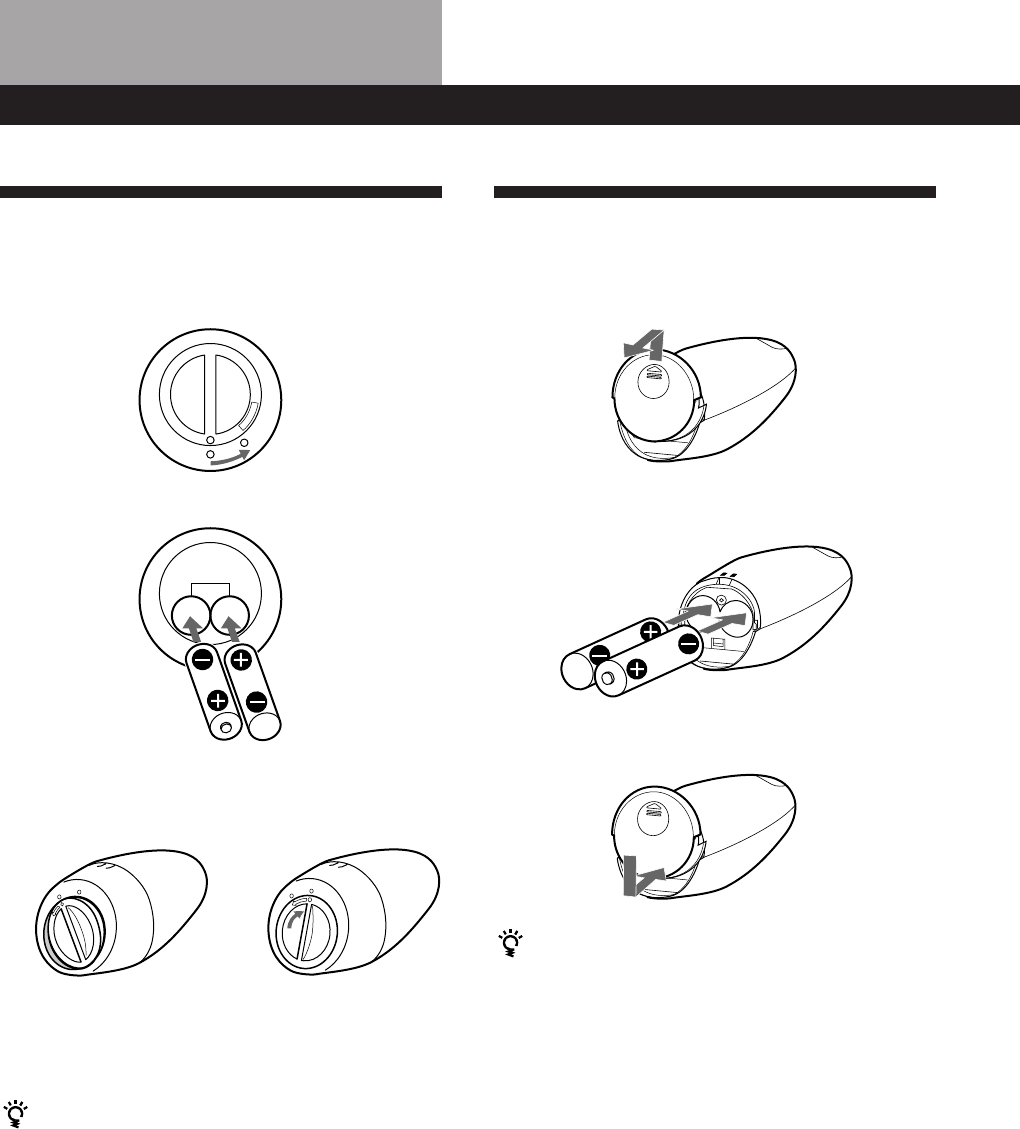
Inserting Batteries Into the
Remote: STR-DE905G
1 Open the cover on the bottom of the remote.
2 Insert two size -AA (R6) batteries with correct
polarity (+/–).
3 Close the cover by holding it down (it will be a
little uneven) and turning it to the right.
The cover locks
After inserting the batteries into the remote
Place it undisturbed on a flat surface for about 10
seconds to allow the internal circuitry to calibrate.
To avoid damage caused by battery leakage and
corrosion
Remove the batteries when the commander will not be
used for a long time.
Battery life
• Normal operation can be expected about three
months using Sony SUM-3 (NS), and a half year
using Sony AM-3 (NW) alkaline batteries. Since the
remote consumes power whenever you pick it up
and an on-screen display appears, the service life of
the batteries may be less than three months,
depending on how much you handle the remote.
• When the batteries become weak, LOW will appear
on the display during the initial on-screen displays
(but possibly not at the deeper menu levels). When
EMPTY appears, the batteries are almost completely
drained and will soon need to be replaced.
Inserting Batteries Into the
Remote: STR-DE805G
1 Open the cover on the bottom of the remote.
2 Insert two size -AA (R6) batteries with correct
polarity (+/–).
3 Close the cover.
To avoid damage caused by battery leakage and
corrosion
Remove the batteries when the commander will not be
used for a long time.
Battery life
• Normal operation can be expected about three
months using Sony SUM-3 (NS), and a half year
using Sony AM-3 (NW) alkaline batteries. Since the
remote consumes power whenever you pick it up
and an on-screen display appears, the service life of
the batteries may be less than three months,
depending on how much you handle the remote.
• Do not expose the remote sensor to direct sunlight or
lighting apparatuses. Doing so may cause a
malfunction.
O
P
E
N
÷
÷


