


3
EN
EN
3-859-278-11(1)
TABLE OF CONTENTS
Getting Started
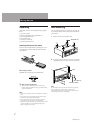
Unpacking 4
Rack Mounting 4
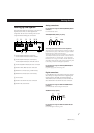
Hooking Up the System 5
Digital Interface 6
Setting the Clock 8
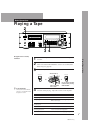
Playing a Tape 9
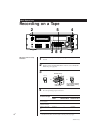
Recording on a Tape 10
Advanced Recording Operations
Things You should know Before Recording 12
Setting the Recording Mode 13
Using the SBM (Super Bit Mapping) Function 13
Locating the End of the Recorded Portion (End Search) 14
Inserting a Sound-Muted Section While Recording (Record Muting) 14
Monitoring the Recorded Sound (Record Monitoring)
(PCM-R700 Only) 15
Fade-in/Fade-out Recording (Fader) (PCM-R700 only) 15
Advanced Playback Operations
About the Display 16
Locating a Track (AMS/Direct Access) 17
Locating a Point (Shuttle Play/Mark&Locate) 17
Playing Tracks Repeatedly (Repeat Play) 18
Playing Tracks Skipping Specific Portions During Playback
(Skip Play) 18
Fade-in/Fade-out Playback (Fader) (PCM-R700 only) 19
Writing Sub Codes
About Sub Codes 19
Writing Start IDs During Recording 20
Writing Skip IDs During Recording 21
Writing Sub Codes During Playback 21
Adjusting the Position of an Existing Start ID 22
Erasing Sub Codes 23
Renumbering the Program Numbers Automatically
(Renumbering Function) 23
Menu Operations
Menu Operations 24
Operations Using the Optional Remote
The Optional Remote RM-D750 26
Writing and Erasing an End ID 27
Additional Information
Remote Control Function Using a Parallel Remote Connector 28
Disabling Button Operations (Key Protect Function) (PCM-R700 Only)
28
Precautions 29
Cleaning 29
Display Messages 30
Troubleshooting 30
Specifications 32
Index 33
Welcome!
Thank you for purchasing the Sony
Digital Audio Tape Deck. Before
operating the unit, please read this
manual thoroughly and retain it for
future reference.
The PCM-R500 and PCM-R700 have the
following common and distinguishing
features.
Common features
• 4DD (Direct Drive) motor mechanism.
• SBM (Super Bit Mapping) function
(during analog recording).
• Support for three sampling
frequencies (48 kHz, 44.1 kHz, 32
kHz).
• Installable in a 19-inch rack.
• Analog balanced XLR in/out jacks.
• Professional-use AES/EBU digital
interface.
• Connectors for parallel and serial
remote control.
• Easy menu operations using the
SHUTTLE and DATA dials.
• Mark & Locate function.
• Independent REC LEVEL controls for
left and right channels for analog
signals.
PCM-R700
• Four heads to allow monitoring of the
recorded sound during recording.
• Fade-in/out recording and playback
function.
• Key Protect function.
Additional functions (with the
optional remote only)
RMS play, Music Scan, and writing and
erasing of an end ID are available. For
details, see pages 26 and 27.
About This Manual
The instructions in this manual are for
models PCM-R500 and PCM-R700.
All illustrations in this manual show the
PCM-R500 unless the illustration is
indicated as that of PCM-R700.
Conventions
• Controls in the instructions are those
on the deck; these may, however, be
substituted by controls on the remote
that are similarly named or, when
different, appear in the instructions
within brackets.
• The following icon is used in this
manual:
z
Indicates useful information or
tips that make a task easier.