


88
US
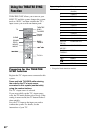
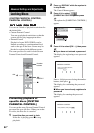
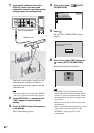
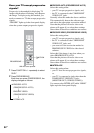
1 Connect the calibration mic to the
ECM-AC1 jack on the rear of the
subwoofer, and set it up at the ear level
using a tripod, etc. (not supplied).
The front of each speaker should face the
calibration mic, and there should be no
obstruction between the speakers and the
calibration mic.
Note
• Place the calibration mic so that the “FRONT”
side of it is pointed toward the front speakers.
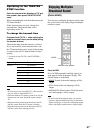
2 Press FUNCTION +/– repeatedly until
“DVD” appears in the front panel
display.
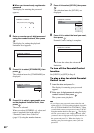
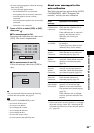
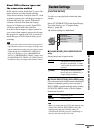
3 Press DISPLAY when the system is
in stop mode.
The Control Menu appears.
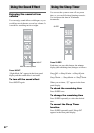
4 Press X/x to select [AUTO
CALIBRATION].
5 Press .
The [AUTO CALIBRATION] display
appears.
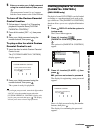
6 Press X/x to select [YES], then press
to start [AUTO CALIBRATION].
Be quiet during the measurement.
Note
•Avoid being in the measurement area and
making noise during the measurement (about 1
minute), to avoid measurement failure. During
the measurement, test signals are output from
the speakers.
•Reflections from walls or the floor may affect
measurements.
•When you install the surround speaker (L) to the
right position, the system set the “SL SR
REVERSE” setting (page 99) to “ON”
automatically.
VIDEO 1 VIDEO 2
VIDEO 2
TV VIDEO 1TV
AUDIO IN AUDIO IN AUDIO IN DIGITAL IN
OPTOCAL
L
R
DIGITAL IN
DIGITAL
IN
COAXIAL
COAXIAL
ECM-AC1
Calibration mic
Rear of the subwoofer
START
T
0 : 0 3 : 0 4
3
(
2 8
)
1
(
4 4
)
DVD VIDEO
AUTO CALIBRATION
Connect calibration mic. Start
measurement?
YES
AUTO CALIBRATION
NO
Measuring. Please wait a moment.