


Preparation
12
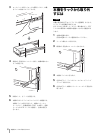
Preparing the Rack
Mount the brackets and rail assemblies on the rack.
Mounting the Brackets
Mount the brackets that hold the rail assemblies in place
on the rack.
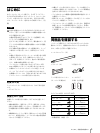
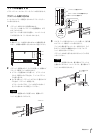
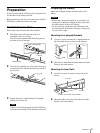
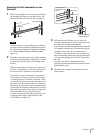
1
Decide where the brackets are to be mounted.
The library position in relation to the bracket
position is explained below.
We recommend using a marker to mark the position
where each bracket is to be mounted.
Caution
Note that if the four brackets are not mounted at the
correct height, it will be impossible to mount the
library.
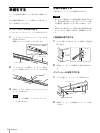
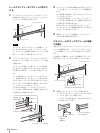
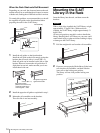
2
Using the bracket positioning and B screws, mount
the two front brackets on the rack.
1 Insert a bracket positioning screw into the second
screw hole from the top of the bracket and tighten
it slightly.
2 Insert a B screw into the second screw hole from
the bottom of the bracket and tighten it slightly.
Align the screws with the center of the rack screw
holes, and then tighten the screws completely,
securing the bracket to the rack.
Caution
Use the bracket positioning screws only with the
upper part of the screw holes on the front brackets.
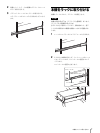
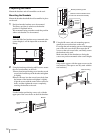
3
Using the B screws and rack mounting spacers,
mount the two rear brackets on the rack.
First align the rack mounting spacers with the upper
part of the rack screw holes, then center the B
screws on the rack screw holes, and finally secure
the brackets to the rack.
Make sure that all four brackets are facing the
correct way and are mounted at the correct height.
Caution
Only use the spacers with the upper screws on the
rear brackets. (The spacers are only used with the
rear brackets.)
1U
2U
2U
B screw
Bracket
Bracket positioning
screw
Position
of screw
cramps
Bracket
Make sure that the bracket screw
holes are centered horizontally.
Center the
screw holes
Bracket positioning screw
2U
Rack mounting
spacer
B screw
B screw