SONAMP
®
ASAP3D SE STEREO POWER AMPLIFIER
4
Placement/Installation
The Sonamp ASAP3D SE is designed to operate automatically
and is housed in a compact chassis that can be conveniently
mounted out of sight. The amplifier can be placed
horizontally on the supplied rubber feet, or it can be hung on
a wall — hidden behind a wall-mounted flat-panel TV — using
the keyhole-shaped hole on its bottom panel.
The ASAP3D SE includes a joining plate that allows it to be
rack-mounted in a single 1U space side-by-side with another
ASAP3D SE. An optional Rack-Mount Filler Panel is available
(Sonance part #92729) that allows a single ASAP3D SE to be
mounted in a 1U rack space.
Stand-Alone Placement
I
MPORTANT: T
O AVOID DAMAGE, THE AMPLIFIER MUST
ALWAYS REST ON ITS FOUR FEET TO ALLOW SUFFICIENT
CLEARANCE FOR PROPER VENTILATION.
Apply the four supplied stick-on feet to the amplifier’s bottom
panel and place the ASAP3D SE on a level surface, in an
upright position, out of direct sunlight and away from
windows through which rain may enter.
Situate the amplifier away from heat sources such as hot air
ducts or radiators. Be sure that the amplifier is adequately
ventilated by convection cooling or suitable cabinet fans.
When using the ASAP3D SE with a TV set, it may be
convenient to hide the amplifier inside of the TV cabinet or
bookshelf (but not on the TV itself).
IMPORTANT: THE ASAP3D SE REQUIRES TWO INCHES OF
CLEARANCE ON THE TOP AND ALL SIDES.
• Never place any object on or against the amplifier
• Never operate the amplifier on a carpeted surface, as this
will compromise ventilation.
Rack-Mounting
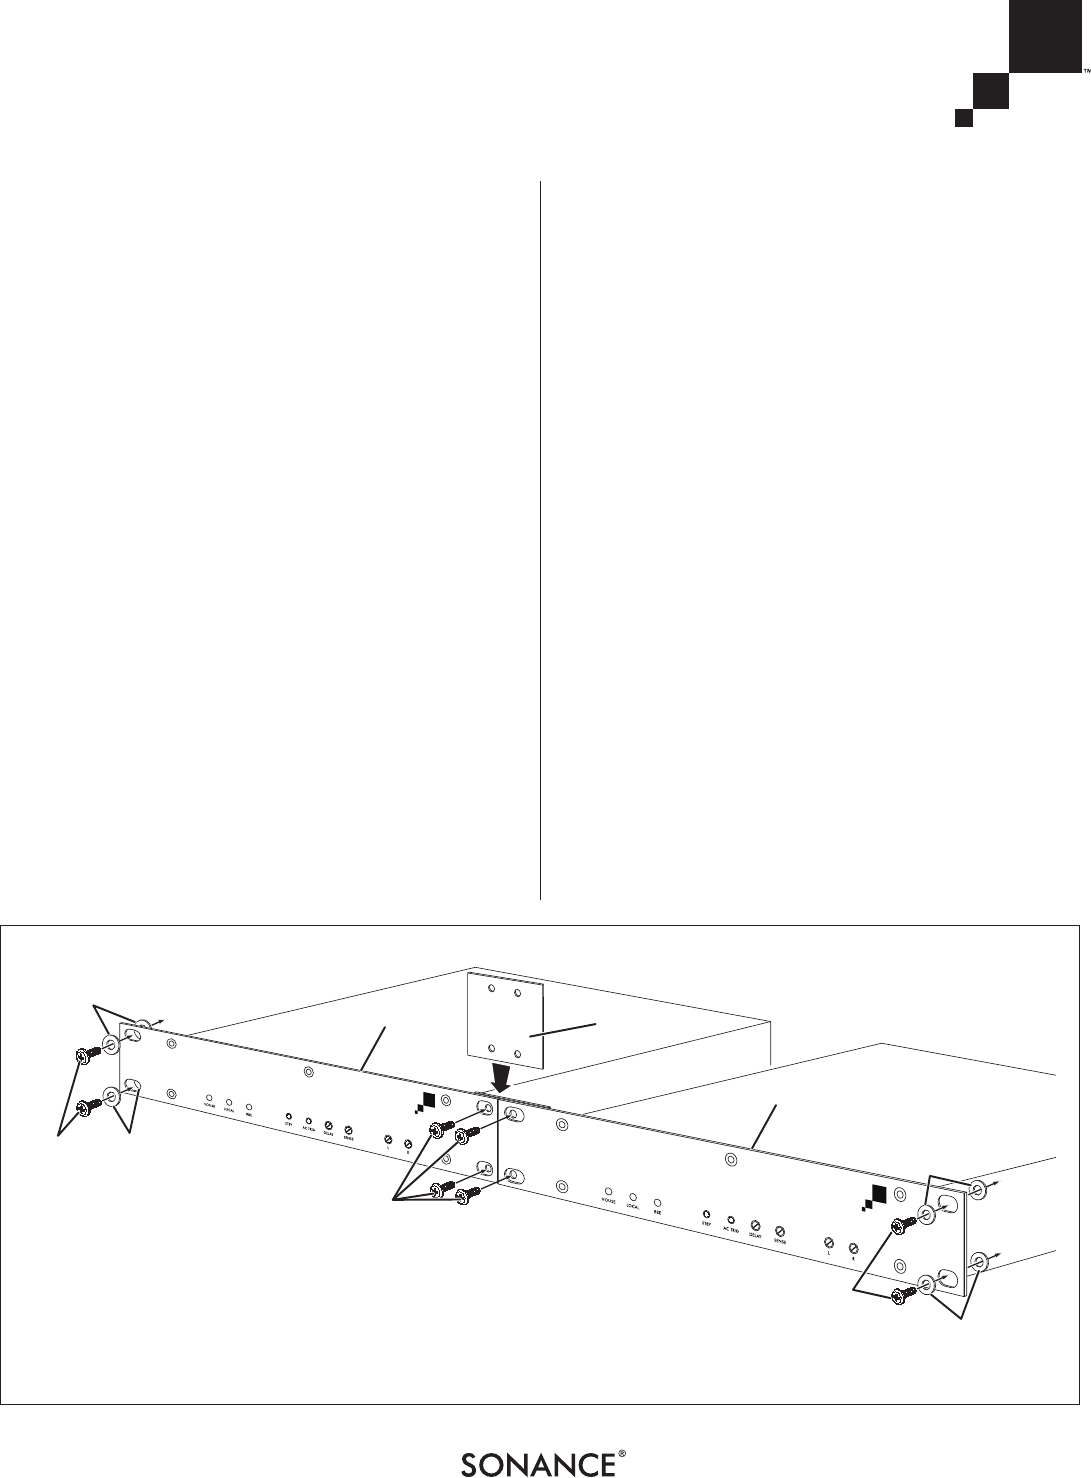
Two ASAP3D SE amplifiers can be rack-mounted side-by-side
using the included joining plate.
• If they’ve already been installed, remove the amplifier’s
stick-on feet before using the included rack-mount
accessories.
• Use nylon washers on rack-mount screws to isolate the
amplifiers from the rack rails (see
Figure 1
). This will help
prevent ground loops and hum problems.
• Very sensitive low-level components might pick up some
hum radiated from the ASAP3D SE’s power supply. If this
occurs, move the amplifier to another rack position, away
from the other components.
To rack-mount the ASAP3D SE (see Figure 1):
1. Place the amplifier with its front panel touching the
other amplifier or rack-mount filler panel.
2. Slip the Joining Plate behind the rack holes and attach
it using 4 rack screws.
3. Attach the assembled unit to the rack using 4 more
rack screws. Use nylon washers on the rack screws in
front of and behind the face plates to isolate them from
the rack rails, to help prevent ground loops and hum.
Joining
Plate
ASAP3D SE
ASAP3D SE
To Rack
Rail
To Rack
Rail
To Rack Rail
Rack-Mount
Screws
Rack-Mount
Screws
Rack-Mount
Screws
Nylon
Washers
Nylon
Washers
Nylon
Washers
Nylon
Washers
FIGURE 1: RACK-MOUNTING THE ASAP3D SE


