E-4
System connections
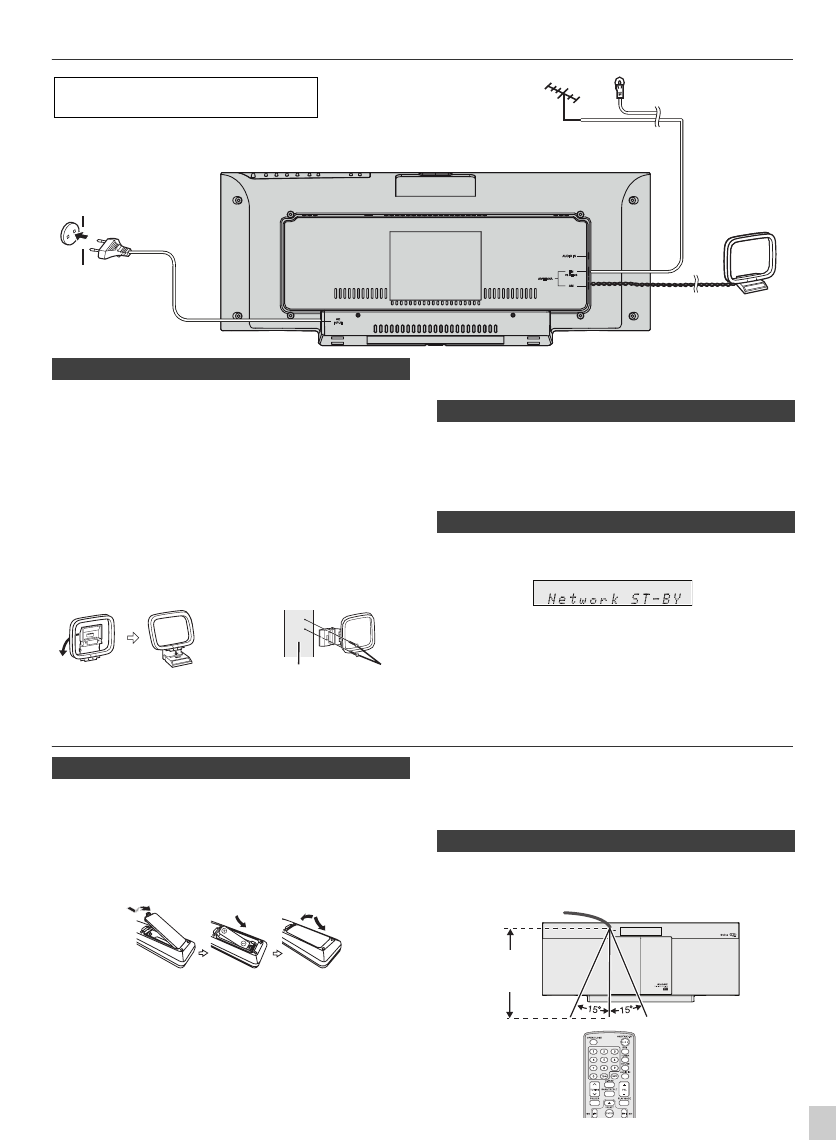
Supplied FM aerial:
Connect the FM aerial wire to the FM 75 OHMS socket and position
the FM aerial wire in the direction where the strongest signal can be
received.
External FM aerial:
Use an external FM aerial (75 ohms coaxial cable) for better
reception. When an external FM aerial is used, disconnect the
supplied FM aerial wire.
Supplied AM loop aerial:
Connect the AM loop aerial to the AM and earth (GND) terminals.
Position the AM loop aerial for optimum reception. Place the AM loop
aerial on a shelf, etc., or attach it to a stand or a wall with screws (not
supplied).
Installing the AM loop aerial:
Note:
Placing the aerial on the unit or near the AC power lead may cause
noise pickup. Place the aerial away from the unit for better reception.
After checking all the connections have been made correctly,
plug the AC power lead of this unit into the wall socket.
Note:
Unplug the AC power lead from the wall socket if the unit will
not be in use for a prolonged period of time.
●
The first time the unit is plugged in, the unit will enter the
demonstration mode. (refer page 8)
●
To cancel the demonstration mode, press the DEMO button (remote
control) during power stand-by mode. The unit will enter the low
power consumption mode.
●
To return to the demonstration mode, press the DEMO button again.
●
If iPod or iPhone is docked, the unit will begin charging. “Charge
Mode” will be displayed. Demonstration mode is invalid during
charge mode.
Remote control
Caution:
●
Remove the battery if the unit will not be used for a long period of
time. This will prevent potential damage due to battery leakage.
●
Do not use rechargeable battery (nickel-cadmium battery, etc.).
●
Installing the battery incorrectly may cause the unit to malfunction.
●
Batteries (battery pack or batteries installed) shall not be exposed
to excessive heat such as sunshine, fire or the like.
Notes concerning use:
●
Replace the battery if the operating distance is reduced or if the
operation becomes erratic. Purchase an “AA” size battery (UM/
SUM-3, R6, HP-7 or similar).
●
Periodically clean the transmitter on the remote control and the
sensor on the unit with a soft cloth.
●
Exposing the sensor on the unit to strong light may interfere with
operation. Change the lighting or the direction of the unit if this
occurs.
●
Keep the remote control away from moisture, heat, shock, and
vibrations.
Check the remote control after checking all the connections.
Point the remote control directly at the remote sensor on the unit.
The remote control can be used within the range shown below:
External FM
antenna for better
reception (not
supplied)
FM aerial
AM loop aerial
Make sure to unplug the AC power lead
before making any connections.
Wall socket
(AC 220 - 240 V ~ 50/60 Hz)
■ Aerial connection
<Assembling> <Attaching to the wall>
Wall Screws
(not supplied)
■ AC power connection
■ Demonstration (Network stand-by) mode
■ Battery installation
1
Open the battery cover.
2
Insert the supplied battery according to the terminal
indicated in the battery compartment.
When inserting or removing the battery, push it towards the
(–) battery terminals.
3
Close the cover.
■ Test of the remote control
0.2 m - 6 m
(8" - 20' )
Remote sensor


