


7
English
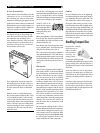
AC Power and Control
AC Power Input
Your RCC-1055 is configured at the factory
for the proper AC voltage in the country where
you purchased it (either 115 volts or 230/240
volts. The AC line configuration is noted on a
decal on the back panel.
NOTE: Should you move your CD player
to another country, it may be possible to re-
configure it for use on a different line volt-
age. Do not attempt to perform this
conversion yourself. Opening the enclosure
of the RCC-1055 exposes you to danger-
ous voltages. Consult a qualified service
person or the Rotel factory service depart-
ment for information.
The RCC-1055 should be plugged directly into
a 2-pin polarized wall outlet or into the
switched outlet on another component in your
audio system. Do not use an extension cord.
Be sure the power switch on the front panel
of the RCC-1055 is turned off (in the "out"
position). Then plug the power cord into an
AC power outlet.
If you are going to be away from home for
an extended period of time such as a month-
long vacation, it is a sensible precaution to
unplug your CD player (as well as other au-
dio and video components) while you are
away.
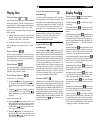
Power Switch and Power
Indicator
The Power Switch is located on the left side
of the front panel. Push the switch button in
to turn on the RCC-1055. To turn the RCC-1055
off, push the button again to return it to the
"out" position.
NOTE: If you are using a switched outlet to
turn on and off your CD player, you should
leave the power switch in the "on" position.
When AC power is applied to the unit, it
will power up in fully active mode.
When the Power Switch is turned on the disc
in position 1 in the tray is selected. The Disc
and Track Displays illuminate and show Disc
1/ Track 1. The Time Indicator also illuminates.
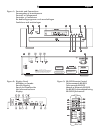
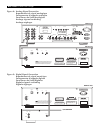
Output Connections
The RCC-1055 gives you a choice of analog
or digital output signals. The analog output
signal from the built-in Digital to Analog con-
verter is used with conventional analog au-
dio components. The digital output, which pro-
vides an unprocessed digital data signal, is
used with outboard D/A converters or digi-
tal processors.
NOTE: To prevent loud noises that neither
you nor your speakers will appreciate,
make sure all the system components are
turned off when you make any signal con-
nections.
Analog Outputs
[See Figure 4 for wiring illustration]
A pair of standard RCA jacks supplies a con-
ventional unbalanced analog output signal
from the RCC-1055 to the source inputs of an
audio preamplifier, integrated amplifier, or
receiver. RCA connections are found on vir-
tually all components. Select high quality au-
dio interconnect cables. Connect the left chan-
nel output of the RCC-1055 to the left chan-
nel source input on the preamplifier or other
component. Connect the right output of the
RCC-1055 to the right channel source input
on the preamplifier or other component.
Digital Output
[See Figure 5 for connection illustra-
tion]
If you are using the RCC-1055 as a disc trans-
port with an outboard D/A converter or other
digital processor, you need an unprocessed
digital data stream from the RCC-1055, taken
before the built-in D/A converter. This signal
is supplied by the back-panel coaxial digital
output jack. Using a standard 75 ohm coax
cable, connect the digital output jack to the
digital input connector on the outboard D/A
converter.
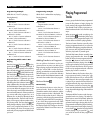
Remote Control
The RCC-1055 is supplied with an RR-D92
remote control. When using the RR-D92 the
emitter on the front of the control must be
pointed at the RCC-1055 front panel. The basic
disc play functions are controlled by the but-
ton located near the front of the RR-D92. There
is a cover over the lower portion of the RR-D92
that slides down to reveal buttons that con-
trol secondary functions, such as programming,
disc scanning and direct disc selection.
The RR-D92 duplicates the basic disc play
control functions of the front panel control but-
tons. When a disc play control is on both the
front panel and the remote control, both control
identifiers are shown in the related instruction
text. For example, to play a disc you can press
either
on the front panel or on the re-
mote control. There are some functions, such
as programmed track play functions, that are
operated exclusively by the RR-D92.
Remote Sensor
The Remote Sensor picks up the infrared sig-
nals from the remote control. Do not cover or
block the sensor. It must be unobstructed or
the remote control will not work properly. The
operation of the Remote Sensor can also be
affected if it is exposed to bright light, par-
ticularly sunlight. Certain types of lighting, such
as halogen lights, that emit a fair amount of
infrared light, can also interfere with proper
operation. In addition remote control functions
may not work reliably if the batteries in the
RR-D92 are weak.
External Remote Input
This connector is designed to be used in con-
junction with Xantech™ brand Video Link™
IR signal pick ups (sold separately by custom
system installers). This feature enables you to
operate the RCC-1055 with the hand held re-
mote control even when it is installed where
it is not visible from your listening location.
Contact your authorized Rotel dealer for more
information.
Video Link and Xantech are Trademarks of
Xantech Corporation.