


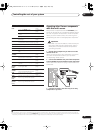

Controlling the rest of your system
12
75
En
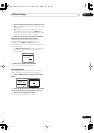
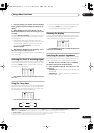
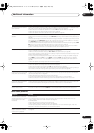
4 Point the two remote controls towards each other
then press the button that will be doing the learning on
this receiver’s remote control.
PRES KEY
starts flashing to indicate the remote is ready
to accept a signal.
• The remote controls should be 3 cm to 5 cm apart.
5 Press the corresponding button on the other
remote control that is sending (teaching) the signal to
this receiver’s remote control.
For example, if you want to learn the playback control
signal, press and hold
briefly. The LCD display will
show
OK
if the operation has been learned.
1
If for some reasons the operation hasn’t been learned the
LCD will display
ERROR
briefly and then display
PRES
KEY
again. If this happens, keep pressing the (teaching)
button as you vary the distance between the two remotes,
until the LCD display shows
OK
.
2
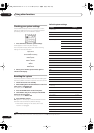
Certain buttons represent operations that cannot be
learned from other remote controls.
3
The buttons
available are shown below (with the exception of the TV
controls, a combination of
SHIFT
and these buttons can
also be learned):
6 To program additional signals for the current
component repeat steps 4 and 5.
To program signals for another component, exit and
repeat steps 1 through 5.
7 Press and hold the
RECEIVER
button for a couple of
seconds to exit and store the operation(s).
Erasing one of the remote control
button settings
This erases one of the buttons you have programmed and
restores the button to the factory default.
1 While pressing the
RECEIVER
button, press
SETUP
.
The remote LCD display shows
SETUP
.
2 Use
/
to select
ERASE
then press
ENTER
.
The LCD on the remote prompts you for the component
corresponding to the button setting to be erased.
3 Press the input source button corresponding to the
command to be erased then press
ENTER
.
The LCD display flashes
PRES KEY
.
4 Press and hold the button to be erased for two
seconds.
The LCD display shows
OK
or
NO CODE
to confirm the
button has been erased.
5 Repeat step 4 to erase other buttons.
6 Press and hold the
RECEIVER
button for a couple of
seconds when you’re done.
Resetting the remote control presets
This will erase all preset remote control preset codes and
programmed buttons.
1 While pressing the
RECEIVER
button, press
SETUP
.
The remote LCD display shows
SETUP
.
2 Use
/
to select
RESET
then press
ENTER
.
RESET
flashes in the LCD display.
3 Press and hold
ENTER for about two seconds
.
The LCD shows
OK
to confirm the remote presets have
been erased.
Confirming preset codes
Use this feature to check which preset code is assigned
to an input source button.
1 While pressing the
RECEIVER
button, press
SETUP
.
The remote LCD display shows
SETUP
.
2 Use
/
to select READ ID then press
ENTER
.
The LCD on the remote prompts you for the input source
button you want to check.
Note
1 Note that interference from TVs or other devices will sometimes result in the remote control learning the wrong signal.
2• Some commands from other remote controls cannot be learned, but in most cases the remotes just need to be moved closer together or farther apart.
• If the remote LCD shows
FULL
, it means the memory is full. See
Erasing one of the remote control button settings
below to erase a programmed button
you’re not using to free up more memory (note that some signals may take more memory than others).
3 Note that the number key decimal button (+10/D.ACCESS) may not be learned with some components.
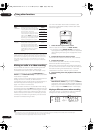
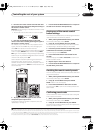
SLEEP
CLEAR
SR
+
ANALOG
ATT
DISC
DIMMER
CLASS
D.ACCESS
RECEIVER SOURCE
SYSTEM OFF
INPUT
SELECT
DVD TV
BD TV CTRL
DVR1 i Pod
TUNER
RECEIVER
CD
DVR2
HOME MEDIA
GALLERY
CD-R
ZONE2/3
GENRE
HDMI
3 cm to 5 cm
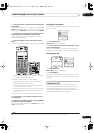
SLEEP
CLEAR
+
10
SR
+
ANALOG
ATT
DISC
DIMMER
CLASS
D.ACCESS
RECEIVER SOURCE
SYSTEM OFF
INPUT
SELECT
ENTER
TV CONTROL
DVD TV
BD TV CTRL
DVR1
TUNE
TUNE
ST ST
i Pod
TUNER
RECEIVER
ENTER
A PARAMETER
TOP MENU ì
V PARAMETER
MENU T.EDIT
BAND
RETURN
SETUP
PROGRAM
CD
DVR2
HOME MEDIA
GALLERY
CD-R
ZONE2/3
ì
CH
LEVEL
GENRE
ì
HDMI
TV CONTROL
VOL
STATUS
SIGNAL SEL
T.DISP
SBch
STEREO/
F.S.SURR
JUKEBOX
TV CH
INPUT
SELECT
MPX
AUDIO SUBTITLE
INFO
MUTE
REC
TV VOL
REC STOP
HDD
CH
CH
DVD
PROGRAM
DISP
PHOTO
TV/DTV
VSX_LX60LX70.book 75 ページ 2007年7月18日 水曜日 午前10時19分