Connecting up
02
14
En
6 If you have a DVD player or other source
1
component you want to connect, connect it now before
connecting the power cord in the next step.
See
Connecting auxiliary components
on page 27 for how
to connect a digital source component.
7 Connect the power cord.
2
• Connect the power cord to AC inlet on the receiver
subwoofer. Connect the power cord to a wall socket.
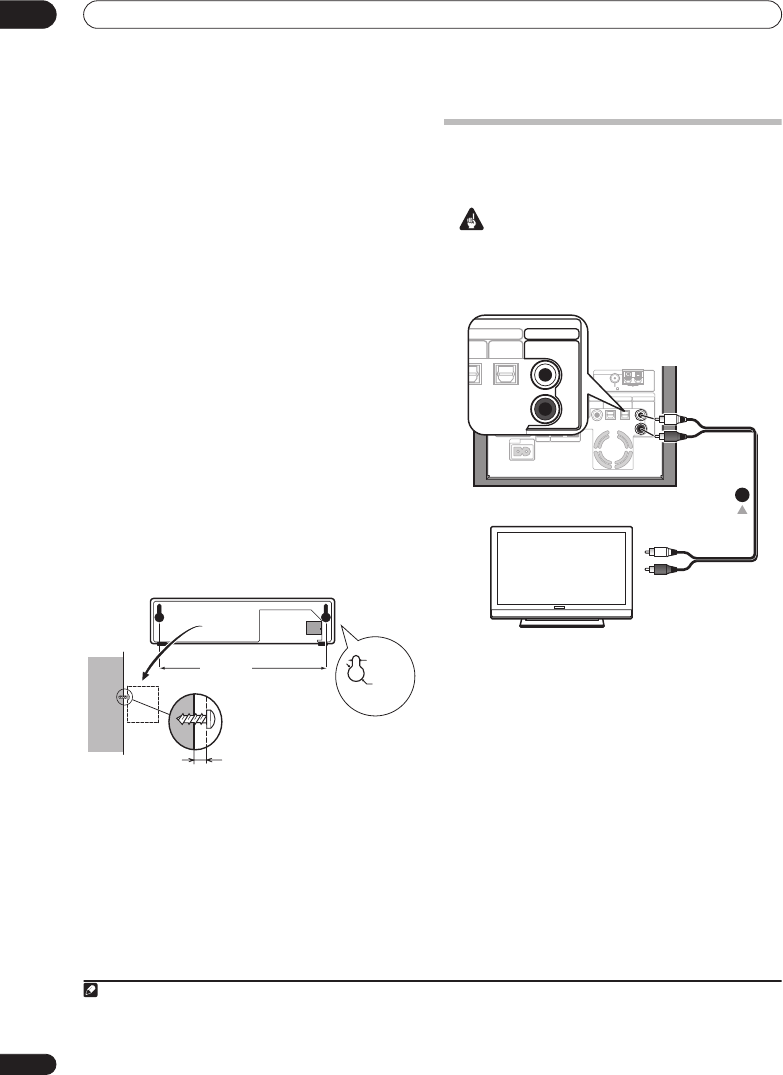
Wall mounting the display unit
It is possibe to mount the display unit on the wall.
Before mounting:
• Remember that the display unit is heavy and could
cause the wood screws to work loose, or the wall
material to fail to support it, resulting in the display
falling. Make sure that the wall you intend to mount
the display on is strong enough to support it. Do not
mount on plywood or soft surface walls.
• Mounting screws are not supplied. Use screws that
are suitable for the wall material and that will support
the weight of the display.
•Pioneer bears no responsibility for accidents resulting
from faulty assembly or installation, insufficient
mounting strength of walls or other building fixtures,
misuse or natural disasters.
• If you are unsure of the qualities and strength of the
wall, consult a professional for advice.
Using this system for TV audio
If your TV has a stereo audio output you can connect it to
this system and enjoy surround TV sound.
Important
• When connecting this system, be sure to switch
power off and disconnect the power cord from the
wall socket. Connect the power cord to the wall
socket only after completing all other connections.
1 Connect the audio output jacks on your TV to the
AUX input jacks on the receiver subwoofer.
Use the red/white stereo audio cable (not supplied) for
this connection. Make sure you match the left and right
outputs with their corresponding inputs for correct
stereo sound.
• You can use the
AUX
input jacks for any analog
source you want, such as a tape deck, etc.
Note
1 Make sure to connect a TV or monitor (for video sources) to take advantage of this system’s home theater potential. Please refer to the
instruction manual supplied with your TV or monitor for connection details.
2• Do not use any power cord other than the one supplied with this system.
• Do not use the supplied power cord for any purpose other than connecting to this system.
7
1
/8 in.
(181 mm)
3/32 in. (2.5 mm)
Mounting screw
(not supplied)
5/32 in.
(4 mm)
3/8 in.
(10 mm)
To stereo audio outputs
1
MCACC
SETUP MIC
SYSTEM CONNECTOR
AC IN
CONTROL IN
CONTROL
USE ONLY WITH DISPLAY UNIT.
SEE INSTRUCTION MANUAL.
OUT
SUBWOOFER
CENTER FRONT
SURROUND
DVD
(COAXIAL)
DTV
(OPTICAL)
PC/GAME
(OPTICAL)
SPEAKERS
DIGITAL
AUDIO INPUT
ANALOG
AUX
AM LOOP ANTENNA
FM UNBAL 75
RL
RL
R
L
TV
TV
TICAL)
PC/GAME
(OPTICAL)
ITAL
AUDIO INPUT
ANALOG
AUX
R
L
HTS-570.book 14 ページ 2007年1月29日 月曜日 午後9時7分


