4 Pelco Manual C1014M-B (10/97)
3.0 INSTALLATION FOR CASH REGISTERS
This section covers the installation of the ICIMI1000 interface cable with the Gilbarco
TCR/15 and “G-Site”; Koppens/Schlumberger Micromax 1000, 2000, 3000 Pro;
Suntronics Station Minder 890, 960, 2000; and Verifone Ruby Super System cash
registers.
The following should be noted prior to installation:
3.1 LOCATING THE PRINTER CONNECTION
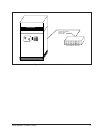
1. Locate the printer and unplug the cash register printer cable from the printer.
(On the Gilbarco TCR/15, locate the port labeled DISPLAY. This connection
will be found on the back and underneath the register. If the display port is not
labeled, follow the cable from the customer display back to the register.)
2. Plug Pelco’s printer interface (ICIMI1000) into the 25 pin D-SUB connector on
the printer. (On the Gilbarco TCR/15, plug Pelco’s display interface (ICIMI100)
directly into the register display port. The Interface Extension Cable is used to
interface the register display port.)
3. Plug the register printer cable into the Pelco ICIMI1000 interface. (You can
use either the male or female 25 pin D-SUB connector.)
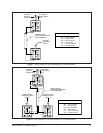
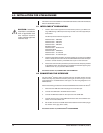
4. If the Pelco Inter-Check
®
is to be located more than four feet from the printer,
you can run wiring to where the Inter-Check
®
is located using the ICI1000
wiring kit (supplied with the Inter-Check
®
unit). Refer to Figure 1 or Figure 2 to
properly configure the wiring for the Inter-Check
®
unit.
5. Make sure all connections are tight.
6. Check register and display for proper operation.
Proceed to Section 3.2, INTER-CHECK
®
PROGRAMMING.
3.2 INTER-CHECK
®
PROGRAMMING
Inter-Check
®
must have communication parameters programmed in order to com-
municate with the registers. Refer to the Inter-Check
®
installation/operation manual
for complete information about system programming. Perform the following steps
to program the Inter-Check
®
communication parameters:
1. Enter the Main Menu by pressing “ENT” on the keypad for programming mode.
2. Inter-Check
®
1000S users press “1” on the keypad for Channel 1 Setup.
Inter-Check
®
2000D users press “1” or “2” depending on the channel you are
using for data display.
3. Press “1” for Communication Setup in the Channel Menu. Press “1” to setup
Communication Parameters. On the monitor screen, you will see the current
communication parameters followed by the “Baud=?” statement.
CAUTION:
Installation
should be in accordance
with all applicable local
and national electric
codes, utilizing approved
materials only.
NOTE:
The Pelco Gilbarco TCR/
15 register interface utilizes the dis-
play port on the cash register dis-
play. It Is not a printer connection
like most of our interfaces.