


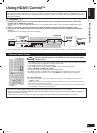
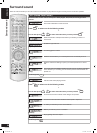

ENGLISH
RQTV0156
28
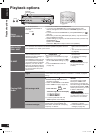
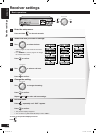
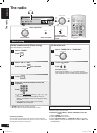
Receiver settings
➡ page 26 for basic operations
Change these settings to suit
the connections you have made
to the digital input terminals
(➡ pages 6, 7, 9, and 10).
You cannot allocate more
than one terminal per input.
Therefore, if you change the
setting for “DVD” to “OPT 1”,
digital input for DVD input will
be only through the OPTICAL 1
terminal.
•
•
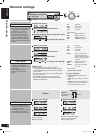
Select and confirm.
Select the equipment and confirm.
Change the digital input setting and confirm.
Repeat and to change other settings.
TV: Television
DVR: DVD recorder
DVD: DVD player
CD: CD player
Factory setting:
TV: OPT1 (OPTICAL 1)
DVR: OPT2 (OPTICAL 2)
DVD: COAX1 (COAXIAL 1)
CD: COAX2 (COAXIAL 2)
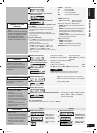
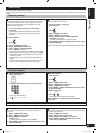
This unit automatically detects
whether input is digital or
analogue, but you can fix the
input mode.
Select “AUTO” if it isn’t
necessary to fix a certain
signal.
•
•
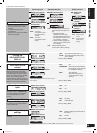
Select and confirm.
Select the equipment and confirm.
Select the setting and confirm.
Repeat and to change other settings.
PCM FIX mode
In rare cases, the unit may have trouble
recognizing the digital signals on discs. Use this
mode if the beginnings of tracks are cut off when
playing CDs.
Do not use this mode if the unit can handle audio
from CDs normally.
When PCM FIX mode is on, the unit cannot
process other signals. Choose another mode if
PCM FIX causes noise.
•
•
•
TV: Television
DVR: DVD recorder
DVD: DVD player
CD: CD player
AUTO: The unit automatically
detects whether input is
digital or analogue. (HDMI
takes priority when input
is digital.)
ANALOG: Analogue input fixed
DIG: Digital input fixed
PCMFIX: PCM (from CDs) digital
input fixed
Factory setting:
TV, DVR, DVD, CD: AUTO
“DIGITAL INPUT” lights after fixing
digital input.
“PCM” lights if you select the PCM FIX
mode.
“PCM FIX” flashes on the display if you
input any signal other than PCM after
you have set the PCM FIX mode.
•
•
•
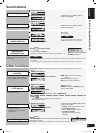
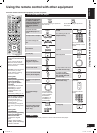
This option appears after you
have set “LR BI-WIRE setting”
to “YES” (➡ page 27).
Adjust high frequency (HF) and
low frequency (LF) balance.
Correct HF and LF delay time.
•
•
•
Balance
Select and confirm.
Select and confirm.
Adjust and confirm.
Use the bar as a guide.
LF: low frequency
HF: high frequency
Delay time
Select and confirm.
Select and confirm.
Adjust and confirm.
Adjustment range: 0 to 30 cm
Adjust in 1-cm increments.
Factory setting: 0 cm
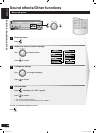
Digital input settings
Input signal
Bi-amp settings
cm
AUTO
SPEAKER SETUP
ADVANCED
DUAL AMP
BI-AMP
SPEAKERS
A B
AUTO DETECTOR
SURROUND
AUX SETUP MIC
MENU
SETUP
RETURN
INPUT SELECTOR
ENTER
VOLUME
HDMI
TUNE
S VIDEO IN
VIDEO IN
L
A
U
D
IO
IN
R
MENU
SETUP
RETURN
INPUT SELECTOR
ENTER
3
3
3
2a
2
2
2a
3
Speaker
(cross section of
a speaker)
Difference
Receiver settings
3
3
For your reference
2a
2b
2a
2b
2b
2b
SA-XR58.indb 28 6/27/2006 6:55:24 PM