16
Outlaw Audio
Owner’s Manual
Connecting Your RR 2150
External Amplifier Connections
You can use a separate, external power amplifier either as a substitute for the
RR 2150’s internal amp or to supplement the internal amp when adding addi-
tional speakers in a different area of your home. Remember that the RR 2150
is not designed for “dual source” operation. (Although the “Tape” outputs may
be used for that purpose if they are not connected to a recorder.) An additional
amplifier will only amplify the source you select with the RR 2150’s input selec-
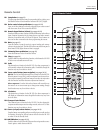
tor (FP17 and RC11 for front panel and remote control respectively).
As with any component that is connected to the RR 2150, always make sure that
both the RR 2150 and the additional amplifier are OFF or disconnected from
any AC power source when making these connections. A misstep here could
result in severe damage to your amplifier and/or loudspeakers.
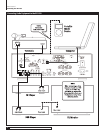
There are a number of options available to connect an external amplifier:
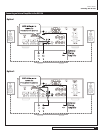
OPTION 1:
Using an external amplifier only.
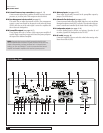
Remove the pre-out/main-in U-shaped jumpers. Connect the RR 2150’s pre-
amplifier outputs (RP17) to the external amplifier’s inputs. Next, connect your
speakers to the external amplifier.
This option lets you control the volume produced by any speakers connected
to the new amplifier with the RR 2150’s volume control.
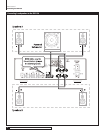
OPTION 2:
Using an external amplifier AND the RR 2150’s internal amplifier
for two sets of speakers fed with the same source and at the same
relative volume level.
Remove the pre-out/main-in U-shaped jumpers. Using a pair of shielded a
“Y” interconnects, connect the RR 2150’s left channel preamp output to both
the RR 2150’s main amplifier inputs and to the left channel inputs of the new
amplifier. Repeat the step above for the right channel.
This option lets you control the volume produced by any speakers connected
to the new amplifier with the RR 2150’s volume control.
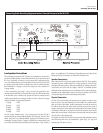
OPTION 3:
Using the RR 2150’s internal amplifier and external amplifier for two
sets of speakers fed with the same source, but with the ability to
turn the second pair of speakers on an off from the front panel.
Do not remove the pre-out/main-in jumpers. Connect the RR 2150’s External
Loop outputs (RP14) to the external amplifier’s inputs. (This, of course, pre-
sumes that you are not using the External Loop connections.) Next, connect
the speakers to the external amplifier. You will still be able to connect speakers
to the RR 2150’s amplifier.
The RR 2150’s volume control sets the relative level for both pairs of speakers.
You may turn the speakers connected to the external amplifier on or off by
pressing the External Loop switch on the front panel.
NOTE: This option is best suited for a custom installation and may
require a separate volume control for the speakers attached to the
external amplifier.
OPTION 4:
Using an external amplifier to send a second source to a second set
of speakers.
Do not remove the pre-out/main-in jumpers. Connect the RR 2150’s Tape
outputs (RP13) to the external amplifier’s inputs. (This, of course, assumes
you are not using the Tape connections.) Next, connect the speakers to the
external amplifier.
Use the RR 2150’s volume control to adjust the level to the speakers connected
to the RR 2150.
The input for the source fed to the external amplifier and the speakers connected
to it is selected with the front panel Record Selector (FP 18). As the output to the
Tape Outputs is fixed, we strongly advise that you either use an amplifier with
built-in volume control for this application, or that an optional speaker-level
volume control be installed between the outputs of the external amplifier and
the speakers. Be certain that the volume control is capable of handling the
power output from your external amplifier.
NOTE: As with Option 3, this is best suited for a custom installation to
make certain that all external components are properly matched for
safe operation.
12 Volt Trigger
The RR 2150 has one 12 volt Trigger output that output offers a 12 volt DC
signal that can be used to control compatible external components such as
amplifiers, blinds and projection screens.
To control an external device such as an Outlaw power amplifier with the RR
2150, connect the Trigger Output (RP5) on the rear panel to the matching
“Trigger” or “Control” input on the external component.
Once the two units are connected, the external component will turn on when
the RR 2150 is on, and off when the RR 2150 is turned off.
AC power connection
Insert the supplied power cord into the AC input socket (RP20), and then con-
nect it to a non-switched AC outlet. If a power conditioner or other device is
used between the RR 2150 and the AC power source it is your responsibility to
make certain that the external device is capable of handling the power drawn
by the RR 2150. Use of external power products not compatible with the RR 2150
may create a safety hazard.
It is important use the supplied power cord, not a standard IEC 3-prong
(grounded) power cord. If the power cord is replaced, by certain to use one
with identical configuration and capacity.
CAUTION: Before you plug the power cord into an AC wall outlet,
confirm that you’ve made all connections to the RR2150 first.
WARNING: Never disconnect the power cord at the RR 2150 end
while the other end is still plugged into an AC outlet. This may cause
an electric shock. Always connect power by plugging into the AC outlet
last and disconnect by unplugging from the AC outlet first.


