15
RR 2150 Stereo RetroReceiver
Owner’s Manual
Bare wire or pin terminations
Unscrew the outer barrel of the speaker connector until you see the hole
in its center post. Insert the conductor or pin into the hole and screw the
outer barrel tightly.
• Spade lugs (they look like small two-pronged forks)
Unscrew the barrel enough to place the lug’s prongs around the inner
post and then retighten the barrel.
• Eye lugs (they are complete circles)
Unscrew the barrel completely until it comes off the post. Place the eye
around post, replace the barrel, and tighten.
• Banana plugs
Insert them into the holes in the end of each post/barrel assembly. Just
push them in carefully and you’re done.
CAUTION: DO NOT over tighten the barrels. This isn’t a contest of
strength. Just hand tighten the barrel enough to insure good contact
so that it is snug to the wire or termination device and the speaker
terminal.
Whichever type of termination you use, it is important to make sure that
the individual wire strands that make up each conductor bundle are tightly
wrapped together and that there are no frayed ends that protrude past the
speaker terminal or the wire termination for that conductor. This will prevent
short circuits and possible amplifier failure.
Remember these three points:
Make sure to observe proper continuity and polarity.
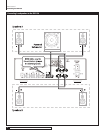
For continuity, make sure you connect your main Left speaker to System
A’s Left terminals and your main Right speaker to the System A’s Right
terminals. Then connect your secondary speakers to System B terminals,
making sure to connect the Left speaker to the Left terminals and the
Right speaker to the Right terminals. Care here will save a lot of time
later.
The RR 2150’s speaker connections are color-coded. Red terminals are “+”
or “hot” while black terminals are “–” or “ground.” For proper polarity,
make sure that you’ve connected the proper speaker’s “+” terminal (the
one with the red barrel) to your speaker’s “+” terminal. Then connect the
“–“ terminal (it has a black barrel) to the same speaker’s “–“ terminal.
It’s that simple.
A Note On Phase
When speakers are connected correctly, they are said to be “in phase.” This is
critical to proper sound reproduction as it means that the drivers in each speaker
work together, with the cones in each speaker moving in the same direction
at the same time. When speakers are hooked up “out of phase,” the drivers
in each speaker respond differently to the amplifier’s signal. For example, the
drivers of the left speaker will push out when the drivers of the right speaker
pull in, producing a very imprecise, almost “ghostly,” stereo image or poor bass
performance. No, there’s nothing dangerous about hooking speakers up “out
of phase.” You won’t damage anything, it just doesn’t sound good.
Subwoofers and Bass Management Settings
The RR 2150 is unique among stereo receivers in that it has built-in bass
management, a feature common, if not required, for multi-channel products,
but not found in the two-channel world. While traditional two-channel systems
have long used full-range speakers, modern audio systems – even those designed
for two-channel music – may use frequency limited bookshelf, or “satellite”
speakers in combination with a separate subwoofer.
Bass Management
Rather than provide a simple subwoofer output that places the burden of bass
management on the subwoofer, the RR 2150 includes a custom designed analog
bass management system that calls upon the heritage of Outlaw’s award win-
ning ICBM-1 bass management system for multi-channel systems.
The internal crossover is a symmetrical 2nd order (12 dB/octave) Butterworth
filter set. BP (Bypass)duplicates the full range signal sent to your speakers at the
subwoofer output. This enables you to utilize the crossover in your subwoofer.
If your system includes a subwoofer, read on for the configuration steps. If you
are not using a subwoofer, skip to the next section.
Subwoofers come in two varieties, powered and passive. Powered subwoofers
include their own built-in amplifier and are by far the most popular, while
passive subwoofers require the use of a separate, external amplifier. You can
use either type with your RR 2150.
Powered subwoofers
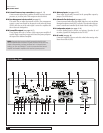
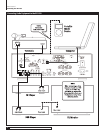
Use a shielded interconnect cable to connect the RR 2150’s subwoofer output
jack (RP11F) to the subwoofer’s line input jack. If the subwoofer has more
than one input jack, check its owner’s manual to see which input you should
use for a monaural bass signal. Then follow any specific connection and/or
configuration instructions supplied with the subwoofer.
We suggest that you use the rear panel Bass Management switch (RP15) rather
than your powered sub’s internal crossover. You’ll find the RR 2150’s circuitry
exceptionally clean and noise-free compared to similar circuits in most subs.
Passive (non-amplified) subwoofer
Modified “bi-amp” option
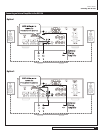
The modified “bi-amp” configuration uses the
RR 2150’s internal crossover and is used most often:
Set the RR 2150’s Bass Management switch to the crossover frequency (60, 80,
or 100 Hz) that is appropriate for your speakers.
Connect the RR 2150’s subwoofer output jack (RP18) to the input of the ampli-
fier used to power the subwoofer and the output of the subwoofer amplifier to
the subwoofer.
Traditional “bi-amp” option
The traditional “bi-amp” configuration requires
an external electronics crossover and separate power amplifier:
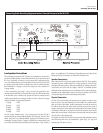
Set the Bass Management switch (RP15) to BP (bypass). Remove the U-shaped
jumpers that connect the RR 2150’s preamp outputs (RP16) and power amp
inputs (RP17).
Connect the RR 2150’s preamp outputs to the crossover’s inputs. Connect the
crossover’s high pass outputs to the RR 2150’s main amp inputs. Then connect
the crossover’s low pass outputs to the inputs of the amplifier you will use to
drive your subwoofer and connect that amplifier to the subwoofer.
Adjust the crossover to best integrate the output of the wide range speakers
and the subwoofer.
Connecting Your RR 2150


