


4
Precautions
—Continued
For British models
Replacement and mounting of an AC plug on the power
supply cord of this unit should be performed only by
qualified service personnel.
IMPORTANT
The wires in the mains lead are coloured in accordance
with the following code:
Blue: Neutral
Brown: Live
As the colours of the wires in the mains lead of this
apparatus may not correspond with the coloured
markings identifying the terminals in your plug,
proceed as follows:
The wire which is coloured blue must be connected to
the terminal which is marked with the letter N or
coloured black.
The wire which is coloured brown must be connected to
the terminal which is marked with the letter L or
coloured red.
IMPORTANT
The plug is fitted with an appropriate fuse. If the fuse
needs to be replaced, the replacement fuse must approved
by ASTA or BSI to BS1362 and have the same ampere
rating as that indicated on the plug. Check for the ASTA
mark or the BSI mark on the body of the fuse.
If the power cord’s plug is not suitable for your socket
outlets, cut it off and fit a suitable plug. Fit a suitable
fuse in the plug.
For European Models
Table of Contents
Declaration of Conformity
We,
ONKYO EUROPE
ELECTRONICS GmbH
LIEGNITZERSTRASSE 6,
82194 GROEBENZELL,
GERMANY
GROEBENZELL, GERMANY
ONKYO EUROPE ELECTRONICS GmbH
K. MIYAGI
declare in own responsibility, that the ONKYO product
described in this instruction manual is in compliance with the
corresponding technical standards such as EN60065,
EN55013, EN55020 and EN61000-3-2, -3-3.
Important Safety Instructions ........................... 2
Precautions.........................................................3
Table of Contents...............................................4
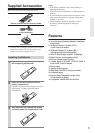
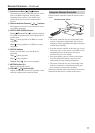
Supplied Accessories........................................5
Installing the Batteries ...........................................5
Features .............................................................. 5
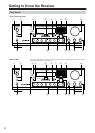
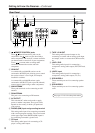
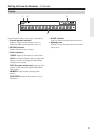
Getting to Know the Receiver........................... 6
Front Panel............................................................6
Rear Panel.............................................................8
Display...................................................................9
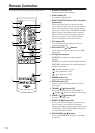
Remote Controller............................................10
Using the Remote Controller ...............................11
Introduction
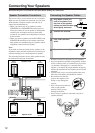
Connecting Your Speakers ............................. 12
Speaker Connection Precautions........................12
Connecting the Speaker Cables..........................12
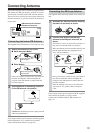
Connecting Antenna........................................ 13
Connecting the Indoor FM Antenna.....................13
Connecting the AM Loop Antenna.......................13
Connecting an Outdoor FM Antenna...................14
Connecting an Outdoor AM Antenna...................14
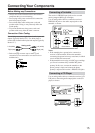
Connecting Your Components ....................... 15
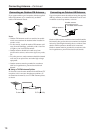
Connecting a Turntable .......................................15
Connecting a CD Player......................................15
Connecting a Recording Component ..................16
Connecting a Remote Interactive Dock (RI Dock).....16
Connecting a DVD Player....................................16
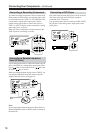
Connecting a TV or Other Component with an Audio
Output.............................................................17
Connecting Components..............................17
Connecting the Power Cords of Other
Components ...............................................18
Connecting the Power Cord ................................18
Connections
Turning On the Receiver .................................19
Turning On and Standby .....................................19
Changing the Input Display .................................19
Enjoying Audio Sources..................................20
Muting the receiver (remote controller only)........21
Using Headphones..............................................21
Setting the Display Brightness.............................21
Using the Sleep Timer (remote controller only)...21
Using the Tone and Balance Controls.................22
Recording .........................................................23
Recording the Input Source.................................23
Listening to the Radio .....................................25
AM Frequency Step Setup (not North America and
Europe)...........................................................25
Listening to AM/FM Stations................................25
Using RDS (European Models Only)...................27
Naming Preset Channels (other than European
model).........................................................29
Entering a Name..................................................29
Correcting a Character ........................................29
Connecting Components not Reached by the
Remote Controller Signals (IR IN/OUT)..... 30
If Remote Controller Signal Does not Reach the
Receiver Remote Sensor................................30
If Remote Controller Signal Does not Reach Other
Components ...................................................30
Enjoying Audio Sources
Troubleshooting...............................................31
Specifications...................................................33
Others