


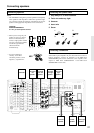
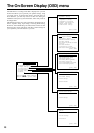


29
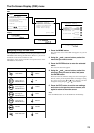
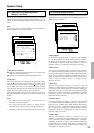
Menu
1.Speaker Setup
2.Input Setup
3.Listening Mode Setup
4.Preference
5.Zone2 OSD Setup
6.About
Select: Exit:|EXIT|
Enter:|ENTER| Quit:|OSD|
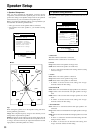
1.Speaker Setup
1.Speaker Config
2.Speaker Distance
3.Level Calibration
4.Bass Peak Level
5.LFE Level Setup
Quit:|OSD|
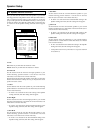
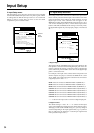
1-1.Speaker Config
a.Subwoofer :Yes
b.Front :Large
c.Center :Large
d.Surround L/R
:Large
e.Surround Back
:Large
Quit:|OSD|
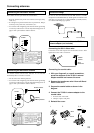
Navigating through the OSD menu
The explanations here assume you are using the buttons on the
TX-DS989 when entering the OSD menu. However, you can use
the buttons on the remote controller as well.
The buttons on the remote controller correspond to those on the
TX-DS989 as shown below.
1. Press the MENU button.
The main menu screen of the OSD menu appears on your TV
monitor.
2. Using the and cursor buttons, select the
menu that you want to enter.
3. Press the ENTER button to enter the selected
menu.
The screen for that menu appears.
4. Using the and cursor buttons, select the
sub-menu that you want to enter, and press
the ENTER button.
Each sub-menu has different settings that can be changed as
desired, and they are all explained below. To change a setting,
first select it using the
and cursor buttons, and then
change the setting using the
and cursor buttons.
5. Press the EXIT button to set the new settings
and return to the previous menu screen, and
again to return to the main screen.
Note:
Press the MENU button to exit the OSD menu immediately.
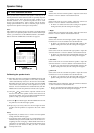
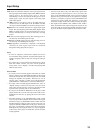
The On-Screen Display (OSD) menu
Main menu
Menu
Sub menu
Button on remote controller
OSD MENU
(upper edge of
ENTER button)
(lower edge of
ENTER button)
(left edge of
ENTER button)
(right edge of
ENTER button)
ENTER
EXIT RETURN
MENU
UP
DOWN
LEFT
RIGHT
ENTER
EXIT
Button on TX-DS989 (under cover)
OSD
Display