


Advanced Operations
En-46
Setting the Incoming Digital Signal (Fixed
Mode)
■ Fixed Mode
`Off
:
The format is detected automatically. If no digital
input signal is present, the corresponding analog
input is used instead.
`PCM:
Only 2-channel PCM format input signals will be
heard. If the input signal is not PCM, the PCM
indicator will flash and noise may also be produced.
`DTS:
Only DTS (but not DTS-HD) format input signals
will be heard. If the input signal is not DTS, the dts
indicator will flash and there will be no sound.
When “HDMI”, “COAXIAL” or “OPTICAL” is selected
in the “Audio Selector” setting, you can then specify the
signal type in “Fixed Mode”.
Normally, the AV receiver detects the signal format
automatically. However, if you experience either of the
following issues when playing PCM or DTS material, you
can manually set the signal format to PCM or DTS.
• If the beginnings of tracks from a PCM source are cut off,
try setting the format to PCM.
• If noise is produced when fast forwarding or reversing a
DTS CD, try setting the format to DTS.
Note
• The setting will be reset to “Off” when you change the setting in
“Audio Selector” (➔ page 45).
Menu Hardware
OSD
■ Volume OSD
`On
`Off
Turn this setting on to display the volume level on the TV
screen while it is adjusted.
Remote ID
■ Remote ID
`1
, 2, or 3
When several Onkyo components are used in the same
room, their remote ID codes may overlap. To differentiate
the AV receiver from other components, you can change
its remote ID from “1”, to “2” or “3”.
Note
• If you do change the AV receiver’s remote ID, be sure to change
the remote controller to the same ID (see below), otherwise, you
won’t be able to control it with the remote controller.
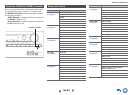
Changing the remote controller’s ID
Tuner
■ AM/FM Freq Step
`10kHz/200kHz
:
`9kHz/50kHz:
Select the frequency step according to your area.
For AM/FM tuning to work properly, you must specify the
AM/FM frequency step used in your area.
Note
• When this setting is changed, all radio presets will be deleted.
Auto Standby
■ Auto Standby
`Off
`On
When “Auto Standby” is set to “On”, the ASb indicator
lights and the AV receiver will automatically enter standby
mode if there is no operation for 30 minutes with no audio
and no video signal input.
“Auto Standby” will appear on the AV receiver’s display
and OSD 30 seconds before the Auto Standby comes on.
Note
•Set to “
On”, the Auto Standby function may activate itself during
playback with some sources.
•The Auto
Standby function does not work when Zone 2 is on.
Hardware
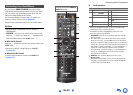
1
While holding down RECEIVER, press and hold
down Q SETUP until the remote indicator lights
(about 3 seconds).
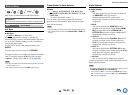
2
Use the number buttons to enter ID 1, 2, or 3.
The remote indicator flashes twice.
1 2 3 4 5
“Setup”