


25
Connecting the AV Receiver
—Continued
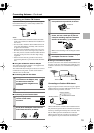
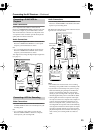
Video Connections
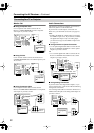
Use a component video cable to connect the AV
Receiver’s COMPONENT VIDEO 1/2/3 IN to the com-
ponent video output on your D-VHS VCR, as shown.
Your TV must also be connected via component video.
A component video connection provides better picture
quality than an S-Video connection.
Audio Connections
• Use an optical digital audio cable to connect the AV
Receiver’s DIGITAL IN OPTICAL 2 to the optical
output on your D-VHS VCR, as shown.
OR
• Use a coaxial digital audio cable to connect the AV
Receiver’s DIGITAL IN COAXIAL to the coaxial
output on your D-VHS VCR, as shown.
You might need to change the digital input assignments
(see page 31).
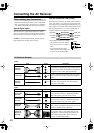
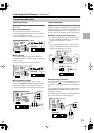
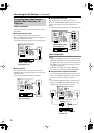
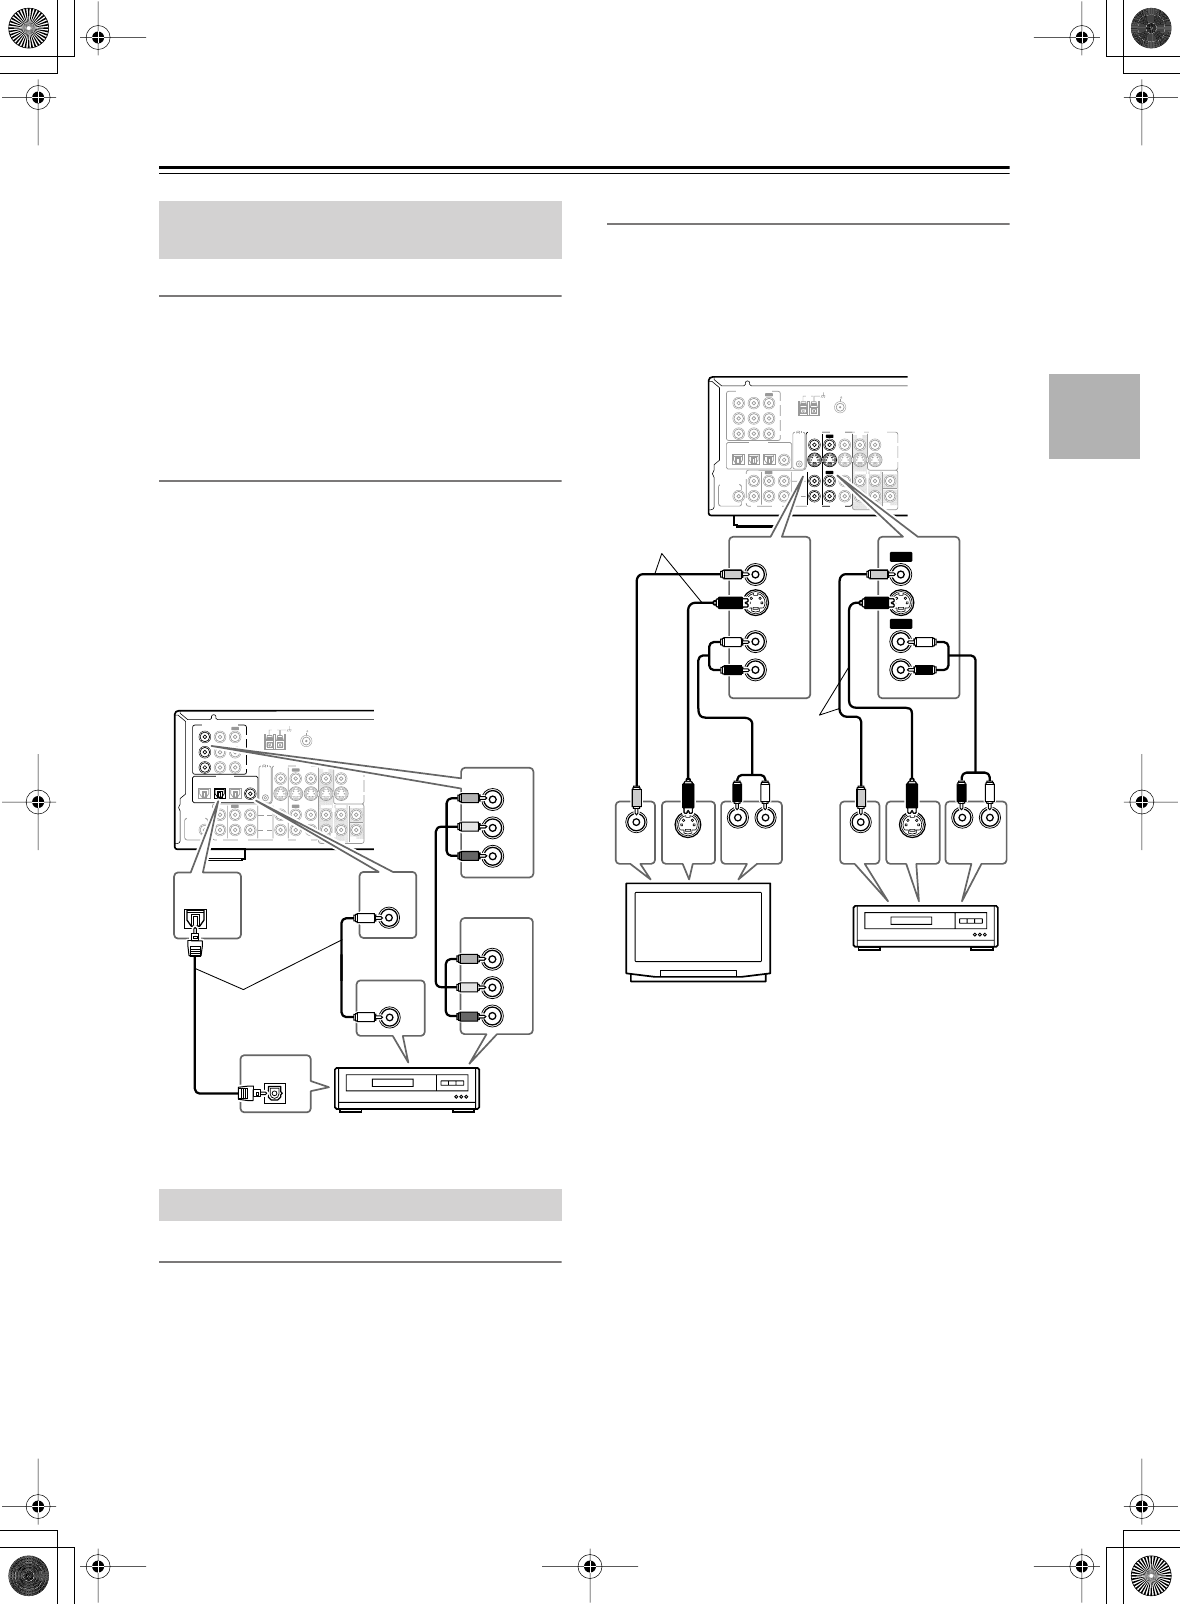
Video Connections
• Use an S-Video cable to connect the AV Receiver’s
S VIDEO VIDEO 1 OUT to an S-Video input on your
recording VCR.
OR
• Use a composite video cable to connect the AV
Receiver’s VIDEO VIDEO 1 OUT to a composite
video input on your recording VCR.
Audio Connections
• Use an analog audio cable to connect the AV
Receiver’s AUDIO VIDEO 1 L/R OUTs to the audio
inputs on your recording VCR.
This illustration shows how to connect a VCR for record-
ing from a TV or another VCR.
Notes:
• The AV Receiver must be turned on for recording.
Recording is not possible while it’s in Standby mode.
• If you want to record directly from your TV or play-
back VCR without going through the AV Receiver,
connect your TV/VCR’s audio and video outputs
directly to your recording VCR’s AV inputs. See the
manuals supplied with your TV and VCR for details.
•Video signals connected to composite video inputs
can only be recorded via composite video outputs. If
your TV and video playback components are con-
nected via composite video, you must connect your
recording VCR via composite video as well. Similarly,
video signals connected to S-Video inputs can only be
recorded via S-Video outputs. If your TV and video
playback components are connected via S-Video, you
must connect your recording VCR via S-Video as
well.
Connecting a D-VHS VCR for
Playback
Connecting a VCR for Recording
L
R
ANTENNA
FM
75
AM
OPTICAL COAXIAL
123
DIGITAL
IN
REMOTE
CONTROL
IN
IN
IN
IN
IN IN
IN
IN
FRONT
SURR
CENTER
SUB
WOOFER
OUT
OUT
OUT
VIDEO 2
VIDEO 1
DVD MONITOR
OUT
VIDEO
S VIDEO
DVD
TAPE
CD
L
R
VIDEO 2
VIDEO 1
SUBWOOFER
PRE OUT
VIDEO 1
/2/3IN
DVD
IN
COMPONENT VIDEO
Y
P
B
PR
OUT
L
R
OPTICAL
2
VIDEO 1
/2/3
IN
Y
P
B
PR
COAXIAL
Y
P
B
PR
DIGITAL OUT
OPTICAL
DIGITAL OUT
COAXIAL
COMPONENT
VIDEO OUT
D-VHS VCR
Connect one
or the other
L
R
ANTENNA
FM
75
AM
OPTICAL COAXIAL
123
DIGITAL
IN
REMOTE
CONTROL
IN
IN
IN
IN
IN IN
IN
IN
FRONT
SURR
CENTER
SUB
WOOFER
OUT
OUT
OUT
VIDEO 2
VIDEO 1
DVD MONITOR
OUT
VIDEO
S VIDEO
DVD
TAPE
CD
L
R
VIDEO 2
VIDEO 1
SUBWOOFER
PRE OUT
VIDEO 1
/2/3IN
DVD
IN
COMPONENT VIDEO
Y
P
B
PR
OUT
L
R
VIDEO 1
VIDEO
S VIDEO
VIDEO
S VIDEO
IN
IN
VIDEO 2
VIDEO 1VIDEO 2
LRLR
OUT
OUT
S VIDEO
OUT
VIDEO
OUT
AUDIO
OUTPUT
S VIDEO
IN
VIDEO
IN
AUDIO
INPUT
TV or
playback VCR
VCR
Connect
one or the
other
Connect one
or the other