


79
Advanced Setup—Continued
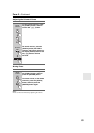
■ LipSync
The AV receiver can be set to automatically correct any
delay between the video and the audio, based on the data
from the connected monitor.
Notes:
• This function works only if your HDMI-compatible
TV supports HDMI Lip Sync.
• You can check the amount of delay being applied by
the HDMI Lip Sync function on the A/V Sync screen
(see page 76).
■ xvColor
If your HDMI source and HDMI-compatible TV both
support the “x.v.Color,” you can enable “xvColor” on the
AV receiver with this setting.
Notes:
• If the color is unnatural when “xvColor” is set to
“Enable”, change the setting to
“Disable”.
• Refer to the connected component’s instruction
manual for details.
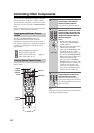
■ HDMI Ctrl
This function allows -compatible components
connected via HDMI to be controlled with the AV
receiver.
Notes:
• , which stands for Remote Interactive over
HDMI, is the name of the system control function
found on Onkyo components. The AV receiver can be
used with CEC (Consumer Electronics Control),
which allows system control over HDMI and is part of
the HDMI standard. CEC provides interoperability
between various components, however, operation with
components other than -compatible
components cannot be guaranteed.
When set to “On” and close the menu, the name of
connected -compatible components and
“RIHD On” are displayed on the AV receiver.
“Search…”
→ “(name)” → “RIHD On”
When the AV receiver cannot receive the name of the
component, it is displayed as “Player*” or
“Recorder*”, etc (“*” means the number of two or
more component).
When set to “Off” and close the menu, “RIHD Off”
are displayed on the AV receiver.
“Disconnect”
→ “RIHD Off”
• When an -compatible component is con-
nected to the AV receiver via the HDMI cable, the
name of the connected component is displayed on the
AV receiver display. For example, while you are
watching TV broadcasting, if you operate a DVD
player (being powered on) by the remote control of the
AV receiver, the name of the DVD player is displayed
on the AV receiver.
•Set to
“Off” when a connected piece of equipment is
not compatible or it is unclear whether the equipment
is compatible or not.
• If movement is unnatural when set to
“On”, change the
setting to
“Off”.
• Refer to the connected component’s instruction
manual for details.
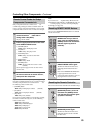
Power Ctrl
To link the power functions of -compatible
components connected via HDMI, select “On”.
This setting is set to “On” automatically when the above
“HDMI Ctrl” is set to “On” first time.
Notes:
• The
“Power Ctrl” setting can be set only when the
above
“HDMI Ctrl” setting is set to “On”.
• HDMI power control only works with -
compatible components that support it and may not
work properly with some components due to their
settings or compatibility.
• When set to “On”, power consumption will increase.
• When set to “On”, regardless of whether the AV
receiver is On or on Standby, both audio and video
received by an HDMI input will be output by the
HDMI OUT for playback on the TV or other
component that’s connected to the HDMI OUT.
• Refer to the connected component’s instruction
manual for details.
TV Ctrl
Set to “On” when you want to control the AV receiver
from an -compatible TV that is connected to
HDMI.
Notes:
• Do not assign the component connected with the
HDMI input to the TV/TAPE selector when you set
“TV Control” setting to “On”. Otherwise, appropriate
CEC (Consumer Electronics Control) operation is not
guaranteed.
•Set to
“Off” when the TV is not compatible or when it
is unclear whether the TV is compatible or not.
• The
“TV Ctrl” setting can be set only when the above
“HDMI Ctrl” and “Power Ctrl” settings are both set to
“On”.
• Refer to the connected component’s instruction
manual for details.
76
Disable: HDMI lip sync disabled (default).
Enable: HDMI lip sync enabled.
Disable: “x.v.Color” disabled (default).
Enable: “x.v.Color” enabled.
Off: disabled (default).
On: enabled.
Off: Power Control disabled.
On: Power Control enabled.
Off: TV Control disabled.
On: TV Control enabled.
Note:
After changing the settings of the “HDMI Ctrl”,
“Power Ctrl”, or “TV Ctrl”, turn off the power to all
connected pieces of equipment and then turn them
on again. Refer to the User’s Manuals for all
connected pieces of equipment.