


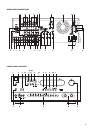

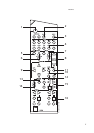
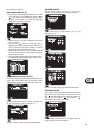

CONNECT THE SPEAKERS
Connect the right speaker to the terminals market ‘R +’ and ‘R -’
ensuring that the ‘R +’ is connected to the ‘+’ terminal on your
loudspeaker and the ‘R -’ is connected to the loudspeaker’s ‘-’
terminal. Connect the terminals marked ‘L +’ and ‘L -’ to the left
speaker in the same way.
Always use heavy duty (16 gauge; 1.5mm or thicker) stranded
wire to connect loudspeakers to your T770.
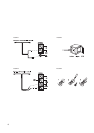
Unscrew the speaker terminal’s plastic bushing. Insert the pin or
bare cable end into the hole of the terminal and then secure the
cable by tightening down the terminal’s bushing (Fig. 4).
To avoid any danger of bare metal from the speaker cables touching
the back panel or another connector, ensure that there is only 1/2”
(1.27cm) of bare cable or pin and no loose strands of speaker wire.
NOTE: This unit is designed to produce optimum sound quality
when speakers with impedances within the set’s ranges are
connected. Please check the following information and choose
speakers with the correct impedances for the connections.
FRONT SPEAKERS A or B: 4 ohms min. per speaker
CENTER SPEAKER: 4 ohms min.
SURROUND SPEAKERS: 6 ohms min. per speaker
19. CENTER SPEAKER
This connects the center loudspeaker that is used when the T770
is operated in Dolby* Digital, Dolby Pro Logic, EARS surround
sound mode or with the EXT. 5.1 CH input selected.
Connect the CENTER speaker in the same way as described in the
section “Connect the speakers” above (section 18).
20. SURROUND SPEAKERS
This connects the Surround loudspeakers that are used when the
T770 is operated in Dolby Digital, Dolby Pro Logic, and EARS
Surround sound modes or with the EXT. 5.1 CH input selected.
Connect the SURROUND speakers in the same way as described
with SPEAKERS A & B above (section 18).
21. COOLING FAN
The cooling fan allows T770 to deliver high amounts of power
without the unit becoming too hot. The fan will only operate in
Surround Sound mode operation during loud passages coming
from the surround channels. With No Surround mode selected
(stereo), the fan is inoperative.
NOTE: Ensure that the air outlets of the fan aren’t blocked in any way.
22. NAD-LINK IN OUT
The NAD-Link connector is used to pass commands from other
units fitted with NAD-Link connectors. This allows centralised
control of a complete system, and also allows some of the basic
functions of other NAD components (such as a CD player or
cassette deck) also equipped with NAD-Link to be controlled with
the receiver’s remote control. To function with such other units,
connect the T770’s NAD-Link Out to the NAD-Link In on the other
unit. NAD-Link connectors can be daisy-chained, IN to OUT, so
that a whole system can be controlled from the remote control
facilities of one unit.
23. AC POWER CORD
After you have completed all connections to the amplifier, plug the
AC line cord into a “live” wall socket.
24. AC OUTLETS
(120V North American versions only)
The AC power cords of other units in the audio system can be
connected directly to the T770’s AC outlets.
If another stereo component is plugged into the SWITCHED AC
outlet, power will be supplied to that component only when your
T770 is turned on.
If another stereo component is plugged into the UNSWITCHED AC
outlet, power will be supplied whether your T770 is on or off.
NOTE: The AC outlets should be used with units with a
COMBINED power consumption of no more than 120 Watts.
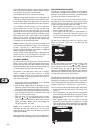
25. DIGITAL AUDIO INPUTS (FIG. B)
The T 770 has three digital inputs to allow for connection of DVD,
CD or Laser Disc players:
1. Digital Audio input 1 allows for connection of a digital source
with an Optical output. Use a cable terminated with a TOS Link
connector. This digital input can be selected and linked with
any of the analogue inputs, with the exception of the EXT 5.1
CH. input.
2+3. Digital Audio inputs 2 and 3 allow for connection of a digital
source with a Coaxial digital output. Use a cable with the right
impedance, specifically designed for the transfer of digital
signals. This digital input can also be selected and linked with
any of the analogue inputs, with the exception of the EXT 5.1
CH. input.
NOTE: The sound of the digital inputs is not passed on to the Multi
Source, Video 1, Video 2, Tape 1 and Tape 2 outputs. If available,
also connect the analogue outputs of the digital sources as well to
the matching analogue inputs of Digital input 1, 2 and 3.
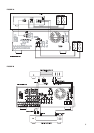
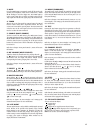
FRONT PANEL CONTROLS
POWER, SPEAKERS AND HEADPHONE
FUNCTIONS
1. POWER
Press the POWER button to switch the receiver to its ‘Stand-by’
mode. The Stand-by indicator (No. 2) over the power button will
light up. On the front panel, press any of the input selector buttons
(No. 6) to switch to receiver on. From the remote control, press
the green Stand-by button (No. 1 on remote control drawing) to
switch the unit on. The display will light up indicating which input
was selected; the Stand-by indicator will extinguish.
Pressing the POWER switch again will turn the unit OFF completely.
The NAD T770 receiver uses a memory back-up system to store
surround sound trim settings and Preset station information for the
tuner section. This information is retained for several weeks, even
the unit is switched off completely or unplugged.
GB
10
* Manufactured under license from Dolby Laboratories. “Dolby”, “Pro Logic” and the double-D symbol are trademarks of Dolby Laboratories. Confidential Unpublished Works
©1992-1997 Dolby Laboratories, Inc. All rights reserved.