


ENGLISH FRANÇAIS
DEUTSCH
ESPAÑOL
ITALIANO
PORTUGUÊS
SVENSKA
8
BI-AMPING
Some loudspeakers have separate connection terminals for the LF (Low
Frequency) and HF (High Frequency) sections of the speaker. This facility
allows to "Bi-Amp" these speakers, where a separate power amplifier is
used for the LF and HF section, which may improve overall sound quality.
The NAD C 372 provides two sets of pre amplifier outputs (PRE OUT 1
& 2) to facilitate the connections for Bi-Amping. Moreover, the level from
PRE OUT 2 can be reduced in relation to PRE OUT 1 to accommodate
power amplifiers with different gain (amplification factor).
To set up the C 372 with power amplifiers first decide which power
amplifier has the highest gain. This is easily done by comparing the
loudness level of the power amplifiers in an identical system (keep the
volume control at the same level; use the same source and speakers).
The amplifier that plays louder has the highest gain (note that this does
not need to be the more powerful amplifier of the two). Connect the
amplifier with highest gain to the PRE OUT 2 (No. 10) sockets; the other
power amplifier to the PRE OUT 1 (No. 8) sockets. From the maximum
level position (0dB), use the VOLUME PRE OUT 2 control (No. 11) to
reduce the output level of PRE OUT 2 so that the volume level of both
power amplifiers is exactly matched.
NOTES: The gain of the NAD C 272 power amplifier is identical to that
of the C 372's built-in power amplifier (in fact, the C 272 and C 372's
power amplifier section are almost identical). When combined with the
NAD C 272 for Bi-Amping, leave the PRE-OUT 1 connected, with the
links provided, to MAIN-IN. Connect the C 272 to the PRE-OUT 2
output. Set the VOLUME PRE-OUT 2 control to its maximum position.
The provided links to connect from PRE-OUT 1 to MAIN-IN can also be
used to connect from PRE-OUT 2 to MAIN-IN, should the C 372's power
amplifier have the highest gain. Always turn the C 372 and external
power amplifiers off before connecting or disconnecting anything from
Pre-Out and to Main-In sockets.
POWERDRIVE
To meet the diverse requirements of high current drive and high
dynamic power, our patented PowerDrive amplifier circuit will build
further on our reputation for amazingly effective power. By adding a
second high-voltage rail to our well regulated high-current power
supply, we get an "overdrive" that can nearly double the continuous
power on a short term dynamic power basis. This is a further
development and refinement of our renowned Power Envelope circuit,
utilized by NAD in the 80's and 90's. PowerDrive differs from Power
Envelope in that it offers greater amplifier stability and low impedance
drive capability, resulting in less distortion when driving real speakers
with real program material.
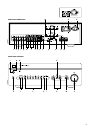
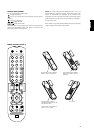
REMOTE CONTROL HANDSET (FIGURE 3)
The Remote Control handset handles all the key functions of the NAD
C 372 and has additional controls to remotely operate NAD Tuners,
Cassette and CD machines. It will operate up to a distance of 16ft (5m).
Alkaline batteries are recommended for maximum operating life. Four
AAA (R 03) batteries should be fitted in the battery compartment at the
back of the Remote Control handset. When replacing batteries, check
that they have been put in the right way round, as indicated on the base
of the battery compartment. Please refer to previous sections of the
manual for a full description of individual functions.
When a command from the remote control is received, the Standby/
protection indicator will blink. Note that the indicator may also blink
when receiving commands not necessarily for the C 372 but for other
components in the system.
POWER ON AND OFF BUTTONS
The NAD C 372 remote has a separate On and Off button. This can be
particularly useful to keep components within a system "in sync": This
way all components will switch to stand-by when Off is pressed or
switch to operating mode when On is pressed, instead of some
components switching On when the amplifier is switched to Stand-by.
(Note that the other components have to be capable of responding to
the separate On and Off commands as well). Press the ON button to
switch the unit from Stand-by to the operating mode; The Stand-by
indicator (Fig. 2; No. 2) will turn from amber, to red, then to green and
the indicator for the last selected input will blink and light up. Press the
OFF button to switch the unit to the Stand-by mode: The Stand-by
indicator will light up amber.
SPEAKERS A & B
These buttons perform the same function as those on the front panel.
The Speakers A and B buttons engage or disengage the speakers
connected to respectively the Speakers A and Speakers B terminals on
the rear panel. Press A to switch the speakers connected to the speaker
A terminals On or Off. Press B to switch the speakers connected to the
speaker B terminals On or Off. The indicator directly over the buttons
shows the status of speakers A and B.
MUTE
Press the MUTE Button to temporarily switch off the sound to the
speakers and headphones. Mute mode is indicated by the active input
indicator on the front panel flashing. Press MUTE again to restore sound.
Mute does not affect recordings made using the Tape outputs but will
affect the signal going to the Preamp outputs (Pre-Out 1 &2).
INPUTS
The input selector buttons perform the same functions as the buttons
labelled the same on the front panel.
MASTER VOLUME
Press the MASTER VOLUME or buttons to respectively
increase or decrease the loudness level. Release the button when the
desired level is reached. The motorised Volume Control on the front
panel will indicate the level set. The Master Volume buttons do not
affect recordings made using the Tape outputs but will affect the signal
going to the Pre-amp outputs (Pre-Out 1 &2).
TUNER CONTROL
(for use with NAD Tuner)
TUNE or scans respectively higher or lower station
frequencies for both AM and FM.
PRESET or selects respectively higher or lower number
station preset.
CD PLAYER CONTROL
(for use with NAD CD/DVD Player)
engages Pause
engages Stop
engages Play, toggles between Play and Pause or engages Track
skip; Press once to respectively go to the next track or to return to start
of current or previous track.
engages CD drawer Open/Close; Press once to open the CD
drawer then once again to close the CD drawer and start playback.
The TAPE/TUNER - CD switch applies tape controls to the transport keys
when in the TAPE/TUNER position, and applies CD controls to the
transport keys when in the CD position.