


ENGLISH
FRANÇAISDEUTSCHESPAÑOLITALIANO
PORTUGUÊS
SVENSKA
7
If Speakers A and B are both engaged (both indicators over the Speakers
A and B buttons are lit), the amplifier's output power is fed to both sets
of speakers in parallel. If speakers A and B are disengaged, both sets of
speakers are silenced. You can use this setting mode to listen to
headphones (No. 3).
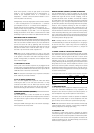
NOTES: Always turn the volume down when engaging or
disengaging either Speaker A or Speaker B. When using Speakers A
and B at the same time, make sure that the total impedance of the
speakers connected is more than 8 ohms. Refer to the table below:
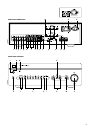
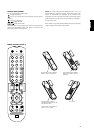
5. INPUT SELECTORS
These buttons select the active input to the NAD C 372 and the signal
sent to the loudspeakers, the Tape outputs and the Pre-Out sockets. The
buttons on the remote control handset duplicate these buttons, with
the exception of the tuner input; see below. Green indicators just above
each button show which input is currently selected.
DISC Selects a line-level source connected to the DISC sockets as the
active input.
CD Selects the CD (or other line-level source) connected to the CD
sockets, as the active input.
VIDEO Selects the VCR (or stereo TV/Satellite/Cable receiver) connected
to the VIDEO sockets, as the active input.
AUX Selects a line-level source connected to the AUX sockets, as the
active input.
TUNER Selects the tuner (or other line-level source) connected to the
Tuner sockets, as the active input.
TAPE 2 Selects Tape 2 as the active input.
TAPE 1 Monitor Selects the output from a tape recorder when playing
back tapes or monitoring recordings being made through the Tape 1
sockets. Press the Tape 1 button once to select it and again to return to
the normal input selection.
Tape 1 is a tape Monitor function which does not override the current
input selection. For example, if the CD is the active input when TAPE 1
is selected, then the CD signal will continue to be selected and sent to
both the TAPE 2, and TAPE 1 OUTPUT sockets, but it is the sound from
recorder connected to Tape 1 that will be heard on the loudspeakers.
Apart from the amber indicator to show Tape 1 is engaged, the green
indicator for the active input will also stay lit.
NOTE: The remote control handset with the C 372 supplied is of a
universal NAD type, designed to operate several NAD models. Some
buttons on this handset are inoperative as the functions aren't
supported by the C 372. The Video 2 and Video 3 input selector buttons
on the remote control handset are inoperative in the case of the C 372.
6. INFRA-RED REMOTE CONTROL COMMAND RECEIVER
The infrared sensor, located behind this circular window, receives
commands from the remote control. There must be a clear line-of-sight
path from the remote control to this window; if that path is obstructed,
the remote control may not work.
NOTES: When a command from the remote control is received, the
Stand-by/protection indicator will blink. Note that the indicator may also
blink when receiving commands not necessarily for the C 372 but for
other components in the system.
Direct sunlight, very bright or fluorescent ambient lighting may affect
the operating range and angle for the remote control handset.
7. SOFT CLIPPING™ INDICATOR
The green SOFT CLIPPING™ indicator shows that the Soft Clipping™
mode is engaged. Refer also to chapter "Rear Panel Connections",
section 13; "Soft Clipping™" for more information.
8. BASS & TREBLE CONTROLS
The NAD C 372 is fitted with BASS and TREBLE tone controls to adjust
the tonal balance of your system.
The 12 o'clock position is 'flat' with no boost or cut and a detent
indicates this position. Rotate the control clockwise to increase the
amount of Bass or Treble. Rotate the control counter-clockwise to
decrease the amount of Bass or Treble. The Tone controls do not affect
recordings made using the Tape outputs but will affect the signal
going to the Pre-amp outputs (Pre-Out 1 & 2).
9. TONE DEFEAT
The TONE DEFEAT switch bypasses the tone control section of the NAD
C 372. If the Tone Controls are not normally used and left in the 12
o'clock position, then it is advisable to switch out the Tone Control
section altogether by using this switch. In the 'out' position, the Tone
Control circuits are active, pushing the TONE DEFEAT switch 'in'
bypasses the Tone Control section.
10. BALANCE
The BALANCE control adjusts the relative levels of the left and right
speakers. The 12 o'clock position provides equal level to the left and
right channels. A detent indicates this position.
Rotating the control clockwise moves the balance towards the right.
Rotating the control counter-clockwise moves the balance to the left.
The BALANCE control does not affect recordings made using the Tape
outputs but will affect the signal going to the Pre-amp outputs (Pre-Out
1 & 2).
11. VOLUME
The VOLUME control adjusts the overall loudness of the signals being
fed to the loudspeakers. It is motor driven and can be adjusted from the
remote control handset. The VOLUME control does not affect recordings
made using the Tape outputs but will affect the signal going to the Pre-
amp outputs (Pre-Out 1 &2).
12. BRIDGE MODE INDICATOR
The BRIDE MODE indicator lights up (amber) when the C 372 is
switched to Bridge Mode. Refer also to chapter "Rear Panel
Connections", section 12, "Bridge Mode" for more information.
RECORDING
TO MAKE A RECORDING
When any source is selected, its signal is also fed directly to any tape
machine connected to the TAPE 2 or TAPE 1 OUTPUTS for recording.
TAPE TO TAPE COPYING
You can copy between two tape machines connected to your NAD
C 372. Put the source tape in the recorder connected to Tape 2 and the
blank tape into the recorder connected to Tape 1. By selecting TAPE 2
Input you can now record from Tape 2 to Tape 1 and monitor the signal
coming from the original tape.
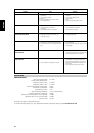
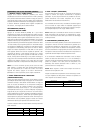
Bridge Mode Stereo Mode
One speaker 81 minimum One speaker 41 minimum
Two speakers 161 minimum Two speakers 81 minimum