


NA
D
7
GB
11. TIME DISPLAY SELECTOR.
During normal (non-programmed) play, the display
indicates the elapsed time since the beginning of the
current track.
If you press the TIME button once, the display shows
the time remaining until the end of the current track
(SINGLE REMAIN). This function does not operate if
the Track Number is greater than 20.
Press TIME again to display the total time remaining
until the end of the disc or the total playing time remain-
ing of a pre-programmed selection of the disc (maxi-
mum 2) and tracks (TOTAL REMAIN).
Press the TIME button a third time to return to the
normal elapsed-time display.
12. SCAN
SCAN BACK The SCAN button causes the opti-
cal pickup to scan backward through the recording at
high speed. This button works only while the player is
in PLAY or PAUSE.
SCAN FORWARD . The SCAN button causes
the optical pickup to scan rapidly forward through the
music. The behaviour of this function is similar to Scan
.
NOTE: For the first 4 seconds Scan works at approx-
imately 20x the original speed, after holding either
SCAN button for more than 4 seconds, the speed is
approximately 100x the original speed.
When using SCAN the music will be heard in frag-
mentary form at reduced volume as the player scans
through it. Use this “audible scan” to cue the player
precisely to the spot where you want to resume play.
After a STOP command, or after loading a new disc,
you must press PLAY (to activate the TIME display)
before the scan circuit will work.
13. DISC DRAWER.
To open the disc drawer, press the OPEN button.
The drawer contains a revolving “carousel” tray that
accepts a maximum of five discs. The DISC number in
the display with a circle around it identifies the tray
location that is aligned with the optical playback mech-
anism at the rear of the unit.
When the drawer is opened from STOP mode, the
carousel revolves. The tray location indicated by the
circled Disc Number display moves to the front-left
loading position recess (marked ‘DIRECT PLAY’). The
front-right loading position is the next higher disc num-
ber. Thus if the display indicates Disc # 1, as it does
when the power is first switched on, opening the draw-
er places location # 1 at front-left recess (marked
ìDIRECT PLAYî) and location #2 at front-right. Press
NEXT repeatedly to bring tray locations # 3, #4, and #5
to the front.
NOTE: The transparent playing surface of each disc
must face DOWN, and its label must face UP. CD-3
discs (CD ”singles”) can be played without the aid of an
adapter. Place the disc in the drawer, centred in the
smaller circular recess.
The NAD Model 523 CD player was not designed to
accommodate a ‘damping disc’ placed on a disc, nor
two discs stacked together. It plays audio discs, but not
discs identified as CD-V, CD-I, CD-ROM or PHOTO CD
and thus playback will be muted.
Do not attempt to turn the carousel tray by hand, or
to stop its motion. Doing so may cause the control logic
to mis-identify disc numbers, which can result in dam-
age to discs during operation.
To play just one disc, place it within the large circular
recess at the front-left loading position (marked
‘DIRECT PLAY’), and press PLAY. The disc at front-left
will be moved into playing position and will begin to
play.
For multi-disc play, place CDs within any (or all five)
circular recesses in the carousel tray, beginning at the
front-left loading position. At each location you may
place either a standard 12-cm CD or, in the smaller
inner recess, an 8-cm CD-3 (CD “single”).
To change discs during the playback of any disc the
drawer may be opened and two discs may be replaced,
as follows:
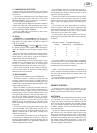
WHILST PLAYING: YOU MAY REPLACE:
DISC# DISC#(LEFT) DISC#(RIGHT)
134
245
351
412
523
Do not press NEXT or any of the DISC 1 to 5 buttons
during this process. If you do, playback will immediately
stop and the tray will close so that the current disc can
be returned to its normal place in the tray.
NOTE: Take care that each disc is centred within its
recess. A disc that protrudes outside of its recess could
jam and suffer damage when the drawer closes and
the tray revolves.
To close the drawer, press either OPEN or PLAY. Do
NOT push the drawer closed by hand.
REMOTE CONTROL
A wireless remote control is provided with your CD
player, enabling you to operate programming and play-
back functions from the comfort of your armchair.
BATTERIES
Batteries must be installed before the remote control
can be used. In the future, if the player does not
respond to remote commands, the batteries may be
weak and should be replaced. The handset requires
two 1.5-volt AA-size penlight cells (equivalent type R6P
or R6PU). Alkaline cells are recommended for maxi-
mum operating life.
To open the battery compartment, press downward
with a thumb nail in the half-circle notched area on the
back of the handset and lift the cover of the battery
compartment off. Install fresh AA cells, orienting them
as shown on the diagram within the compartment. The
coil springs should contact the negative (- end of each
cell). Press the battery compartment cover back on in
the correct position until it latches.