


99
99
9
ENGLISH
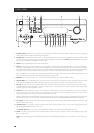
In case you simply cannot wait to experience the performance of your new NAD T 163 tuner preamplifier, we
provide the following “Quickstart” instructions to get you underway. The steps below connect your DVD
player and multi-channel amplifier to the T 163; be sure to read “Input Setup”.
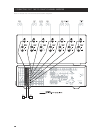
• Connect the T 163’s preamplifier outputs to your multi-channel amplifier. (cables not supplied)
• Connect the T 163’s composite video or S-Video MONITOR OUT jack to your TV/monitor’s corresponding
input. (cables not supplied)
• Connect your DVD player’s composite video or S-Video output to the T 163’s corresponding DVD input.
(cables not supplied)
• Connect the DVD player’s optical digital output to the T 163’s optical DIGITAL IN 1 input (Optical cable not
supplied).
• Connect your left and right front speakers to the multi-channel amplifier’s FRONT L and R outputs, being
sure to connect red to red (“+”) and black to black (“-”), with care to avoid stray wires or strands crossing
between terminals. (Connect center, surround, and surround-back speakers as well, if you like). If your
system includes a powered subwoofer, connect the T 163’s AUDIO PRE-OUT SW1, 2 or both jacks to its
line inputs.
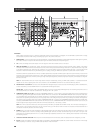
• Press in the main power switch (black pushbutton) on the T 163’s rear panel (this puts the T 163 into
STANDBY mode and illuminates an amber LED to indicate it is ready to receive remote commands), then
use the HTR 2’s [ON] key to power up the tuner preamplifier. Be sure the multi-channel amplifier and TV/
monitor is powered up, with the correct input selected.
• Start playback of the DVD player. Press the HTR 2 remote’s [Amp] Device Selector key, and then its (red)
DVD/numeric 1 key to select the DVD input. You should hear multichannel or stereo sound, and see an
image on the TV/monitor. (If one or the other fails to appear, you may need to use the tuner preamplifier’s
on-screen menu system to check assignment of audio, video, and digital inputs; see “Setting Up the T
163”.)
Enjoy the movie or music, but be sure to set aside time to read this manual thoroughly, and to set up,
calibrate, and configure your T 163 carefully and completely.
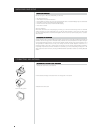
PLAPLA
PLAPLA
PLA
Y A DVD MOVIEY A DVD MOVIE
Y A DVD MOVIEY A DVD MOVIE
Y A DVD MOVIE
QUICKSTART