


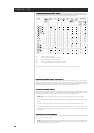


3030
3030
30
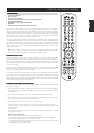
USING THE HTR 2 REMOTE CONTROL
TRIGGER SETUPTRIGGER SETUP
TRIGGER SETUPTRIGGER SETUP
TRIGGER SETUP
USING THE ZR 2 REMOTE CONTROLUSING THE ZR 2 REMOTE CONTROL
USING THE ZR 2 REMOTE CONTROLUSING THE ZR 2 REMOTE CONTROL
USING THE ZR 2 REMOTE CONTROL
Search Mode
If none of the codes from the table, when entered, turns on the component, and if you are quite sure you
have followed the above procedure completely and carefully, you may want to try the “search” method as
follows:
Enter Library Mode by simultaneously pressing-and-holding for 3 seconds both the desired Device Selector
key and the [A/V PRESET] key, until the Learn LED turns green. Now press-and-hold the HTR 2’s [
] (or
[
]) key; the remote will step through all the available codes at a rate of approximately 1 per second. When
the component turns off, immediately release the cursor key; press [ENTER] to accept that code-library and
exit the Library Mode. Try a few commands; should you prove to have stepped past the needed code-library,
re-enter the Library Mode and use the cursor key to step back to it.
NOTE: It is possible that search mode will find code-libraries that operate, at least partially, some other-
brand (non-NAD) components. You may certainly exploit such capabilities as you find them. However,
since we can only ensure the completeness or accuracy of NAD code-libraries, we cannot support the HTR
2’s operation with other-brand components.
Checking Code-Library Number
You can check the current code-library on any Device Selector key as follows. Enter Library Mode by
simultaneously pressing-and-holding for 3 seconds both the desired component’s Device Selector key and
the [A/V PRESET] key, until the Learn LED turns green. Press the [DISP] key; the HTR 2 indicates the current
code-library by flashing its [TAPE], [VCR], and [MACRO] keys. For example, to indicate code-library #501 the
HTR 2 will flash [TAPE] 5 times, pause, and then flash [MACRO] once. You might wish to make a note of your
components’ code-library numbers.
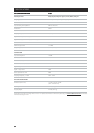
SUMMARY OF HTR 2 MODESSUMMARY OF HTR 2 MODES
SUMMARY OF HTR 2 MODESSUMMARY OF HTR 2 MODES
SUMMARY OF HTR 2 MODES
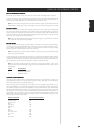
Mode Keys To Press (for 3 seconds)
Learn/Copy/Punch Through Device Key + Record Key
Delete Mode Device Key + Return Key
Macro Record Macro Key + Function Key
Library Mode Device Key + Preset Key
Back Light Timeout Display Key + Digit Key
Factory Reset (see “Factory Reset,” above)
The ZR 2 remote control is a discrete compact remote for controlling the T 163 from various rooms other than
the main room. The ZR 2 remote allows full separate control of the source selection irrespective to the main
room. This means the zone input may be completely different, audio and video, from the main input and
thus corresponding volume levels as well. If one wishes to enjoy the same source, as the main room the ZR
2 remote has a [LOCAL] button to allow simultaneous listening, but with full separate volume levels.
The T 163’s front florescent display will show activity of the zone control so that main room occupants are
aware of the zone remote activity. Furthermore if there is no main room activity, only the zone indicator will
be active in the T 163’s fluorescent display.
The T 163’s rear-panel TRIGGER output can be assigned to any of its six AV inputs: DVD, SAT, VCR, VIDEO
4-6. Whenever the assigned input is selected, either manually or by recalling a Preset, the TRIGGER output
will produce +12 V DC, which can be used to activate a connected component or system. See your NAD
audio specialist for more information.
ASSIGNING THE TRIGGER OUTPUTASSIGNING THE TRIGGER OUTPUT
ASSIGNING THE TRIGGER OUTPUTASSIGNING THE TRIGGER OUTPUT
ASSIGNING THE TRIGGER OUTPUT
From the OSD’s main <Setup> menu, select the <Input Settings> item using the remote's [/] and
[
/] keys; use the same keys to toggle the <Trigger 1 or 2, 1 +2, MAIN, or ZONE> line. One can select
the video input (DVD, SAT, VCR, or VIDEO 4-6) you wish to assign to the TRIGGER 1 output. Furthermore the
selected Trigger 1 or 2 can be assigned to the main room, zone, or both locations. See ADVANCED OPTIONS
to assign MAIN and/or ZONE control. Select <Save and Exit> to store the trigger assignment.