


1212
1212
12
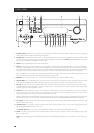
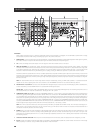
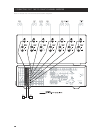
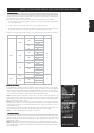
REAR PANEL
ATTENTION!
Please make all connections to your T 163 tuner preamplifier with the unit powered off or unplugged. (It is also advisable to power-down or unplug
all associated components while making or breaking any signal or AC power connections.)
1 MONITOR OUT: Connect to video input of the monitor/television, using quality dual-RCA and/or S-Video cables designed for video signals. In general,
the S-Video connection is superior and should be used if your TV/monitor provides the corresponding input.
2CD: Connect the analog stereo audio output from a CD player or other line-level audio source to this input.
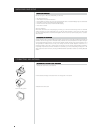
3 FM & AM ANTENNA: The supplied wire “dipole” FM antenna will connect to the FM connector using the supplied “balun” adapter. It will usually
work best when mounted on a vertical surface such as a wall, with arms fully outstretched forming a horizontal “T” perpendicular to the origin point
of the signal. Experiment with placement and orientation of to yield the clearest sound and lowest background noise. In areas of difficult FM
reception an external FM antenna can yield dramatic gains in quality; consult your NAD audio specialist or a professional antenna installer.
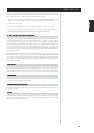
The AM loop antenna supplied with the T 163 (or a suitable replacement) is required for AM reception. Open the clip terminal lever, insert the wire
and close, ensuring that the lever locks the wire in place. Testing different positions for the antenna may improve reception; vertical orientation will
usually produce the best results. Antenna proximity to large metal objects (appliances; radiators) may impair reception, as will attempts to lengthen
the wire to the loop.
NOTE: An external AM antenna can improve long-distance reception substantially; consult your NAD audio specialist or a professional antenna
installer. Do not connect anything other than a loop antenna to the AM ANTENNA terminal. Do not remove the AM loop antenna.
4 DIGITAL IN OPT 1-2; COAX 3-6: Connect to the coaxial S/PDIF-format digital outputs of sources such as CD or DVD players, HDTV or satellite tuners,
or other components; connect DIGITAL IN OPT1-2 to optical S/PDIF-format digital outputs.
DIGITAL OUT: Connect the optical and/or coaxial DIGITAL OUT ports to the corresponding S/PDIF digital input of a recording component such as a
CD recorder, DAT deck, or computer soundcard. See "Setting Up the T 163", below.
5 COMPONENT VIDEO IN 1-3; OUT: Connect the COMPONENT VIDEO IN 1, 2 and 3 inputs to component-video outputs from compatible source
components, typically a DVD player and terrestrial or satellite HDTV tuner. Connect the T 163 COMPONENT VIDEO OUT to the component-video input
of a compatible video monitor/TV. Be sure to observe consistency in connecting the Y/Cr/Cb jacks (some source and TV components label these Y/
Pb/Pr) to the corresponding sources/inputs; do not rely purely on the color-coding of the jacks, which may not always be consistent among brands.
The routing of the component-video inputs is fixed: COMPONENT VIDEO IN 1 is routed to the COMPONENT VIDEO OUT jacks when the DVD input
is selected; COMPONENT VIDEO IN 2 is selected when the SAT input is active; COMPONENT VIDEO IN 3 is selected when the VCR input is active; the
audio and digital inputs assigned to DVD, SAT and VCR will be used (see also, "Input Setup," below).
NOTE: The T 163’s component-video inputs and outputs are fully wide-band, compatible with all HDTV formats. The T 163 does not display its on-
screen menus on its component-video output. To use on-screen menus, you will need to make an S-Video or composite connection between the T
163 and the monitor/TV, and select it for menu display.
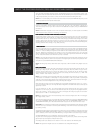
6 POWER: Press in to switch the tuner preamplifier to ON and OFF. Pressing any front panel button will also switch the tuner preamplifier on. Press
the remote’s [OFF] button to return to Standby. Pressing POWER again turns the unit OFF, recommended if you do not plan to use your tuner
preamplifier for an extended period of time. It is usual (and perfectly acceptable) to leave the T 163 in Standby mode in between normal viewing
and listening sessions.
7 120V/230V VOLTAGE SELECTOR: With the power cord disconnected from the wall outlet, select the appropriate mains voltage for your area.
8 RS-232: Connect this interface via RS-232 serial cable (not supplied) to any Windows® compatible PC to allow remote control of the T 163 through
NAD’s proprietary PC software. See your NAD audio specialist for more information.