


1111
1111
11
ENGLISH
FRONT PANEL
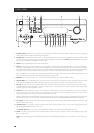
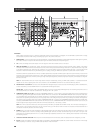
12 TAPE MONITOR: Press to engage the Tape Monitor loop. The signal present at the rear-panel TAPE MONITOR IN jacks will be heard. Press again
to release and return to the previously selected input.
NOTE: Selecting any other input selection while Tape Monitor is engaged automatically releases it.
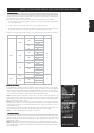
13 DIGITAL AUDIO SELECTOR: Use to select digital audio input independently of video input to cycle through the T 163’s 6 digital audio inputs (OPT
1-2; Coaxial 3-6). Press repeatedly to step through the T 163’s digital audio inputs. The digital inputs are shown collectively as Digital 1-6 in the VFL
display’s small corner readout. Any digital input can be assigned to any video input (DVD, SAT, VCR, VIDEO 4-5, CD). The chart below shows the
default assignments; see “Input Setup,” below.
Digital Input Jack Default Assignment
OPT 1 DVD
OPT 2 SAT
Coax 3 VCR
Coax 4 VIDEO 4
Coax 5 VIDEO 5
Coax 6 CD
NOTE: Digital inputs take precedence: The T 163 will automatically play any active signal present at the selected digital input; if none is present,
it will “fall back” to the analog audio input assigned to that Video input. Digital inputs can be selected OFF to listen to the analog input of a source
with an assigned digital input.
NOTE: Changing the digital audio input via the Digital Audio Selector is a temporary setting that will be lost when the input is changed or the tuner
preamplifier is cycled though Standby or OFF. (See the section “Input Setup” below to reassign digital inputs to video or audio inputs.)
14 EXT 7.1: Press to listen to the component connected to the T 163’s 7.1 CH. INPUT jacks (typically, a DVD-Audio or SACD-Multichannel player). The
HTR 2 remote’s [Ext. 7.1/5.1] key (“10+”) works similarly.
15 SURROUND MODE: Use to select the T 163’s Listening Mode. Press repeatedly to step through the T 163’s Listening Modes. See “About the T 163’s
Listening Modes,” below.
NOTE: Depending on the format of the currently selected input (digital or analog; stereo or multichannel), different modes will be available. See
“About the T 163’s Listening Modes,” below.
16 LEVELS: Press repeatedly to select the channel, and then use the VOLUME(SETUP) knob to adjust the levels of the T 163’s 7 channels/pairs in turn:
front-left, -center, –right; surround; surround back; subwoofer. The selected channel appears on the VFL and on-screen displays; use the
VOLUME(SETUP) knob to adjust its level relative to the others over a range of ±12 dB. Channel levels may also be adjusted via the on-screen menus;
see “Adjusting Channel Levels,” below.
NOTE: The HTR 2 remote’s [Surr.], [Center], and [Sub]
/ keys provide direct access to those channels’ relative levels, saved in memory.
17 TONE CONTROLS: Press to adjust treble using the VOLUME (SETUP) knob over a ±10 dB range; press again to adjust bass, and a third time to exit
tone-control adjustment.
18 TONE DEFEAT: Press to disable the tone controls; press again to re-enable them for instance, to compare a tone setting to unmodified sound.
NOTE: While TONE DEFEAT is engaged, the TONE CONTROLS key will have no effect.
19 VIDEO 6 INPUT: Use these convenience jacks for occasional sources, such as a camcorder, portable MP3 or tape player, or a videogame console,
or any other analog audio, or composite or S-Video video source. Select the Video 6 input using the HTR 2 remote, or the front-panel VIDEO key.
20 PHONES: Accepts stereo headphone using a standard 1/4-inch stereo phone plug (use a suitable adapter for headphones equipped with a smaller
plug); set the Listening Mode to “Stereo” Plugging in headphones automatically mutes output from all channels’ speaker and pre-out jacks (but not
from the record-out jacks of TAPE, VCR, or VIDEO 4).
NOTE: For headphone listening the front left/right speakers must be set to “Large” on the OSD’s Speaker Settings page, otherwise headphone bass
response will be restricted.
NOTE: Plugging in headphones will automatically switch the T 163 to “Stereo” mode.