


43
ENGLISH
3.
Each time the tuner finds a station, scanning will pause and the
station will be played for five seconds.
During this time, the following operations are possible.
1) The band can be changed by TUNER button .
2) The tuning mode can be changed by T-MODE button.
4.
If no button is pressed during this period, the current station is
memorized in location Preset 02
If you wish to skip the current station, rotate the GYRO TUNING
dial during this period, this station is skipped and auto presetting
continues.
5.
Operation stops automatically when all 50 preset memory
positions are filled or when auto scanning attains the highest
endof all bands. If you desire to stop the auto preset memory at
anytime, press the CLEAR button.
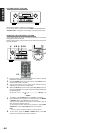
MANUAL PRESET MEMORY
(Using the SR9200)
1.
Tune into the radio station you desire (Refer to the “MANUAL
TUNING” or “AUTO TUNING” section).
2.
Press the MEMO button on the front panel. “– –“ (preset number)
starts blinking on the display.
3.
Select the preset number by rotating the GYRO TUNING dial,
while this is still blinking (approx. 5 seconds)
4.
Press the MEMO button again to enter. The display stops blinking.
The station is now stored in the specified preset memory location.
(Using the remote control unit)
1.
Tune into the radio station you desire (Refer to the “MANUAL
TUNING” or “AUTO TUNING” section).
2.
Tap the MEMO on the remote unite. “– –“ (preset number)starts
blinking on the display.
3.
Enter the desired preset number by tapping ten keypad.
Note:
• When entering a single digit number (2 for example), either
input “02” or just input “2” and wait for a few seconds.
RECALLING A PRESET STATION
(Using the SR9200)
1.
Press the F/P button to show the preset station on the display.
2.
Select the desired preset station by turning GYRO TUNING knob
on the front panel
(Using the remote control unit)
1.
Tap the Preset^ or Preset
v
button to select the desired preset
station, or input your desired preset channel with ten keypad on
the remote.
CHECKING THE PRESET STATIONS
The preset broadcast stations can be checked on the on screen
display.
Press M button, “Tuner Preset Stations” screen appears on the on
screen display.
Note:
• The device of remote control units need to be Tuner.
PRESET SCAN
(Using the remote control unit)
1.
Tap the Pre scan on LCD of remote control unit.
“PRESET SCAN” appears on the display and then the preset
station with the lowest preset number is recalled first.
2.
Preset stations are recalled in sequence (No.1 → No.2 → etc.) for
5 seconds each.
No stored preset number will be skipped.
3.
You can fast forward the preset stations by tapping the Preset^
continuously.
When the desired preset station is received, cancel the preset
scan operation by tapping the CLR or Pre scan.
CLEARING STORED PRESET STATIONS
You can remove preset stations from memory using the following
procedure.
1.
Recall the preset number to be cleared with the method described
in “Recalling” a preset station.
2.
Press the MEMO button on the front panel or tap Memo on the remote.
3.
Stored preset number blinks in the display for 5 seconds. While
blinking, press the CLEAR button on the front panel or tap CLR on
the remote unit.
4.
“xx CLEAR” appears on the display to indicate that the specified
preset number has been cleared.
Notes:
• To clear stored all preset stations, press and hold the CLEAR
and the F/P buttons for two seconds.
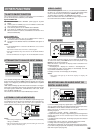
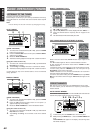
POWER ON/STANDBY
STANDBY
D
O
PHONES
SELECT ENTER
SELECTOR
7.1CH-IN
LD DSS TAPE CD-RCDTV VCR 1 VCR2/DVD-R
MULTI-SPK
MULTI ROOM
AUX1S-DIRECT
AUX2A/D
SLEEP
AUTO-TUNE
GYRO TUNINGDOWN UP
T-MODEF/P
AUX1 INPUT
R
AUDIO
L
VIDEO
S-VIDEO
DIGITAL
MEMO
CLEARDISPLAY
DVD TUNER
2.4. 3.
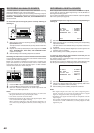
3.
1.
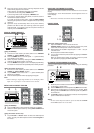
7.1CH-IN
LD DSS TAPE CD-RCDTV VCR 1 VCR2/DVD-R
MULTI-SPK
MULTI ROOM
AUX1S-DIRECT
AUX2A/D
SLEEP
AUTO-TUNE
GYRO TUNINGDOWN UP
T-MODEF/P
AUX1 INPUT
R
AUDIO
L
VIDEO
S-VIDEO
DIGITAL
MEMO
CLEARDISPLAY
DVD TUNER
2.
1.
1.
3.
1. 3.
3.
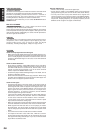
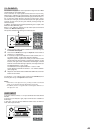
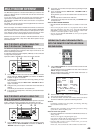
POWER ON/STANDBY
STANDBY
D
O
PHONES
SELECT ENTER
SELECTOR
7.1CH-IN
LD DSS TAPE CD-RCDTV VCR 1 VCR2/DVD-R
MULTI-SPK
MULTI ROOM
AUX1S-DIRECT
AUX2A/D
SLEEP
AUTO-TUNE
GYRO TUNINGDOWN UP
T-MODEF/P
AUX1 INPUT
R
AUDIO
L
VIDEO
S-VIDEO
DIGITAL
MEMO
CLEARDISPLAY
DVD TUNER
3. 2.
2.
3.