


ENGLISH
16
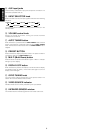
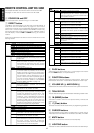
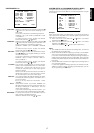
SPKRS SETUP 2/2 (SPEAKER DISTANCE)
Speaker distance for time alignment
Use this parameter to specify the distance of each speaker’s position
from the listening position. The delay time is automatically calculated
according to these distances.
UNITS: The units may be selected in “ft” or “m” with or button.
If you select “ft” the setting parameter will change in 1 foot
increments. If you select “m” it will change in 0.3 meters
increments.
Begin by determining the ideal or most commonly used seating
position in the room.
(There are several usefull books and special DVD and LD’s available
to guide you through proper home theater configuration. If you are
unsure, have your Marantz dealer perform the installation for you.
They are trained professionals familiar with even the most
sophisticated custom installations. Marantz recommends the
WWW.CEDIA.ORG website for further information about this).
Then provide the distance values from that point to each speaker
during the speaker setup process.
Select the target speaker with “OK” button, and input parameter with
or button.
After input for each speaker’s distance has been finished ,move
cursor to ENTER with or button and press the OK button.
If your input is out of the range of the SR-19EX’s processing,
“incomplete channel” will flash.
In that case, input an acceptable parameter or improve the speaker
placement.
The maximum distance a speaker may be placed is 30 feet (9 meters)
from the listening position, which means you can setup your system in
a room which is 60 feet long! If your home theater room is larger than
this please consult a professional as it is sized more closely to a real
movie theater!
The time aligment feature does not function in the STEREO, SOURCE-
DIRECT, 5ch Stereo and 6 CHANNEL INPUT modes.
RETURN : If you desire to return the main menu , press the “OK“
button on RETURN .
EXIT : If you desire to exit from OSD menu system, press the
“OK” button on EXIT.
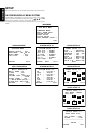
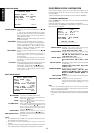
LEVELS SETUP 1/2 (TEST TONE GENERATOR)
TEST MODE : Selects the mode for generating the test tone. If you
select AUTO with or button, the test tone will be
cycled through in a circular pattern which is Left →
Center → Right → Surround Right → Surround Back
Right → Surround Back Left → Surround Left →
Subwoofer → Left → ...in increments of 3 seconds
for each channel.
If you select MANUAL, press the OK button to cycle
through the test tone channels after the “TEST
TONE ON”.
TEST TONE: Press the OK button, ON is indicated and the test
tone starts from the front left speaker.
Notes : Master volume level will be automatically
set at the 0 dB position.
Level adjust : Adjust the level of the test tone for each channel
with the LVL+, LVL– or, , buttons of the RC-
18SR. The current volume level is shown at the
center of the display.
Notes:
• The setup level for each channel is memorized for reproduction
in all surround mode.
• These levels are common for all surround modes, except 6CH-
INPUT mode.
• In order to correctly set the output levels, use a hand-held
Sound Pressure Level meter (SPL), set to C-Weighting and Slow
averaging.
• A Radio Shack
®
SPL meter (catalogue number 330 - 2055) works
well.
• Using the internal channel noise generators, set each channel so
that you read 75 dB SPL from each channel when seated at the
listening position.
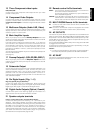
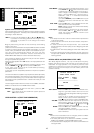
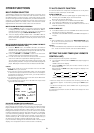
LEVELS SETUP 2/2 (BASS PEAK LEVEL LIMIT)
With Dolby Digital and DTS , not only the LFE (Low Frequency
Effects), but also the bass of all channels can be heard from the
Subwoofer or Large-speakers. This procedure prevents these
speakers from becoming too loud and creating an unbalanced
sound. Since the sound is output at a loud volume, perform this
operation carefully.
TEST SIGNAL: Press the OK button, START is indicated and it
begins to generate a Bass test tone from the
speaker which was designated “bass signal output”
during setup.
There will be no audible sound yet because the
Master volume is set to minimum automatically.
Press button to move the cursor to VOLUME control.
VOLUME: Adjust the bass test tone output level up until the
bass begins to distort or you reach the maximum
level with the VOL+, VOL– or / button. Press
button to move the cursor to ENTER.
ENTER: Press the OK button, ENTER will blink and stop
generating the Bass - test tone.
The Bass Peak Limit Level for your system has now
been memorized.
Notes:
• Each time the subwoofer level is changed, perform the Bass
Peak Level setup and correct the setting.
• The bass peak limiter is not effective in STEREO, SOURCE-
DIRECT 5ch STEREO, and 6CHANNEL-INPUT mode.
• The selected value is displayed in the volume column before the
test signal starts.
SE
:
C
S
1
1
SK SR
TI
TUPP
UN
2/2
10
L
B
0
SL
SL
10
1
ft
R
10
1
0SW
0
B
:
SR
10R
0
SB
0
E
1
EX IRUNTER NTER T
S
O
LS
E
S
C
0
LV
D
E
M
ETUE
TS
S
T
T
E
1/2
L
:
L
T
0
E
BL
SL
S100
ON
:M
P
ANUA
R
0SW
0
SR
R 1 0
0
B
0 0
SB
NTXE
S
P
LS
A
R
A
LV
E
N
––
E
E
S
E
K
TUE
A
M
T
U
SB
2/2
TS
E
E
O
S
L
––––
V
E
––––
IG
NT
LE
P
VEL
A
5
T
: –
R
Bd
L
–
:ST
7
–––––––––
EX ITRUNTER