


2 3
p2
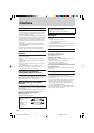
Power Supply Preparations
When using rechargeable batteries
Be sure to recharge the rechargeable batteries BN-R1211 (not in-
cluded) before using them.
For information about these, see “When purchasing rechargeable
batteries” on page 6.
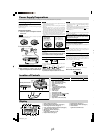
Recharging procedure
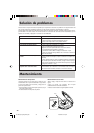
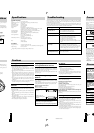
1 Insert the special rechargeable batteries
into the unit.
Caution:
Do not open the battery lid too wide. It can break if you forcibly
open it beyond approximately 90°.
2 Connect the AC adaptor.
Recharging will be completed after 10 hours.
3
When recharging is complete, unplug the AC
adaptor from the power outlet and the DC IN jack.
F
In
•
Using dry-cell batteries (not included)
After disconnecting the AC adaptor, insert two “R6” (LR6) alka-
line batteries.
The procedure for inserting and removing dry-cell bat-
teries is identical to that for rechargeable batteries.
Battery indicator
The battery indicator changes as follows according to the remain-
ing capacity of the battery.
Rechargeable batteries: Recharge batteries.
Dry-cell batteries: Replace batteries with new ones.
Right side panel of the unit
AC adaptor
Notes:
• The length of time the unit can continue further operation after the
battery indicator changes to “ ” differs depending on the type
of batteries used.
• The battery indicator may not be correctly displayed if rechargeable
batteries, other than those designated by JVC, are used.
• When power is supplied from the AC adaptor, “ ” indicator
always lights up.
Tip:
Turning off the Anti-Shock Protection (see page 5) will save the
battery power more or less.
If the unit malfunctions or freezes during use,
disconnect the power source (the AC adaptor
and batteries). Then, connect the power source
and operate the unit again.
Using the AC adaptor
Connect the AC adaptor supplied.
Refer to “When using rechargeable batteries” for connection in-
structions.
Note:
The unit is in the standby condition when the AC adaptor is con-
nected. The primary circuit is always “live” as long as the AC
adaptor is connected to an AC power outlet.
AC adaptor (for multi voltage area only)
Before use
Make sure the present voltage of your AC adaptor fits to your lo-
cal voltage before plugging it into the AC power outlet. If it
doesn’t, shift the AC line-voltage selector with a screwdriver so
that it corresponds to your local voltage.
VOLTAGE
ADJUSTOR
AC 110V
~127V
AC 220V
~240V
If the power plug will not fit your socket, use the AC adaptor.
How to use the AC adaptor
Notes:
• To operate the unit on batteries, the AC adaptor must be dis-
connected from the DC IN jack.
• It takes approximately 10 hours to recharge the rechargeable
batteries.
• Rechargeable batteries have a service life of approximately
300 charge-discharge cycles. If the operating time on one full
charge becomes noticeably shorter than it used to be, the batteries
have reached the end of their service life and should be replaced.
• Recharging takes place only when the unit is powered off. (It is
not possible to recharge the batteries while playing a CD.)
• The AC adaptor and rechargeable batteries may become warm
while recharging is in progress. This is normal and is not a mal-
function.
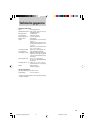
If the battery lid
compartment
comes loose
Slide the lid back into
place horizontally.
Refer to the specifications (page 6) for information on operating times when using rechargeable batteries or dry-cell batteries.
DC IN jack (DC IN 4.5 V )
AC power outlet
Fully charged
Low battery Empty
After a while
the unit will
turn off.
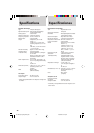
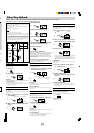
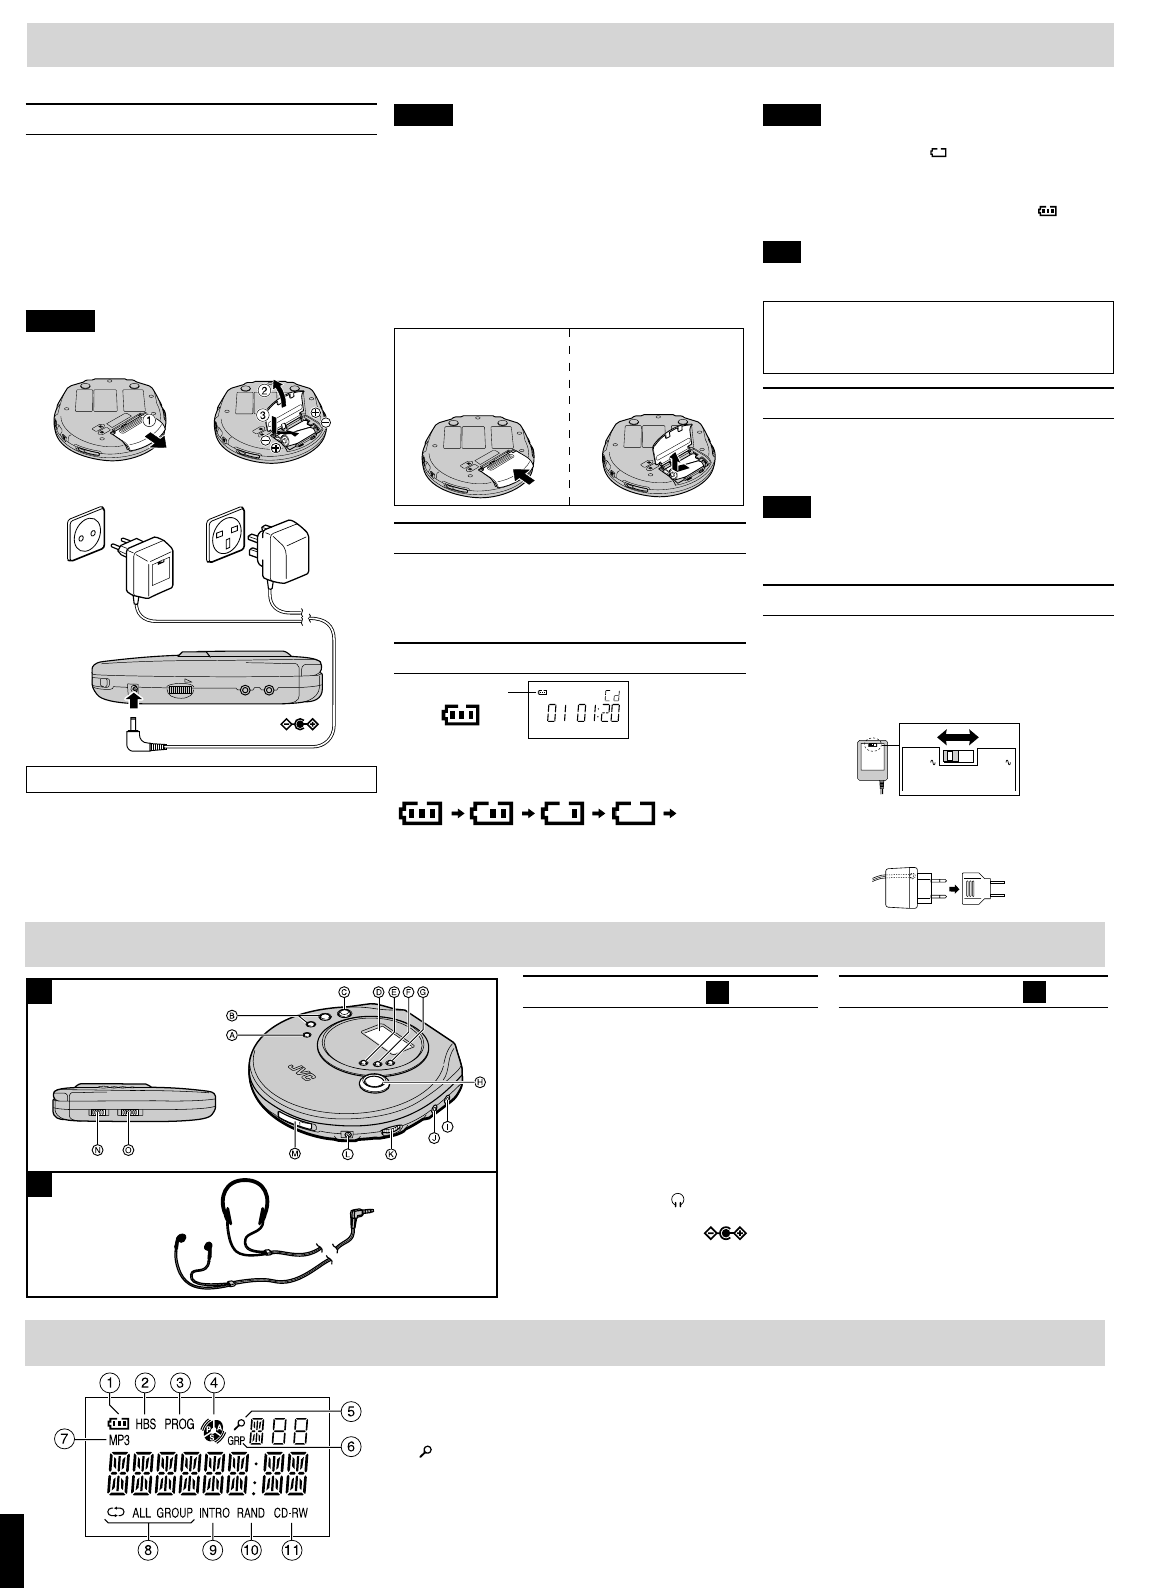
Display
1 Battery indicator (See page 2.)
2 HBS (Hyper-Bass Sound) indicator (See page 4.)
3 PROG (Program) indicator (See page 4.)
4 A.S.P. (Anti-Shock Protection) indicator (See page 5.)
5
(Search) indicator (See page 4.)
6 GRP (Group) indicator (See page 4.)
7 MP3 indicator
Lights when an MP3 disc is used.
8 Repeat indicator (See page 4.)
T
Battery indicator
Removing batteries
Push up on the battery in
the direction indicated by
the arrow. Then lift it out.
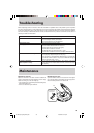
Left side panel of the unit
B
A
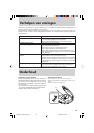
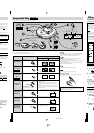
Portable CD player A
A Stop / power off button (7)
B Skip / search buttons (4, ¢)
C Play / pause button (3/8)
D Display
E MODE button
F A.S.P. (Anti-Shock Protection) /
T.SEARCH (Title Search) button
G PROGRAM button
H GROUP button
I LINE OUT jack
J Headphones jack (
)
K Headphones volume control (VOLUME)
L DC in jack (DC IN 4.5 V
)
M Lid open switch (OPEN 3)
N HOLD switch
O Hyper-bass sound switch (HBS)
Stereo headphones
9 INTRO indicator (See page 4.)
0 RAND (Random) indicator (See page 4.)
- CD-RW indicator
Lights when a CD-RW is used.
A
B
Location of Controls
XL-PM20SL[B,UJ]_J.p65 2