


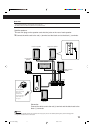


19
Turning off the power with the
sleep timer
Using the sleep timer, you can fall asleep while listening to
music.
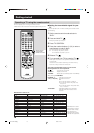
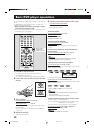
From the remote control ONLY:
Press SLEEP.
Each time you press the button, the shut-off time changes as
follows:
0min (cancelled) ] 10min (minutes) ] 20min ]
30min ] 60min ] 90min ] 120min ] 150min ]
(back to the beginning)
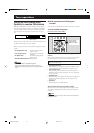
Ex.: When “150min” is selected.
To check the remaining time until the shut-off time
Press SLEEP once.
The remaining time until the shut-off time appears on the
display for a while.
To change the remaining time until the shut-off time
Press SLEEP repeatedly to change the shut off time.
• Each time you press the button, the shut-off time changes.
To cancel the sleep timer
Press SLEEP repeatedly until “0min” appears on the display
window.
• Turning off the power also cancels the sleep timer.
NOTES:
• When DVD is selected as the source to play, this system can also
turn off automatically if playback is not restarted within the time you
have specified (Auto Standby). See page 60.
• If the shut-off time set by Auto Standby comes earlier than the one
set by the sleep timer, Auto Standby takes effect.
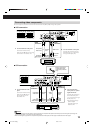
Changing the analog/digital
input mode and decoding mode
When playing software encoded with Dolby Digital or DTS
Digital Surround, the following symptoms may occur:
• Sound does not come out at the beginning of playback.
• Noise comes out while chapters or tracks are being
searched for or skipped over.
To fix these problems, set the correct decoding mode.
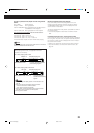
From the remote control ONLY:
Press DECODE to select the digital input
mode when DVD or STB is selected as the
source.
Each time you press the button, the input mode changes as
follow.
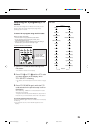
When DVD is selected as the source:
AUTO/PCM ] DOLBY D ] DTS ] (back to the beginning)
L
S.WFR
R
When STB is selected as the source:
ANALOG ] AUTO/PCM ] DOLBY D ] DTS ]
(back to the beginning)
• When you want to hear digital sound reproduced, connect
the center unit and the component through the optical digital
terminals.
ANALOG :Select when the STB is connected to AUDIO
IN jacks.
For Digital Connection
AUTO/PCM :Normally select this for the digital input mode.
The system automatically detects the
incoming signals.
DOLBY D :Select when playing software encoded with
Dolby Digital or Dolby Digital EX.
DTS :Select when playing software encoded with
DTS Digital Surround or DTS-ES.
The following are the digital signal indicators on the display to
indicate what type of signal comes into the system (see also
page 34).
LINEAR PCM :Lights when Linear PCM signal comes in.
DIGITAL EX :Lights when Dolby Digital EX signal
comes in.
DIGITAL :•Lights when Dolby Digital signal comes
in.
•Flashes when “DOLBY D” is selected for
software not encoded with Dolby Digital.
:•Lights when DTS or DTS-ES signal
comes in.
•Flashes when “DTS” is selected for
software not encoded with DTS.
NOTES for the digital input mode:
• If the incoming signal cannot be recognized when selecting
“AUTO/PCM,” no digital signal indicators light up on the display.
• Turning off the system or changing the source returns the input
mode to “AUTO/PCM” automatically.
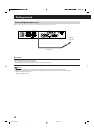
Storing basic adjustments—
auto memory
This system stores sound settings for each source:
• When you turn off the power, and
• When you change the source
The following can be stored:
• The adjustment for the front speakers—balance, bass, and
treble (see pages 30 and 58)
• Low frequency effect attenuator (see pages 30 and 58)
• Subwoofer audio position (see page 30)
• Speaker and subwoofer output level (see pages 18, 36
and 59)*
• Bass boost setting (see page 30)*
• Surround and DSP modes selection (see page 35)*
• DSP effect level (see page 36)*
NOTE:
For the items marked
“*,”
you can assign a different setting for each
source including FM and AM (MW).
EN17-21.TH-A75R[B]_f 02.9.5, 4:11 PM19