


43
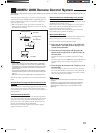
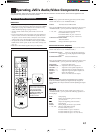
Tuner
You can always perform the following operations (with the remote
control mode selector set to “AUDIO/TV/VCR”):
FM/AM: Alternates between FM and AM.
After pressing FM/AM (with the remote control mode selector set to
“AUDIO/TV/VCR”), you can perform the following operations:
1 – 10, +10: Selects a preset channel number directly.
For channel number 5, press 5.
For channel number 15, press +10, then 5.
For channel number 20, press +10, then 10.
TUNING UP/TUNING DOWN:
Tunes into stations.
FM MODE: Changes the FM reception mode.
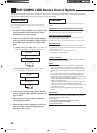
Sound control section (Amplifier)
You can always perform the following operations (with the remote
control mode selector set to “AUDIO/TV/VCR”):
SURROUND ON/OFF: Turns on or off the Surround modes –
Dolby Pro Logic, Dolby Digital, and DTS Digital
Surround.
SURROUND MODE: Selects the DSP modes.
After pressing SOUND (with the remote control mode selector set to
“AUDIO/TV/VCR”), you can perform the following operations:
SEA MODE: Changes the SEA modes.
SUBWOOFER – / +: Adjusts the subwoofer output level.
CENTER – / +: Adjusts the center speaker output level.
REAR•L – / +: Adjusts the left rear speaker output level.
REAR•R – / +: Adjusts the right rear speaker output level.
EFFECT: Selects the effect level.
TEST: Turns on or off the test tone output.
Note:
After adjusting sounds, press the corresponding source selecting
button or CD-DISC to operate your target source by using the 10
keys; otherwise, the 10 keys cannot be used for operating your target
source.
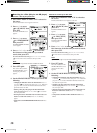
CD player
After pressing CD (with the remote control mode selector set to
“AUDIO/TV/VCR”), you can perform the following operations on
the CD player:
PLAY: Starts playing.
44
44
4: Returns to the beginning of the current (or
previous) track.
¢¢
¢¢
¢: Skips to the beginning of the next track.
STOP: Stops playing.
PAUSE: Pauses playing. To release it, press PLAY.
1 – 10, +10: Selects a track number directly.
For track number 5, press 5.
For track number 15, press +10, then 5.
For track number 20, press +10, then 10.
For track number 30, press +10, +10, then 10.
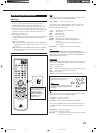
Operating JVC’s Audio/Video Components
You can operate JVC’s audio and video components with this receiver’s remote control, since control signals for JVC
components are preset in the remote control.
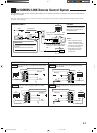
Operating Audio Components
IMPORTANT:
To operate JVC’s audio components using this remote control:
• You need to connect JVC audio components through the COMPU
LINK jacks (see page 35) in addition to the connections using
cables with RCA pin plugs (see pages 5 and 6).
• Aim the remote control directly at the remote sensor on the
receiver.
• If you use the buttons on the front panel or the menu function to
choose a source, the remote control will not operate that source.
To operate a source with the remote control, the source must be
selected using source selecting buttons on the remote control.
• To operate the cassette deck or MD recorder using the COMPU
LINK remote control system, set the source name correctly. (See
page 13.)
• Refer also to the manuals supplied with your components.
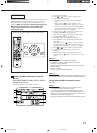
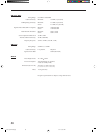
Check to see if the remote
control mode selector is set
to the correct position.
To operate the audio
system, TVs, VCRs, and
DVD players, set it to
“AUDIO/TV/VCR.”
AUDIO/
TV/VCR
CATV/DBS
RM-SRX7000J REMOTE CONTROL
CONTROL
CHANNEL VOLUMETV VOL
TUNING
STOP PAUSE
FF/
/REW
VCR
TV/VIDEO
TAPE/MD
MUTING
REC
PLAY
DOWN UP
AUDIOTV
DVD DVD MUILTI CD TAPE/MD
TV/DBS PHONO FM/AM
VCR
ANALOG/DIGITAL
SURROUND
CENTER
SURROUND
TEST REAR-L
CD-DISC
MODE
ON/OFF
EFFECT REAR-R
SOUND
SEA MODE
SUBWOOFER
RETURN FM MODE
SET
MENU
AUDIO/
TV/VCR
EXIT
TEXT
DISPLAY
SLEEP
123
456
7
/P
89
10
0
+10
100+
CATV/DBS
MENU
ENTER
CATV/DBS
VCR
EN41_50.RX-7000V[J]/f 00.1.12, 0:01 PM43