


➔➔
➔➔➔
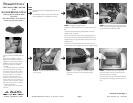
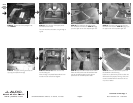
STEP 22: *SUVs or trucks with rear stereo
controls*
Looking into the OEM console, to the rear.
Disconnect the rear stereo controls and the 12v
connections.
Remove the outside cosmetic console off the inner
structure support console.
*Trucks Only*
With the outside cosmetic console off, remove the
rear A/C duct work..
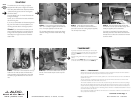
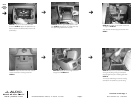
STEP 26: *CAUTION* Read and mark before
cutting.
This is a top view of the line that you need to mark
across the inner structure console.
This shelf area and upper pocket has to be
removed.
Cont.
From
Previous
Page
Continued on Next Page ➔
➔
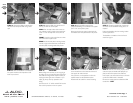
STEP 23: To remove the OEM woofer enclosure.
Start by drilling out these pair of rivets. Located on
the driver side of the console.
STEP 27: This is a view of the driver’s side, rear
area.The mark lines needs to follow the inner edge
of this flat lip.
Straight across, do not follow the edge as it curves
up towards the rear.
➔
STEP 24: Remove the pair of screws from the
front.
STEP 25: Remove the three screws from the pas-
senger side.
There is one screw that i s located on top of the
OEM woofer enclosure.
SB-GM-BURBCNSL/10W3v2, JL AUDIO, Inc 2005
Sheet SKU#011167 3/08/2005Page 4
www.jlaudio.com
➔
➔
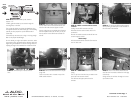
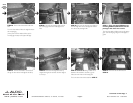
STEP 20: Back out the socket cup set screws to
expose 1-1/2”.
Carefully guide the socket cup set screws through the
mounting holes, in the floor.
From under the vehicle, snug tighten the Stealthbox using
the supplied hardware.You want a little play in the mounting
assembly, to allow proper line up with OEM console in
future steps.
If the socket cup set screws are to long or not long enough.
Back out for proper needed length.
On 4x4 vehicles, you might not be able to touch the socket
cup set screws, from the outside of the vehicle to adjust the
length. Lifting the Stealthbox out of the mounting holes and
adjusting the length will be needed, from inside the vehicle.
STEP 21: With the OEM console out of the vehi-
cle.You need to remove the outside cosmetic con-
sole from the inside structure support console.
Start by pulling the rear cup holders down. Remove
the four exposed screws.This will allow you to pull
the rear section on the OEM outer cosmetic con-
sole off.