


- 18 - SDEC -X000 DACS Calibration Manual v1.0.doc
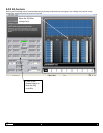
9 Setting Output Level
9.1 Setting Levels before Calibrating
Using the internal noise generator of the SDP set all outputs to
achieve 75dB using the “C” weighting and “SLOW” response.
This will maintain the best signal to noise and headroom
possible by optimizing the gain structure of the system.
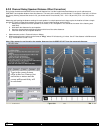
9.2 Final Level Set after Calibrating
Setting the final output level should be done after all corrective
EQ has been completed. It is very important that this be done
so that all channels have a good balance and are properly
calibrated for the average output in the mid-band frequencies.
Use the internal noise test from the SDP and test one channel
at a time.
• Set main and surround channels to 75db.
• Set the subwoofer channel to average between 82dB-
85dB.
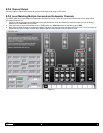
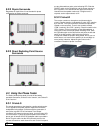
9.2.1 Level Matching Multiple Surround
and Subwoofer Channels
The SDEC-4000 has multiple outputs for Subwoofers and Side
Surrounds. These will need to be level matched to each other
before final output levels are set.
1. Using the internal noise test of the SDP test each output
individually. It will be necessary to mute the output you are
not testing. Make sure the Trim Link is off (not RED).
2. Once you have set each to the reference level of 75dB
enable the Trim Link feature so that the led turns RED.
3. With all the multiple channels un-muted test together and
adjust the output to reach the same reference level. You
will now have an output that has all the multiple channels
level matched and the overall output set to the reference
level. Follow the instructions for level matching the
multiple surrounds and subwoofer channels first and then
set the overall output level to the following reference level.
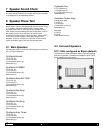
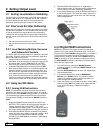
9.3 Using the SPL Meter
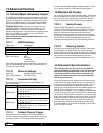
9.3.1 Analog SLM Instructions
NOTE: All instruments of this type are most accurate when
operated in the upper end of the selected range. You should
always use the lowest RANGE setting possible. For example, if
you are balancing a system using the Surround Processor's
noise generator (75dB) you would set the RANGE selector to
70dB.
1. Rotate the RANGE Selector clockwise one click to the
BATTERY TEST position. Observe the meter indication. A
reading anywhere within the red BATT TEST range
indicates adequate battery power. If the indication is below
this range, replace the battery before using the instrument.
2. Now rotate the RANGE Selector clockwise to the desired
range. The meter has a display range from -10dB to +6dB.
The 0dB point corresponds to the RANGE selected.
Therefore, if the 80dB RANGE is selected, a 0dB reading
will equal 80dB.
3. Slide the WEIGHTING Selector to "C" weighting for
channel balance tests. "A" weighting cuts low frequencies.
This will cause errors when measuring subwoofers.
4. It is recommended that you slide the RESPONSE Selector
to the SLOW position. This slows the meters response to
sudden changes in sound level which can make average
level readings difficult.
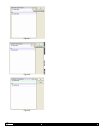
9.3.2 Digital SLM Instructions
NOTE: All instruments of this type are most accurate when
operated in the upper end of the selected range. You should
always use the lowest RANGE setting possible. For example, if
you are balancing a system using the Surround Processor's
noise generator (75dB) you would set the RANGE selector to
70dB. In the event you have selected a range that is too low,
an OVER-RANGE condition is indicated by a flashing display.
Select the next higher range.
1. Turn the SLM on by rotating the RANGE Selector
clockwise. Continue to rotate the RANGE Selector to the
desired RANGE.
2. Press the WEIGHTING button to select "C" weighting for
channel balance tests.
3. It is recommended that you slide the RESPONSE
Selector to the SLOW position. This slows the meters
response to sudden changes in sound level which can
make average level readings difficult.
4. Check the display for a low battery indication. If the battery
needs replacing, BATT will appear in the upper left-hand
corner of the LCD display. Replace the battery if
necessary.