


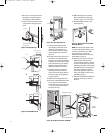


It is highly recommended that you
m
ake front-panel control adjustments
b
efore installing the grille. Experiment
with settings and carefully listen to
ensure that the proper adjustments
have been made.
T
o optimize the P81 and P941 for best
performance:
1. Refer to the Loudspeaker Placement
s
ection on page 8 for information
about loudspeaker installation.
2. Set the High-Frequency Level control
to 0 (different listening rooms may
require other High-Frequency Level
control settings).
3. Set the Low-Frequency Boundary
Compensation control to the appro-
priate position.
•
Select the “off” setting if the speak-
er is mounted at least 4 feet away
from adjacent walls or boundaries.
•
Select the “on” setting if the speak-
er is mounted close to one (or pos-
sibly two) or more adjacent walls
or boundaries. In the “on” position,
system output is reduced below
approximately 400Hz to offset the
increased low-frequency support
due to the boundary.
4. Begin playback of a familiar music or
film source.
5. Listen from the primary listening
p
osition, increasing volume to a
c
omfortable level.
6. Adjust the High-Frequency Level
con-
trol on each P81 or P941 to change
h
igh-frequency balance and timbre.
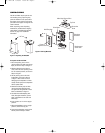
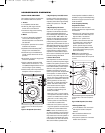
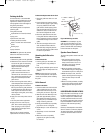
7. Adjust the Listener Axis control
depending on the position of the
primary listening location. Refer to
F
igure 19.
•
Select the “high” (up arrow) setting
if the speaker is mounted so that
the listener is above the tweeter
level.
•
Select the “on axis” setting if the
listener location is directly on axis.
•
Select the “low” (down arrow) set-
ting if the speaker is mounted so
that the listener is significantly
below the tweeter.
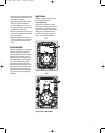
When the loudspeaker has been
mounted upside-down, (with the
woofer higher than the tweeter), refer
to Figure 19. The listener axis control
settings function in the opposite manner
as normal operation:
•
Select the “low” setting if the
speaker is mounted so that the lis-
tener is at tweeter level or above.
•
Select the “high” setting if the
speaker is mounted so that the
listener is below the tweeter.
8. Set the High-Frequency Tilt switch to
“
+” if your listening position is far off
t
he tweeter axis; otherwise, leave it
at “0.”
9. Repeat these steps to optimize per-
f
ormance of the second P81 or P941.
NOTE: For best results, set the High-
Frequency Level, High-Frequency Tilt,
and the Listener Axis controls to the
s
ame positions on both loudspeakers.
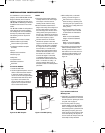
Painting the Frame
Proper surface preparation is critical
for best results. Use spray, roller
(smooth), or a pad to apply the paint.
Clean and prime the frame surface
prior to painting.
1. Place frame on a protected work
surface.
2. Install plastic paint mask (included)
into the frame.
3. Clean front edges of frame face by
gently rubbing with a soft rag damp-
ened with rubbing alcohol.
4. Apply one coat of white or neutral
color water-based primer and let dry.
5. Apply one to two coats of paint for
desired finish.
12
OPTIMIZING PERFORMANCE
Figure 19: Listener Axis Control Upright Speaker Placement
Tweeter
Tweeter
Tweeter
Tweeter
Woofer
Woofer
Woofer
Set Listener Axis Switch to “High” if
listening position is at tweeter level
or above.
Set Listener Axis Switch to “Low”
if listening position is below
tweeter level.
Set Listener Axis Switch to “High”
if listening position is below tweeter.
Set Listener Axis Switch to “Low”
if listening position is at tweeter
level or above.
Inverted Speaker Placement (woofer is above tweeter)
Woofer
Set Listener Axis Switch to “on axis”
if listening position is directly at
tweeter level.
Tweeter
Woofer
Woofer
Tweeter
Set Listener Axis Switch to “on axis”
if listening position is directly at
tweeter level.
Wall
Figure 19: Listener Axis Control Upright Speaker Placement
P81, P941 OM 2/18/05 10:55 AM Page 12