8
HTI88
EXISTING CONSTRUCTION
The grille is packed separately
from the speaker. If at some
later date you wish to remove
the grille from the speaker, to
avoid scratching the grille or
baffle you may unfold a paper
clip, insert the straight end
through one of the holes in the
grille, and gently pull up.
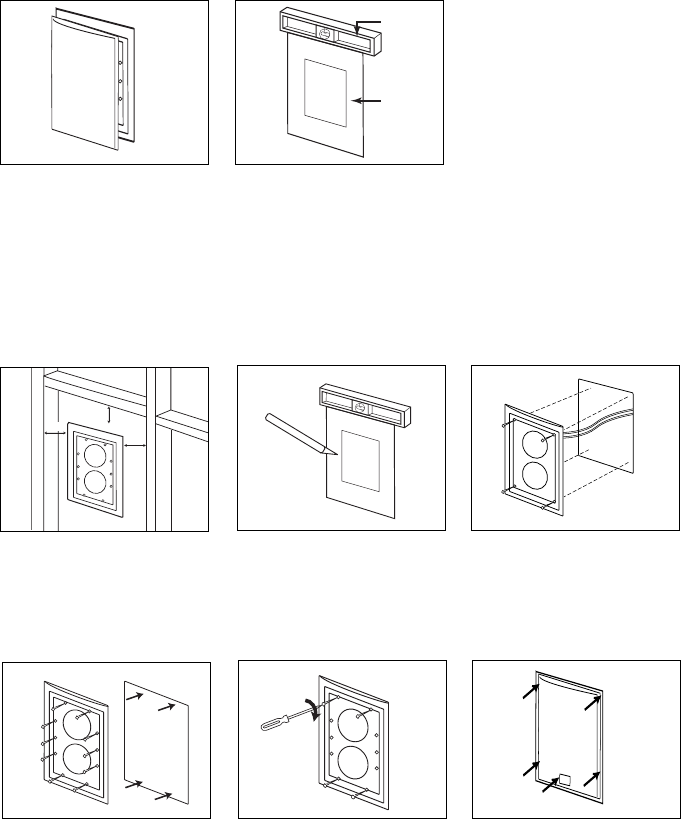
Determine the correct speaker
location.
Template
Level
Note: Always allow at least
one-half inch between a wall
stud and the speaker cutout, or
the locking tabs will not be able
to swivel into place.
1
/2"
1
/2"
1/2"
Cut the drywall.
Connect the speaker wires
to the speaker as
described on pages 4–7.
Replace the metal grille. Attach
the JBL logo to the grille to cor-
respond to vertical or horizontal
installation.
Place the frame assembly in
the wall until the frame surface
is flush with the wallboard.
Screw down each of the ten
Phillips-head screws. It is best
to use a low-speed cordless
driver or a hand-held screw
-
driver to tighten the screws to
prevent over-tightening. The
locking tabs will swivel into
place and secure the unit to the
rear surface of the drywall.
Notes:
• Use the cardboard template
when cutting the drywall.
Although the HTI88 may be
oriented either horizontally
or vertically, the installation
procedure is the same.
• Please be aware the tem-
plate is slightly oversized to
allow for some margin of
error when cutting with the
drywall saw – there should
be no need to allow for fur-
ther margin of error as this
may risk the integrity of the
installation.
HTI88 OM 4/19/05 4:43 PM Page 8


