


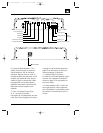

4
Features
• Bridgeable 2/1 Channel Operation
• Simultaneous Stereo + Mono
Operation
• Built-in Staggered 18dB/Octave
100Hz High-Pass and 80Hz Low-Pass
Crossover
• No Current Limiting
• Oversized Floating Rail MOSFET
Switch-Mode Power Supply
• Common Sense 2-way Turn-On
• Stealth Remote Silent Turn-On
Circuitry with Power-On Indicator
• Continuously Adjustable Gain Controls
• Capable of Single-Ended Operation
Into 2-Ohm Loads.
• Fully Complementary, Direct-Coupled,
Discrete Power Amplifier Circuitry
• Gold Plated RCA Input Connectors
• Preamp Output Capability
• Convenient Easy-Disconnect Power
and Speaker Connections
• Third Order (18dB per Octave),
Capacitive/Inductive Power-Supply
Filtering
• Input Mode Switching
• Made in USA
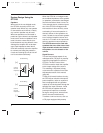
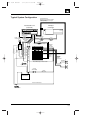
About Installation
Although the GTS100 was designed to
make installation as easy as possible, it
is a sophisticated product that requires
proper installation to realize its full per-
formance potential. Skill with tools, an
understanding of basic electronics, and
experience with car stereo installation
are needed to properly install these
amplifiers. If you feel you do not have
the necessary knowledge and skills,
we
strongly recommend that the instal-
lation be done by your authorized
JBL dealer.
If the GTS100 is installed
by a qualified JBL dealer, we will
double
the length of your warranty to two years
from date of purchase
.
If you choose to install the GTS100
yourself read
all
of the information in
this manual
before
you start the installa-
tion. Pay particular attention to the
safety precautions and notes.
It will save potential problems later if
you take a few minutes to plan the com-
plete installation before you start. The
routing of wires, the power supply con-
nection points, and the mechanical
installation of the unit should be com-
pletely thought out before you begin.
Work carefully and check each step as
it is performed. Before operating the
amplifier, recheck the entire installation
to be sure that each connection is cor-
rect, properly insulated and secure.
JBL 1394 Manual 7/17/98 11:49 AM Page 4