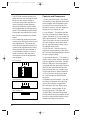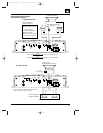
Power Supply Connections
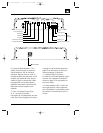
The power input and remote turn-on
wires are connected to the GTS100 via
the power connector on the end of the
amplifier. Use the included wire harness
for connections. In some cases, such
as a custom competition installation,
you may wish to make your own custom
power harness. The part number of the
mating connector and terminals is listed
in the specifications section of the man-
ual, and is a common part available at
many electronics parts retailers. Please
do not call JBL for this, we stock only
the pre-made harness as supplied with
the amplifier.
+12V Battery Wire (Yellow)
• Connect the yellow wire directly to
+12 volt terminal of the battery.
• If it is necessary to extend the power
wire, use 12 gauge or larger wire that
is heat and oil resistant.
• The GTS100 will draw as much as
20-Amps from the vehicle’s electrical
system, enough to overload conven-
tional vehicle wiring. Therefore the
+12 volt power supply must be
directly from the positive side of the
battery.
Do not connect to the
vehicle’s fuse block or to a wire
feeding other accessories.
• To prevent electrical system damage
or fire, a fuse holder and fuse (not
included, maximum 20A) must be
installed in the power supply wire, as
close to the battery as possible, and
before the wire travels through the
firewall or other metal panel.
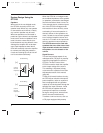
Ground Wire (Black)
• Proper grounding is extremely impor-
tant. It has a significant effect on the
overall performance and noise level
of the system. The ground wire must
be solidly connected to a major sheet
metal structure of the vehicle. Usually
the power supply ground wire can be
connected to a sheet metal panel
near the amp mounting location.
Scrape all paint and primer off the
sheet metal at the grounding point to
ensure a good electrical connection.
Attach the wire to the grounding point
with a sheet metal screw and lock
washer (preferably a star lock washer)
or a bolt/lock washer/nut set.
• In some vehicles, such as those
that have non-metal bodies, it may
be necessary to extend the power
supply ground wire and connect it to
a frame rail or even directly to the
negative (-) terminal of the battery.
Use heat and oil resistant 10 gauge
or larger stranded copper automotive
wire and crimp or solder and insulate
the wire-to-wire connections. Keep
the extension wire as short as possible.
Solder or crimp a terminal on the end
of the extension wire and connect it
to the frame or battery terminal.
• When multiple amplifiers are installed
in the system, it is often best to
ground all of the amplifiers and signal
processors to the same point to pre-
vent noise pickup from a ground
loop. In some unusual installations
the noise level will be lower if the
amplifier or amplifiers are grounded
to the same point that the head unit
is grounded. Use of heavy gauge
14
JBL 1394 Manual 7/17/98 11:49 AM Page 14


