


AVR
39
ENGLISH
Manual Speaker Setup, System Settings
Listening in Zone 2
With the multizone system in use, you may enjoy an exciting 5.1-channel home theater
presentation in the main listening area, while others listen to the same program or an
entirely different source in another room. See
Install a Multizone System
, on page 21, for
installation information.
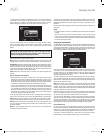
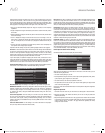
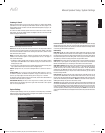
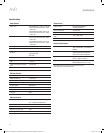
You control the AVR’s multizone system from the on-screen Zone 2 menu. Press the
Setup button, and use the Up/Down buttons to navigate to the Zone 2 line. Press the OK
button to display the Zone 2 menu.
Zone 2
Status:
Source:
Volume:
Assigned AMP:
Off
FM Radio
Zone 2
Status: This line lets you turn Zone 2 on or off.
Source: This line lets you select the source input for Zone 2. You may select a different
source from the one currently operating in the main listening area. However, if the same
source has been selected for both the main listening area and Zone 2, listeners in both
areas will hear the same content.
NOTE: Only analog audio sources, including The Bridge IIIP and USB devices, are
available to the multizone system. To hear digital devices such as a CD player in
Zone 2, follow these steps:
In addition to making a digital audio connection, connect the source device’s analog 1.
audio outputs to the AVR. Make a note in Table A5 on page 47 to record which set of
analog inputs you used.
In the Info menu, scroll down to the Zone 2 Audio setting and select the analog audio 2.
input. (Leave the Audio Input From Source set to the digital input.)
Volume: Highlight this line, and use the Left/Right buttons to control the volume in
Zone 2.
Assigned AMP: This line lets you assign the Assigned AMP channels to “Zone 2”
for multizone operation (see
Number of Speakers
, on page 37). When this line is set
to Zone 2, you may configure the main listening room for only up to 5.1 channels.
To operate the multizone system using the main remote, slide the Zone Select Switch at
the bottom of the remote to the “2” position.
AVR 3650/AVR 365 only: To select a zone using the Zone 2 remote, press the Zone
Selector, and the Zone Indicator light will turn green when the remote is set to operate
Zone 1 or red to operate Zone 2.
System Settings
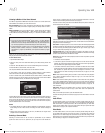
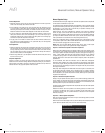
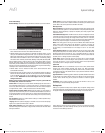
The AVR’s System Settings menu lets you customize in what way many of the AVR’s
features operate. Press the Setup button and navigate to the System line. Press the OK
button to display the System Settings menu.
System Settings
Front Panel Settings
Front Panel Dimmer:
On 100%
dB
On
On
On
Auto
On
Off
HDMI Settings
HDMI Audio to TV:
HDMI Control:
Audio Return Channel:
Power Control:
TV Control:
General A VR Settings
Network Settings
Volume Units:
Volume Default:
Volume Default Level
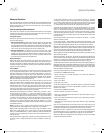
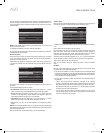
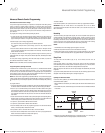
System Settings
Unit of Measure:
Language:
Dolby Vol. Calibration:
RS232 Control:
Feet (ft)
English
Off
24-02-2011 03
Medium
3 seconds
30 seconds
5 minutes
10 minutes
Menu Appearance
Menu Transparency:
Volume/Status Messages:
Menus:
Setup and Slide-In Menus:
Screen Saver:
System Info
Software Version:
Upgrade Software:
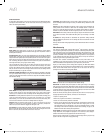
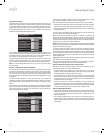
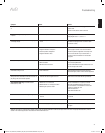
Front-Panel Dimmer: This control sets the brightness of the AVR’s front-panel message
display. Select from 100%, 50%, 25% or Off. The light inside the Volume Control will go
out when the display is partly or fully dimmed, but the Power Indicator will always remain
lit to remind you that the AVR is powered on.
HDMI Settings
HDMI Audio to TV: This setting determines whether HDMI audio signals are passed
through the HDMI Monitor Out connector to the video display. In normal operation, leave
this setting at Off, as audio will be played through the AVR. To use the TV by itself, without
the home theater system, turn this setting to On. In this case you will need to mute the
TV’s speakers (or switch the setting to Off) when using the AVR for audio.
HDMI Control: This setting allows the communication of control information among the
HDMI devices in your system. Turn this setting to On to allow control communication
between the HDMI devices; turn the setting to Off to forbid control communication.
Audio Return Channel: Selecting “Auto” will send audio from the TV to the AVR via the
HDMI Audio Return Channel (ARC) connection (which is in the HDMI cable connecting
the AVR to the TV). The TV source’s “Audio Input from Source” will be automatically
reassigned to the HDMI ARC connector. This way, whenever you’re watching a source
that is connected directly to your TV (such as an Internet connection), you can listen to
the sound through the AVR.
Power Control: This setting links the power on/off functions of the AVR to those of a TV
connected to its HDMI Monitor Out connector. When Power Control is set to On, turning
the TV’s power off will automatically put the AVR into the Standby mode; turning the TV’s
power on will automatically turn the AVR on. NOTE: The connected TV must support the
HDMI System Standby CEC (Consumer Electronics Control).
TV Control: This setting extends some audio-control functions between the AVR and a TV
connected to its HDMI Monitor Out connector. When TV Control is set to On, if the TV is set
to use external speakers, the TV’s internal speakers will mute, and you can use the TV’s
remote to control the AVR’s volume up/down and mute functions. If the TV is set to use
its internal speakers, the AVR’s output will automatically mute. NOTE: The connected TV
must support the HDMI Remote Control/System Audio Control CEC (Consumer Electronics
Control).
0295CSK - HK (x65Series) AVR3650_365_2650_265 CORE OM, WORK18 danny.indd 39 01/07/11 11:34:09