AVR
24
Set Up the Remote Control
Once you have programmed the remote, you can switch the remote’s control mode to
access the functions for a particular device by pressing the remote’s Source Selector
button for that device. To control the receiver, press the remote’s Setup button.
Follow these steps to program the Source Selector buttons for your source devices:
Turn on the source device you want to program the remote to control.1.
Look up the code numbers for the device in 2. Tables A14 – A24 in the Appendix. Write all
the applicable code numbers in a convenient place.
Press the Source Selector button for the device and hold it as it glows red, goes dark 3.
and glows red again. Then release it. The remote is now in the Programming mode.
NOTE: The remote will remain in the Programming mode for 20 seconds. If you do not
complete Step 4 within 20 seconds, the remote will exit the Programming mode, and you
will need to repeat Step 3.
Aim the remote at the source device and use the remote’s Number buttons to enter a 4.
code number from Step 1, above.
If the device turns off, press the Source Selector button again to save the code. The a)
Source Selector button will flash, and the remote will exit the Programming mode.
If the device does not turn off, enter another code number. b)
If you run out of code numbers for a device, you can search through all of the codes c)
in the remote’s library for dervices of its type by pressing the remote’s Up button
repeatedly until the device turns off. When it does, press the Source Selector button
to save the code.
Check that other functions control the device correctly. Sometimes manufacturers use 5.
the same Power code for several models, while other function codes vary. Repeat this
process until you’ve programmed a satisfactory code set that operates most of the
device’s functions.
If you searched through the remote’s code library to find the code, you can find out 6.
which code number you have programmed by pressing and holding the Source Selector
button to re-enter the Programming Mode. Then press the remote’s OK Button, and the
Source Selector button will flash in the code sequence. One flash represents “1,” two
flashes for “2,” and so forth. A series of quick flashes represents “0.” Record the code
number programmed for each device in Table A9 in the Appendix.
Repeat Steps 3 – 6 for each source device you want to control with the AVR remote.
Reassigning a Source Selector Button for a Different Device Type
You can reassign a Source Button to control a different device type (for example, you can
program the Media Server button to control a DVD player).
Turn on the source device you want the remote to control.1.
Look up the code numbers for the device in 2. Tables A14 – A24 in the Appendix. Write all
the applicable code numbers in a convenient place.
Press the Source Selector button you want to override and hold it for three seconds 3.
as it glows red, goes dark and glows red again. Then release it. The remote is now in
the Programming mode.
Press the Source Selector button that corresponds to the source device’s type (i.e., 4.
for a DVD player, press the Blu-ray button). The Source Selector button you pressed in
Step 3 will flash once.
Aim the remote at the source device and use the remote’s Number buttons to enter a 5.
code number from Step 2, above.
If the device turns off, press the Source Selector button from Step 3 again to a)
save the code. The Source Selector button will flash, and the remote will exit the
Programming mode.
If the device does not turn off, enter another code number. b)
If you run out of code numbers for a device, you can search through all of the codes c)
in the remote’s library for devices of its type by pressing the remote’s Up button
repeatedly until the device turns off. When it does, press the Source Selector button
from Step 3 to save the code.
Most of the button labels on the AVR remote describe each button’s function when the
remote is used to control the AVR. However, the button may perform a different function
when used to control another device. Refer to the Remote Control Function List, Table
A13 in the Appendix.
You can also program the remote to perform Macros (preprogrammed code sequences
that execute many code commands with a single button press), and for “punch-
through” programming (allowing the remote to operate a device’s channel or transport
controls when the remote is in another device’s mode). See
Advanced Remote Control
Programming
, on page 41, for instructions on these functions.
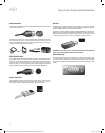
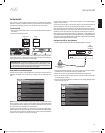
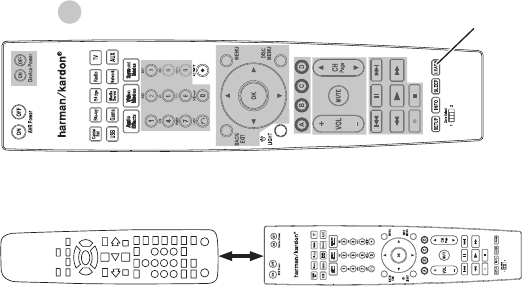
Learning (AVR 3650/AVR 365 only)
If you have the device’s original remote control, you may “teach” its individual button
codes into the following “destination” buttons on the AVR 3650/AVR 365 remote:
Device Power On/Off buttons, Number buttons, Last button, Back/Exit button, Menu
button, Up/Down/Left/Right buttons, OK button, Disc Menu button, A/B/C/D buttons,
Channel Up/Down buttons, Volume Up/Down buttons, Mute button, Transport Control
buttons.
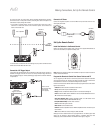
= Destination Buttons
Learn
Button
Place the two remotes with their IR transmitters facing each other, about 1 inch 1.
(25mm) apart.
1 inch
(25mm)
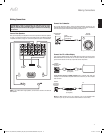
Press the AVR remote’s Source Selector button for the source device, then press and 2.
hold the Learn button until the Source Selector button glows red. The remote is now
in the Learning mode.
On the AVR remote, choose a destination button that will learn the source device 3.
remote’s function. Press the destination button, and the Source Selector will flash
once.
On the source device’s remote, press and hold the button with the function that you 4.
want to teach to the AVR remote until the Source Selector button flashes three times.
The source device remote’s button has now taught the AVR remote’s destination button
to perform its function on that source.
You can program additional buttons for this source by repeating Steps 3 – 4. You can 5.
program buttons for other sources by repeating Steps 1 – 4.
When you’re finished, press the Learn button once to exit the Learning mode, or wait for
the remote to exit the Learning mode on its own after about 30 seconds.
0295CSK - HK (x65Series) AVR3650_365_2650_265 CORE OM, WORK18 danny.indd 24 01/07/11 11:33:55


