


(fehlender Tieftonbereich, falsches Stereo-Bild).
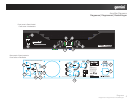
Speakeroutputs(9,10,11):speakonconnectorsarepro-
vided to connect speakersto the amplier quickly and
easily. They are high current rated and provide very stable
and durable contacts. A third speakon connector (11) is
providedtobeusediftheamplierisinthemonobridge
mode. Every speakon connector has (pin 1-) as negative
and(pin1+)aspositive.
Salidasparaaltavoces(9,10,11):losconectoresspeakon
sonofrecidosparaconectarlosaltavocesalamplicador
rápidayfácilmente.Tienenunagranvelocidaddecorri-
ente y ofrece conexiones estables y duraderas. Hay un
tercerconectorspeakon(11)parausarsielamplicador
estáenmodomonopuente.Cadaconectorspeakontiene
(pin-)comonegativoy(pin+)comopositivo.
Sortiesenceintes(9,10,11):lesembasesspeakonper-
mettentunbranchementable,rapide&aisédesenceintes
sur l’amplicateur. Ceci grâce à des contacts durables
& constants. Une troisième embase speakon rouge (11)
sertencasdefonctionnementenmodebridge.Chaque
embasespeakonpossèdeunpinnégatif(Pin1)&unpin
positif (Pin 2).
LautsprecherAusgänge(9,10,11):MitdenSpeakonAn-
schlüssen können Sie ihre Lautsprecher schnell und ein-
fach anden Verstärkeranschließen. Sievertragen hohe
Ströme und bieten stabile und dauerhafte Kontakte. Ein
dritter Speakon Anschluss (11) wird verwendet wenn Ihr
Verstärker im “mono gebrückt” Modus betrieben wird.
JederSpeakonAnschlussistwiefolgtkonguriert:Pin1=
(-);Pin2=(+).
Note: totalspeaker impedancemust not belower than
2 ohm per channel for stereo mode, or 4 ohm for mono
bridgemode.TheXP-seriesamplierisdesignedtohandle
low impedence loads and will operate normally with most
2ohmspeakers/parallelspeakercombinations.However,
for optimal performance and reliability we recommend us-
ing speakers with higher impedence.
Nota:laimpedanciatotaldelaltavoznodebeserinferior
a2ohmporcanalparamodoestéreoo4ohmparamodo
mono puente. Los amplicadores de laSerie XP están
diseñadosparasoportarcargasdebajaimpedanciayfun-
cionarannormalmenteconlamayoríadecombinaciones
de altavoces/paralelosde 2ohm. Sinembargopara un
óptimorendimientoyabilidadserecomiendautilizaral-
tavoces con mayor impedancia.
Remarque:l’impédancetotaledesenceintesconnectées
nepeutêtreinférieureà2Ohmsparcanalenmodessté-
réoou4Ohmsenmodebridgemono.Lesamplicateurs
deSérieXPontétéspéciquementoptimiséspourfonc-
tionner parfaitement stable sous 2 Ohms. Pour des per-
formances optimales, nous recommandons des enceintes
possédantuneimpédanceplusélevée.
Beachten: Die gesamte Lautsprecherimpedanz darf 2
Ohm im stereo-Modus nicht unterschreiten, und 4 Ohm im
mono-gebrückt-Modus. Die XP-Serie Endstufe wurde zur
Arbeit mit niedriger Impedanz entwickelt und verträgt die
meisten 2 Ohm Lautsprecher oder parallele Lautsprecher-
Kombinationen. Jedoch empfehlen wir für optimale Leis-
tungundZuverlässigkeitdieVerwendungvonLautsprech-
ern mit höherer Impedanz.
Powerswitch:thepowerswitch(12)turnstheunitonandoff.
Botón de encendido: el botón de encendido (12)
conecta o desconecta la unidad.
Interrupteurde misesous tension(Power):l’interrupteur
demisesoustension(12)permetl’allumage&l’extinction
del’appareil.
Netzschalter:DerNetzschalter(12)schaltetdasGerätein
und aus.
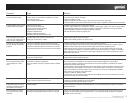
PowerLED:thepowerLED(13)lightswhenthepoweris
on. If the power LED does not light, refer to the trouble
shooting guide.
LEDdeencendido:elLEDdeencendido(13)seilumina
cuandolaunidadestáconectada.SielLEDdeencendido
noseilumina,consultarlaguíaparalasolucióndepro-
blemas.
LED témoin d’alimentation (Power): la LED témoin
d’alimentation (13) s’alllume lorsque l’amplicateur est
alimenté.SicetteLEDnes’allumepas,veuillezconsulter
leguidedesdysfonctionnementssituéàlandumode
d’emploi.
Betriebs-LED (Power): Die Betriebs-LED (13) leuchtet,
wenn die Stromversorgung eingeschaltet ist. Sollten die
LED nicht leuchten schauen Sie bitte unter Fehlerbeseiti-
gung nach.
BridgeLED:thebridgeLED(14)willlightwhenyouhave
set the rear panel operation mode switch (8) for mono
bridge operation. Always make sure that this switch is in
the correct position and that all speaker connections have
been made correctly for the mode of operation you wish to
usebeforepoweringuptheamplier.
LED de modo puente: el LED puente (14) seiluminará
cuando haya seleccionado en la parte trasera del panel el
selector de modo de operación (8) para operación mono
puente.Asegúresesiempredequeésteinterruptorestá
en la posicióncorrecta y quetodas las conexiones de
altavoces se han hecho correctamente en el modo de
operaciónquedeseautilizarantesdeencenderelampli-
cador.
LEDbridge:laLEDbridge(14)s’allumerauniquementsi
vousavezpositionnélecommutateurdemodedefonction-
nement(8)surbridge.Toujoursvérierquelapositiondece
commutateursoitcompatibleaveclenombred’enceintes
etleurconnexionavantdemettrel’amplicateursousten-
sion.
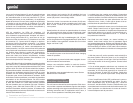
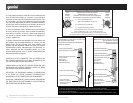
Connections and System Control
ConexionesyControldesistema•Connexions&Utilisation•AnschlüsseundSystemeinstellungen
9
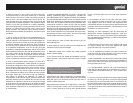
Frontpanel•Panelfrontal•Faceavant•Vorderseite