4. With the channel 1 level control (18) set to zero (fully
counterclockwise), turn the power switch (12) on. With the
level controls of your mixer or other input device turned all
thewaydown,turntheamplierlevelcontrolsupforde-
siredloudnessfromyourspeakers.Note,whentheclipled
(16)light,thereisdistortionpresentintheamplier’soutput
section.Ifaclipled(16)remainsonorashesrepeatedly,
reduce the signal level by lowering the input level control for
channel a or reduce the level at the source. During mono
bridge operation, the channel 2 level is inactive, however,
bothchannelsledwillashsimultaneouslyandshowoutput
conditions.
4. Con el control de nivel (18) a cero (completamente), en-
cender el interruptor (12). Con los controles de nivel de su
mesademezclasuotrodispositivodeentradabajadosto-
talmente.Subirahoralosnivelesdecontroldelamplicador
alvolumendeseadoparasusaltavoces.Nota,cuandoel
LED de Clip (16) se enciende, hay una distorsión presente
enlasalidadelamplicador.SielLEDdeClip(16)sigue
encendido o parpadea repetidamente, reducir el nivel de la
señal mediante la reducción del nivel de entrada del control
por canal o reducir el nivel de origen. Durante la operación
monopuente,elniveldelcanal2estáinactivo,detodos
modos,enamboscanaleselLEDparpadearásimultánea-
mente y muestra las condiciones de salida.
4.Avecle potentiomètre(18) enposition3/4 (75%dela
puissancedel’amplicateur),mettezd’abordvossources
&consoledemixagesoustensionetallumezl’amplicateur
(On)àl’aidedel’interrupteurPower(12)endernierressort.
Puis avec les potentiomètres de volume de votre console
demixageet/oudevossourcesréglezleniveauaudiode
façonàatteindrele0dBsurlesvu-mètresdevotreconsole
demixage.NotezquesilesLEDsdeclip(16)s’allument,
cela indique la présence de distorsion en sortie de
l’amplicateur.SilesLEDsdeclip(16)restentconstamment
allumées,réduisezleniveaud’entréedelavoieAsicelaest
nécessaireouréduisezlevolumedelaconsoledemixage
ou de la source. En mode bridge mono, le canal 2 est inactif
bienqueles2LEDsdesignals’allumerontdefaçonstricte-
mentidentiqueindiquantainsiun fonctionnementcorrect
en mode bridge.
4.MitdemLautstärkedrehreglervonKanal1(18)aufNull-
stellung (vollständig gegen Uhrzeigersinn), schalten Sie
denNetzschalter(12)ein.RegelnSiezuerstdieLautstärke
IhrerSoundquellefallsmöglichaufeinnormalesLine-Level
(0dB).DannregelnSiedieLautstärkedesVerstärkerssoweit
nach oben, bis die gewünschte maximale Lautstärke Ihrer
Lautsprecher erreicht ist. Wenn die Clip LED (16) leuchtet
tretenVerzerrungenamAusgangdesVerstärkersauf.Wenn
die Clip LED (16) dauerhaft leuchtet oder regelmäßig blinkt
reduzieren Sie die Signallautstärke von Kanal A oder reduz-
ierenSiedieLautstärkeIhrerSoundquelle.BeieinerBrück-
enschaltung ist Kanal 2 zwar inaktiv, aber die LEDs beider
Kanäle zeigen identische Funktionen an.
5.Nowadjustyourmixerorotherinputsourcetoyourde-
sired listening level.
5.Ahoraajustesumesademezclasuotrodispositivode
entrada al nivel de escucha deseado.
5. Maintenant réglez votre console de mixage jusqu’au
niveaud’écoutedésiré.
5.NunkönnenSieanderQuelledieLautstärkenachBe-
liebeneinstellen,ohnejedochweiternachobenzuregeln
wie zuvor.
Dependingonyoursystemconguration,sometimesapply-
ingthegroundwillcreateaquietersignalpath.Sometimes
lifting the ground can eliminate ground loops and hum to
createaquietersignalpath.
Dependiendodesusistemadeconguración,avecesapli-
candolatomadetierracrearáunavíadeseñalmássilen-
ciosa. A veces, levantar la toma de tierra puede eliminar
buclesyzumbidosparacrearunavíadeseñalmássilen-
ciosa.
Lecommutateurdemiseàlaterreestutilisépoursépar-
erlamassedesentréessymétriquesdelaterre.Lorsque
vous séparezla terre dela masse,vous supprimezainsi
d’éventuellesbouclesdemassepouvantgénérerdesbruits
parasites.Suivantvotreinstallation,vousdéciderezounon
deséparerlamassedelaterre.
Abhängig von Ihrer Installation kann die Verbindung der
Masse einen leiseren Signalpfad ermöglichen. Unter Um-
ständenkanneinTrennenderMassejedochMasseschle-
ifen und Störgeräusche beseitigen und damit einen leiseren
Signalpfad ermöglichen.
1. With the power amp on, listen to the system in idle mode
(no signal present) with the ground applied (the signal
ground lift switch (2) in the down position).
1.Conelamplicadorencendido,escucharelsistemaen
mododevacío(sinseñal)aplicadoconlatomade tierra
(interruptor de toma de tierra (2)haciaabajo).
1.Avecl’amplicateursoustension(On),écoutezlesystème
sanssignalaudioappliquéauxentréesdel’amplicateuret
aveclaterrereliéeàlamasse(Commutateurdemiseàla
terre(2)positionnéenbas).
1. Im eingeschalteten Zustand und ohne Eingangssignal
hören Sie sich das Geräusch Ihrer Lautsprecher mit verbun-
dener Masse (Groundlift-Schalter (2) = aus, hinunter Posi-
tion) an.
2. Then turn the power off before moving the signal ground
lift switch (2). Lift the ground by moving the signal ground
lift switch (2) up, turn the power back on and listen to de-
termine which position will provide a signal devoid of back-
ground noise and hum. Keep the signal ground lift switch (2)
in the ground position if the noise level remains the same in
either position.
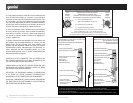
14
Connections and System Control
ConexionesyControldesistema•Connexions&Utilisation•AnschlüsseundSystemeinstellungen
Using the signal ground lift switch
Usando el interruptor de toma de tierra
Utilisationducommutateurdemiseàlaterre
Einsatz des Signal Groundlift Schalters


