


Bridge LED: Die LED “Bridge” (14) leuchtet, wenn
Sie den Moduswahlschalter (8) auf der Rückseite
auf “mono-bridge” (mono gebrückt) geschaltet ha-
ben. Prüfen Sie stets die korrekte Stellung dieses
Schalters und die jeweilige Anschlussweise Ihrer
Lautsprecher bevor Sie den Verstärker einschalten.
SignalLED:the signalLED(15)for eachchannelshow
when a signal is present.
LED de Señal: El LED deSeñal (15) paracada canal
muestraunaseñalcuandoestápresente.
LEDsignal:laLEDsignal(15)dechaquecanals’allumeen
présenced’unsignalaudio.
SignalLED:DieSignal-LED(15)zeigtfürjedenKanalan,
ob ein Signal anliegt.
ClipLED:theamplierhastrueclipLED(16)tohelpyou
properly control the amplier’s output andachieve un-
distorted sound. The clip LED (16) for each channel light
when your signal level is so strong that the distortion
reaches 1% THD. The clip LED (16) should not remain
constantly onor ash repeatedly duringoperation. For
clean sound reproduction, the clip LED (16) should only
light occasionally for an instant. If the LED remains on or
ashesrepeatedly,youwillheardistortedsoundthatcan
be damaging to your speaker systems. If this occurs, re-
duce the signal level by lowering the input level control
for the channel that is clipping or reduce the level at the
source. If the clip LED (16) lights when no signal is pres-
ent, it may indicate a DC level on the output which may
cause damage to speakers (the DC level will not be au-
dible).Pleasenotethatwhenyouareusingtheamplierin
the mono bridge mode, both clip LED (16) of the bridged
channels will operate simultaneously.
LEDdeClip:elamplicadortieneunLEDdeClip(16)
para ayudarle a controlar adecuadamente la salida del
sonido del amplicador y lograr un sonido sin distor-
siones. El LED de Clip (16) para cada canal se ilumina
cuandoelniveldeseñalestanfuertequeladistorsión
alcanza el 1% THD. El LED de Clip (16) no debe perman-
ecer encendido o parpadeando durante el funcionamien-
to. Para una reproducción clara del sonido, el LED de Clip
(16) sólo debe iluminarse ocasionalmente un instante. Si
el LED permanece encendido o parpadeando repetida-
mente,oiráelsonidodistorsionadoyesopuededañarsu
sistema de altavoces. Si eso ocurre, reduzca el nivel de
señal reduciendo el control de entrada de nivel del canal
saturadooreducirelniveldelafuentedelamplicador.Si
elLEDdeClip(16)seiluminacuandolaseñalnoestápre-
sente,puedeindicarqueelniveldesalidadedecibelios
puededañarlosaltavoces(elniveldedecibeliosnoserá
audible).Porfavor,tengaencuentaquecuandoutiliceel
amplicadorenmodomonopuente,ambosLEDdeClip
(16)deloscanalespuentefuncionaránsimultáneamente.
LEDclip:l’amplicateurpossède2LEDstémoinsdesatu-
ration/surcharge(Clip)permettantuncontrôleinstantané
delaqualitéaudio.Celles-cipréviennentdel’apparition
de distorsion & permettent de garantir un signal audio en
sortiedequalitéoptimale.LesLEDsdeclip(16)clignoter-
ontlorsqueleniveaudedistorsionatteindra1%(Distor-
sionharmoniquetotale).LesLEDsdeclip(16)nedoivent
jamaisresterconstammentallumées.Pourunereproduc-
tionaudiodequalité,cesLEDsnedoiventclignoterque
defaçonoccasionnelle.SilesLEDsrestentalluméescon-
stammentouclignotentdefaçonrépétée,vousrisquez
d’endommagervosenceintes.Sitelestlecas,baissezle
niveaud’entréeàl’aidedespotentiomètresrotatifssitués
enfaceavantouréduisezleniveausurvotreconsolede
mixage.SilesLEDsdeclip(16)s’allumentenl’absence
designalaudio,celapeutsignierlaprésencedecou-
rantcontinu(DC)dansl’installationquiconduiraitàune
détériorationdesenceintes(ATTENTION:laprésencede
courantcontinun’estpasdétectableàl’écoute).Vousno-
terez,qu’enmodebridge,lesLEDsdeclipfonctionneront
defaçonstrictementidentique.
ClipLED:DerVerstärkerverfügtübereineechteClip-LED
(16),welcheIhnenhilft,denVerstärkeroptimaleinzustel-
len und ohneVerzerrungen zu betreiben. Die ClipLED
leuchtetjeKanalauf,wenndasSignalsostarkist,dass
dieVerzerrungen1%THDerreicht.DieClipLEDsollte
im Betrieb weder dauerhaft leuchten noch regelmäßig
blinken.ZuroptimalenSoundqualitätsolltedieClipLED
höchstensselten kurzaueuchten.Wenn dieLED dau-
erhaft leuchtet oder regelmäßig blinkt hören Sie verzer-
rten Sound, welcher Ihre Lautsprecher beschädigen
kann. Sollte dies auftreten vermindern Sie die Lautstärke
mitdemLautstärkedrehreglerdesjeweiligenKanalsoder
vermindern Sie die Lautstärke der Soundquelle. Sollte
die Clip LED leuchten wenn kein Signal eingespeist wird
könnte dies auf eine Gleichspannung am Ausgang hin-
weisen, welche Ihre Lautsprecher beschädigen kann (die
Gleichspannungistnichthörbar).WennSiedenVerstärk-
er im Modus “mono-gebrückt” betreiben arbeiten beide
Clip-LEDs simultan.
ProtectLED:protectLED(17)whenyourstturnonthe
amplier,the protect LEDlight briey during aturn-on
delay which indicates that the outputs are disconnected
internally. There will be an audible click when the outputs
reconnect and the protect LED (17) will turn off. Other-
wise, the protect LED (17) indicates that there is a prob-
lemeitherintheamplier’sexternalconnections,loador
temperature conditions or its internal functions. If one of
thesesituationsoccur,theampliersensestheproblem
and automatically switches into protection mode. The
LEDwilllighttowarnyouofthetroubleandtheamplier
willstopworking.Ifthisoccurs,switchofftheamplier
and refer to the trouble shooting guide. If the protect LED
(17)remainslitwhenresumingamplieroperation,donot
usetheamplierandcontactanauthorizedservicetech-
nician.
LEDdeprotección:ElLEDdeprotección(17)laprimera
vezqueenciendeelamplicador,seiluminabrevemente
duranteeltranscursodelaconexiónlocualindicaquelas
salidasestándesconectadasinternamente.Habráunclic
audible cuando las salidas se reconecten y el LED de pro-
tección(17)seapagará.PorotraparteelLEDdeprotec-
ciónLED(17)indicaquehayunproblemayaseadelas
conexionesexternasdelamplicador,cargaotempera-
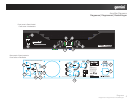
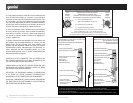
Connections and System Control
ConexionesyControldesistema•Connexions&Utilisation•AnschlüsseundSystemeinstellungen
10