5
QUICK SETUP GUIDE
This quick set-up guide assumes some knowledge with
regards to installing, connecting and using a
subwoofer. We strongly recommend that you do read
through the instruction manual in order to get the best
performance from your Dynaudio subwoofer, even if
you already have installed the subwoofer.
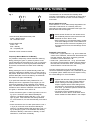
Installing:
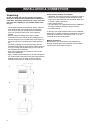
• Carefully unpack the subwoofer and accessories.
• Install the battery cell in the remote control.
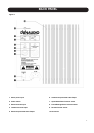
• Connect the processor's or receiver's subwoofer Output
to either the RCA or XLR Input.
• Set the Input button to "Master" unless the subwoofer is
used in a multiple subwoofer setup where another
subwoofer is set as master.
• Set the Preset/Settings switch to "Store".
• Double-check all connections; now connect the supplied
mains lead to the subwoofer and AC outlet.
Using:
• Controlling the subwoofer is entirely done by using the
remote control. Whenever the subwoofer receives a
command from the remote control, the Power status LED
will blink.
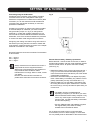
• Set the mains switch on the back panel of the subwoofer
to On. The Power status LED will light up green.
• The subwoofer switches to On or Standby automatically:
It will switch to On when a signal presents itself, it will
switch to Standby when no signal has been available for
20 minutes. When switched to Standby, the power status
LED is red; switched to On, the LED is green.
It is possible to temporarily override Automatic switching:
Briefly pressing the green "I" (Power On) button on the
remote will switch the subwoofer to On, even if no signal is
present. Note that if no music signal presents itself within
20 minutes, the subwoofer will switch back to Standby
again. If you prefer the subwoofer to stay switched On all
the time -regardless of Input signal- press and hold the
green "I' button for 2 seconds to set to Manual Standby/On
switching: The Manual status LED will light up green.
Briefly pressing the red "O" (Power Standby) button will
switch it to Standby, even if a music signal is still present.
Note that on the next occasion a music signal presents
itself (after a 20 minute silence), the subwoofer will switch
to On again automatically. If you prefer the subwoofer
remains switched to Standby all the time -regardless of
Input signal- press and hold the red "O" button for 2
seconds to set to manual Standby/On switching: The
Manual status LED will light up green.
Pressing either the "I" or "O" button briefly, regardless if the
subwoofer is switched On or in Standby mode, will set the
subwoofer back to Automatic switching again:. The Manual
status LED will extinguish.
• Set the subwoofers volume level by pressing the Level
"+" or "-" button.
• Select the desired cross-over frequency by pressing
either 60, 80, 100Hz or Flat. If cross-over frequency
selection is handled by the multi-channel processor or
receiver (most cases), select "Flat".
• Select the desired Phase setting by pressing either the
0°, 90°, 180 or 270° button.
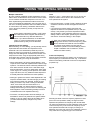
• In the Ext Off mode, the very deepest bass will be
filtered; this will allow the subwoofer to achieve even
higher sound pressure levels. Generally speaking, this
setting is best suited for movies and most music. Press
the EXT On for deepest bass response, as suited for
some music or movie soundtracks with extreme deep
bass.
• You can store your settings in one of the 4 presets A, B,
C or D. Make sure the Preset/Settings switch on the
subwoofers back panel is set to "Store". Press and hold
the desired Preset button for 3 seconds to store. The
Power status LED will blink 3 times to confirm. Previously
stored settings will have been over-written. Set the
Preset/Settings switch to "lock" to prevent accidental
over-writing of the presets.
To recall a preset, simply press the desired preset button
briefly.
Install and make all connections to the subwoofer
and rest of the system before switching the system
and subwoofer on.