


Section 2
INSTALLATION
2.1 UNPACKING
As soon as the amplifier shipment is received, please
inspect for any damage incurred in transit. Since the unit
was carefully inspected and tested at the factory, it left
the factory unmarred. If damage is found, notify the
transportation company immediately. Only the consignee
may institute a claim with the carrier for damage during
shipment. However, CROWN will cooperate fully in such
an event. Se sure to save the carton as evidence of dam-
age for the shipper’s inspection.
Even if the unit arrived in perfect condition -as most do
-
it is advantageous to save the packing materials. They
will prove valuable in preventing damage should there
ever be occasion to transport or ship the unit. Note
the carton and internal pack
-
each is designed for pro-
tection during transit, particularly of the power trans-
former weighing over 25 Ibs. Do
nof
ship the unit without
this factory pack!
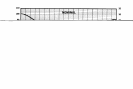
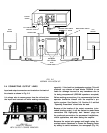
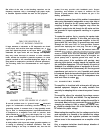
2.2 MOUNTING
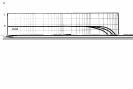
The DC-3DDA is designed on a standard 19 inch rack
mounting format. However, it may be custom mounted
if sufficient support is provided. For dimensions see
Fig.
2-1.
In any circumstance, sufficient ventilation must
be provided for the unit. Good ventilation practice allows
air to flow completely under, around, and through the
amplifier. If the unit is placed above a horizontal surface,
r
7
-I-
FIG. 2
-
1
MOUNTING DIMENSIONS
an air space should be allowed above and below the unit.
If sufficient ventilation is not provided, the unit will
intermittently turn off due to the built-in thermal pro-
tection. Such a condition (if observed) will also be ac-
companied by a warm front-panel due to the integral
heat-sinking employed in the amplifier.
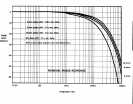
Applications requiring long sustained signals at high
power levels may require the use of a cooling fan.
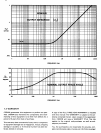
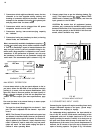
2.3 NORMAL HI-FI INSTALLATION
1. Remove output covers, exposing dual binding-posts.
Two-conductor speaker cables must connect to the OUT-
PUTS using terminal lugs, tinned ends, or the special
“banana” plugs supplied with the
DC-300A.
Connect the
in-line fuses as recommended in the Accessory Bag and
Fig. 2-2. (Not needed with CROWN speakers.)
2. Since the DC-300A is a “basic amplifier,” the main
outputs of the control-center or “preamplifier” must be
connected via shielded audio-cables to the two jacks
marked INPUT. Use RCA-pin at preamp and standard
¼
inch phone-plug at the
DC-300A.
The two cables should be tied parallel along their entire
length, using the accessory cable ties.
3. U/L requirements specify a 3-wire AC power con-
nector; however, proper connections to a switched outlet
on the control center require the use of a 3-to-2 wire
adapter. NOW, plug the AC into a switched outlet on the
control center.
4, Your Control Center may now be turned on. Then
advance the
DC-300A
Input-Gain Controls about %-open
(1
50°
clockwise).
When using the CROWN IC-150A Control-Center, the
VOLUME should attain almost full rotation (2 to 4 o’clock)
for loudest “concert-hall”volume. If at 3 o’clockthevolume
is low, increase the DC-300A input gain controls; if too
high, decrease the
DC-300A
gains.
To assure maximum enjoyment and full speaker protec-
tion, read the following detailed sections on OUTPUTS,
INPUTS and Chapter 3-OPERATION.
13