


18
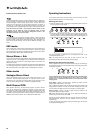
The next step is to select each source input in turn on the 551R and tell the
unit:
• The type of audio connection you want to use for that source (Analogue,
Digital or HDMI).
• The processing mode for that source.
The 551R remembers these settings individually for every source input and
automatically recalls them as and when you change source input.
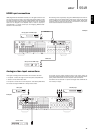
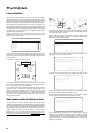
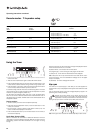
Audio connection type
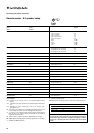
Select the ‘Audio In/Out Setup’ menu. Highlight each source in turn and
select either analogue, digital or HDMI input types (use the Left and Right
arrows):
The options shown will be Analogue, Digital and HDMI if that source has been
assigned an HDMI input for video as above.
Analogue inputs will require a stereo phono/RCA to phono/RCA cable
connection to the 551R. Digital inputs will require either a 75ohm digital type
phono/RCA to phono/RCA co-axial cable (S/P DIF) or an optical fibre cable
(TOSLINK). The 551R will automatically use whichever is connected. Do not
make connections to both the Optical and Co-axial inputs for a source.
Note: The Preamp output item at the bottom of this menu selects between
Normal mode (the default), Pre Out Mode (when external power amps are
used) and Ext 2 Ch Mode (where external power amps for front left and right
only are used). These options are covered later. Make sure this setting shows
Normal. TV-ARC is also covered in a later section.
Once you have set the audio types exit the OSD to save.
This setting can also be changed at any time without using the OSD by
pressing the Audio Input Type button on the front panel or remote, this will
then cycle between analogue, digital or HDMI input types where available for
the currently selected source, as usual they will then be remembered the
next time you return to that source.
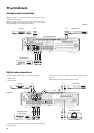
4. Source setup
Audio In/Out Setup Menu
BD/DVD :
Video 1 :
Video 2 :
CD/Aux :
Tape/MD/CDR :
Preamp Out :
TV ARC :
Return : [OSD]
HDMI 1
Digital
HDMI 3
Analog
Analog
Normal
Enable
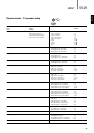
The 551R features a Faroudja digital video processor/ scaler.
This can if desired process any of the video sources and scale them up (or
down) to various resolutions.
This feature is most useful with analogue video sources where the processor
can clean up the picture and scale it to 720p, 1080i or 1080p before
outputting them over HDMI to a suitable TV.
On entering this menu you will see that the sources that you assigned an
analogue video input are automatically set to Process.
Sources that you assigned an HDMI input for video are automatically set to
Bypass (i.e. no processing).
This is because many HDMI sources will be natively 1080p or may have high
quality processing built in where it is best to send this video directly to the TV
without any further processing in the 551R.
For analogue video sources it is almost always desirable to process these for
best picture quality before passing them to the TV.
To change the Process/Bypass status of any source (including HDMI) simple
select it in the menu and use the left and right buttons on the remote.
You can also set the desired output resolution for any Processed video
(Bypassed video is unaffected).
The options are 480p 60Hz, 576p 50Hz, 720p 50Hz, 720p 60Hz, 1080i
50Hz, 1080i 60Hz, 1080p 50Hz and 1080p 60Hz.
Note: 3D TV content, 24fps content or other video standards that the 551R
cannot process or recognise are always Bypassed to the output whatever the
setting in this OSD.
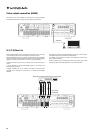
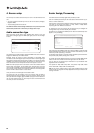
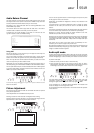
Scaler Assign/Processing Setup
BD/DVD :
Video 1 :
Video 2 :
Video 3 :
CD/Aux :
Tape/MD/CDR :
7.1 Direct :
Output resolution :
Return : [OSD]
Process
Bypass
Bypass
Bypass
Bypass
Bypass
Bypass
1080P/60Hz
Scaler Assign/Processing