


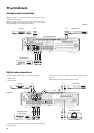


The 551R has 4 HDMI (High Definition Multi-Media Interface) inputs and one
HDMI output. HDMI is a fully digital audio/video system for picture and audio
in digital format for best possible picture quality. DVI (Digital Video Interface)
is a subset of HDMI that uses different connectors and only supports digital
video (no audio). The 551R is compatible with DVI in that simple passive DVI-
HDMI adaptors are available which allow the conversion of the DVI connector
to an HDMI format connector (and back again if required) for routing via the
551R.
HDMI outputs on Blu-ray, DVD players and Set-top boxes also often support
higher resolution formats including progressive scan types. Consult both your
HDMI source and TV manuals for details, it is often possible to select from
various options, you will want to select the highest quality output that both
your source and TV are compatible with.
From Blu-ray players, HDMI can also carry the latest Dolby Digital Plus and
True-HD formats as well as DTS-HD High Resolution and Master Audio.
Ensure that the HDMI output of your player has been set to ‘Bitstream’ or
‘Raw’ to pass the formats to the 551R for decoding.
Also some Blu-ray players feature settings to allow down conversion of Dolby
Digital Plus etc. to backwards compatible Dolby Digital 5.1 for older AV
receivers which do not support these formats.
Ensure any such settings are disabled to allow our 551R access to all the
latest formats.
For all the above reasons HDMI is the preferred connection method for both
Audio and Video.
The 551R can however also accept Composite, S-Video and Component
video for sources without HDMI outputs and automatically transcode and
scale this video to the HDMI output.
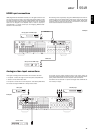
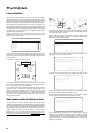
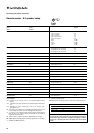
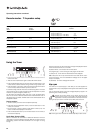
Select the Video Input Assignment Menu.
For each source the currently selected video input type will be shown.
It is possible to assign any of the video input sockets to each Source in turn.
The Options are Composite 1 and 2, S-Video 1 and 2, Component 1 and 2,
HDMI1 – 4.
Note: Assigning a HDMI input to a source automatically also selects Scaler
Bypassing for that source.
You can process these sources if you wish simply by setting the Scaler to
Process in the Scaler Assign Processing menu afterwards.
551R
azur
17
ENGLISH
Video Input Assignment
BD/DVD :
Video 1 :
Video 2 :
CD/Aux :
Tape/MD/CDR :
7.1 Direct :
Return : [OSD]
HDMI 1
Composite 1
HDMI 3
-----
-----
-----
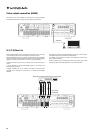
If necessary press the OSD button to perform a retest or press Enter to start
the second part of the autosetup procedure as below.
Again a series of test signals will now be output from all of the connected
speaker terminals and Subwoofer. The 551R uses these to measure the
levels and distances (and hence introduce the correct delays) appropriate to
your speakers and room characteristics.
When the auto setup of the 551R is completed successfully, the 551R will
return to the Speaker Setup Menu.
The Speaker Distance and Level Calibration settings for each speaker will
have been updated.
It is of course now possible to go into the Speaker Delay and Level Calibration
menus if you want to manually check/adjust the settings made by the
CAMCAS system, and it is always advisable to check them as no system can
be totally foolproof.
To exit the auto setup menu of the 551R continue to press the OSD button
on the remote control to exit all menus or until ‘OSD ‘is no longer displayed
on the front panel. You can now unplug the microphone and put it away for
future use.
Note: If the auto setup of the 551R is unsuccessful for some reason a 'Fail'
message will appear on the OSD. Included in this message will be details of
the speaker channel or channels which have not been successfully adjusted.
If this is the case, please again check that the speaker or speakers detailed
in the OSD as 'failed' are connected correctly & have not been wired out of
phase. Also check the microphone connection and any other external issues
that could have affected the tests such as noise in the room etc.
Note: Like all such systems CAMCAS has some limitations. Speakers that
exhibit very strong phase angles or deliberately wire some drive units out of
phase can of course appear to the system as an out of phase speaker when
correctly connected. If a speaker is reported as out of phase but is correctly
wired please consult the speakers manufacturer in case this is the case.
Similarly bi-polar speakers which radiate in more than one direction can
make it difficult to measure the distance and sometimes level accurately as
you might expect.
In all cases it is always advisable to manually check the settings CAMCAS has
made for a ‘reality check’ to ensure there are no obvious errors.
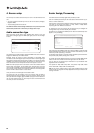
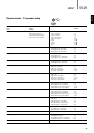
Auto Setup Menu
The unit is now measuring the Distance and Level
settings for your speakers
Please wait........
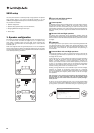
Speaker Setup Menu
Auto Setup
Speaker Configuration
Speaker Distance
Level Calibration
Speaker Crossover
Return : [OSD]
3. Assigning Video inputs