


Thank
you
for
purchasing
this
Cambridge
Audio
Azur
range
AV
Receiver.
We
hope
that
you
enjoy
many
years
of
pleasure
from
it.
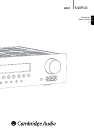
The new 540R v3 is designed for excellent multi-channel surround-
sound performance without compromising on music reproduction.
As such the six fully discrete audiophile grade amplifiers are kept as
separate as possible from the processing and input stages. A large
power supply with low flux toroidal transformer and careful design of the
audio stages ensure that the 540R v3 can reproduce the dynamics and
scale required for modern movie soundtracks whilst also being able to
reproduce a genuinely musical performance with either stereo or multi-
channel music sources.
For the new v3 model we have made several enhancements. We have
added 2 in 1 out HDMI switching, tweaked the amplifier designs for
lower distortion, added a Stereo + Sub mode (digitally created sub) and
post-processing modes with PLII to allow creation of a 6.1 output from
2.0/5.1 DD or DTS material.
All video inputs are now fully freely assignable to any source, making the
unit very flexible despite its relatively small size and socket count.
A new Advanced Bass Management feature allows separate crossovers
and trims for PLII/Neo, DD/DTS and Stereo + Sub modes, plus a Bass
Augment function allows the front speakers to remain Large whilst also
sending front left and right bass to the subwoofer.
A full RS232 control protocol has been implemented and IR Emitter In
added making it easy to integrate the 540R v3 into a Custom Install
situation.
As usual all this proprietary engineering is housed within our
acoustically damped chassis with an Azur navigator remote control
supplied
Your 540R v3 can only be as good as the system it is connected to.
Please do not compromise on your partnering equipment. Naturally we
particularly recommend equipment from the Cambridge Audio Azur
range which includes CD and DVD players which have been designed to
the same exacting standards as this product. Your dealer can also
supply excellent quality Cambridge Audio interconnects to ensure your
system realises its full potential.
Thank you for taking the time to read this manual, we do recommend
you keep it for future reference.
Matthew Bramble,
Cambridge Audio Technical Director
and the AV Receiver design team
Introduction
2
Contents
Introduction .................................................................................................2
Before connecting.......................................................................................2
Limited warranty..........................................................................................3
Safety precautions......................................................................................3
Important safety instructions.....................................................................4
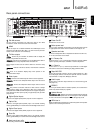
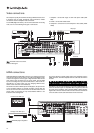
Rear panel connections..............................................................................5
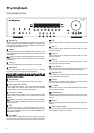
Front panel controls....................................................................................6
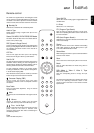
Remote control............................................................................................7
Front panel display......................................................................................8
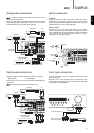
Loudspeaker connections..........................................................................8
Analog audio connections ..........................................................................9
Digital audio connections ..........................................................................9
Aerial connections.......................................................................................9
Front Input connections..............................................................................9
Video connections ....................................................................................10
HDMI connections ....................................................................................10
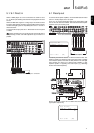
5.1/6.1 Direct In.......................................................................................11
6.1 Preamp Out.........................................................................................11
540R
v3
setup....................................................................................
......12
1. Speaker configuration....................................................................12
2. Speaker delay .................................................................................13
3. Level calibration..............................................................................14
4. Source setup ...................................................................................14
5. Assigning video sources.................................................................15
Surround sound modes............................................................................16
Operating instructions.........................................................................17-20
Decode modes - 5.1 speaker setup...................................................18
Decode modes - 6.1 speaker setup...................................................19
Audio split mode .......................................................................................21
Bass/Treble configuration........................................................................21
Subwoofer setup.......................................................................................21
Advanced bass management ..................................................................21
OSD setup .................................................................................................22
Custom installation use ...........................................................................22
Reset/Back-up memory ...........................................................................22
Troubleshooting.........................................................................................23
Technical specifications ..........................................................................23
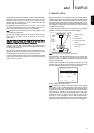
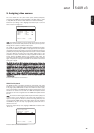
The process of setting up the 540R v3 is first to make all the
connections to your speakers and source equipment and then set the
unit up via its On-Screen Display (OSD), as there are various settings and
adjustments that need to be made before the 540R v3 can be used.
However
before
you
actually
decide
which
connections
to
make
or
perform
any
adjustments
it
is
strongly
advised
that
you
read
through
the
‘540R
v3
setup’
section
of
this
manual
first,
starting
on
page
12.
A lot of explanation is included that will help you to choose the right
connection types for both your sources and TV.
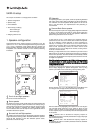
Before connecting
Visit www.cambridge-audio.com and register to receive notification of future
hardware and software releases.
This guide is designed to make installing and using this product as easy as
possible. Information in this document has been carefully checked for accuracy at
the time of printing; however, Cambridge Audio's policy is one of continuous
improvement, therefore design and specifications are subject to change without
prior notice. If you notice any errors please feel free to email us at:
support@cambridgeaudio.com
This document contains proprietary information protected by copyright. All rights
are reserved. No part of this manual may be reproduced by any mechanical,
electronic or other means, in any form, without prior written permission of the
manufacturer. All trademarks and registered trademarks are the property of their
respective owners.
© Copyright Cambridge Audio Ltd 2007
“Dolby”, “Pro Logic”, “Surround EX” and the double-D symbol are trademarks of
Dolby Laboratories.
“DTS”, “DTS Digital Surround”, “DTS-ES” and “Neo:6” are trademarks of Digital
Theater Systems, Inc.
HDMI, the HDMI logo and High-Definition Multimedia Interface are trademarks or
registered trademarks of HDMI Licensing LLC.