


QUICK START CONSIDERATIONS
Your B &K receiver is pre-programmed for ease of operation right out of the box. In general, there is minimal
setup required to start listening to your new receiver. To quickly setup and begin operating your receiver,
follow these quick steps:
11
Start with all AC power cords unplugged from their designated AC outlet.
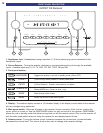
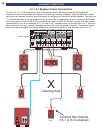
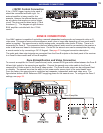
2 From each source device, connect the A/V cables to the appropriate A/V SOURCE INPUTS on the
receiver’s back panel.
3 Connect the appropriate speakers to the receiver.
4 Connect the appropriate video cables from the receiver’s video OUTPUTS to the video monitor’s
input(s).
5 Plug each AC power cord into its designated AC outlet.
6 Turn on the main power switch on the front of each unit. On the receiver, press the ON/STANDBY
button on the front panel, or the ON button of the remote. Turn on all A/V sources.
7 Select a source with the SR10.1 remote control or front panel source control of the receiver.
8 For use with a component video monitor, please see Setup Inputs page 30, Component Video
Assignment.
The rest of this manual will describe in detail the many aspects of your new receiver. Some additional instal-
lation considerations should be noted as follows:
••
It is important that your electronic equipment has proper ventilation. Failure to ventilate your receiver
could result in erratic operation and possible failure caused by overheating. A minimum of 3” clearance
should be maintained above the receiver. Do not place items directly on top of the receiver.
Do not place flammable items on, around or near the A/V equipment (Curtains, paper, etc.).
••
B& K supports various software programs that are able to aide in the setup process of the
receiver/preamplifier, SR10.1 remote and CK1.2 Keypad. This software is available online at B& K’s
website at www
.bkcomp.com or by request from B& K’s customer service. The setup software is easy
to use and is intended to simplify the setup process of your new B& K products.
••
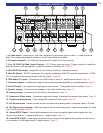
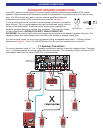
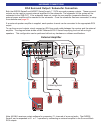
Configure a system diagram of all components that are to be connected into the system. The receiver
has seven sets of inputs. Even though the back panel is labeled for specific sources, in most cases it
is possible to connect any source to any input. For example, if you have a satellite receiver you can
connect it to the V2 input and it will work the same way as connecting it to the SAT input. Select V2
instead of SAT. The source name that will appear on the receiver’s front panel and on the remote or
keypad can be relabeled to match the source equipment that is being used.
••
Determine the type of cable that is needed. Keep in mind that the quality of the cabling that is used
can make a difference in the overall audio and video quality. Try to keep interconnecting cable runs as
short as possible. When routing cables between equipment, be sure to keep AC cables separate from
audio cables. It is a good idea to bundle like cables together to keep interference (noise) to a
minimum.
••
Decide on what types of audio and video signals are going to be used in the system. Determine the
length of the cable for each component's connection and how it should be routed. It is a good idea to
label each cable with a name or number at both ends when allocating each cable. Have all the cables
you need before you begin the installation because it is inconvenient to run to the store when you are
excited to hear what the system will sound like.
••
Plan enough cable length and space to allow future access to the back panel.
••
For best tuner reception, make sure the antenna is several feet away from the receiver and any other
equipment that may produce high frequency interference such as personal computers, CD players,
halogen lamps, etc.
••
For best performance it is recommended that a dedicated AC power line be used for the best
audio reproduction. If the equipment is installed in a rack, be sure to insulate the equipment from the
rack itself.
QUICK START
12