


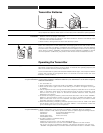

Operating the Transmitter (continued)
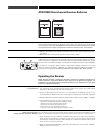
1. A “PRESET” selection in the menu allows you to reset all transmitter functions to their
factory-default values.
2. Press the Set button once to move to Menu mode.
3. Press the Up arrow twice to move to “PRESET” in the LCD window.
4. Press the Set button once and “LOAD” will appear in the LCD.
5. Press and hold the Set button until “DEF” appears in the LCD.
6. Press and hold the Set button until “LOADED” appears briefly in the LCD. The window will
then revert to “PRESET”.
7. Press the Down arrow once to move to “QUIT”.
8. Press the Set button once to exit the Menu mode and return to normal operation, with all
factory-default settings restored.
Tips for Best Results
1. Use only fresh alkaline batteries. Always replace all batteries.
Do not use “general purpose” (carbon-zinc) batteries.
2. Position the dual-channel receiver so that it has the fewest possible obstructions between it
and the normal location of the transmitters. Line-of-sight is best.
3. The transmitters and the dual-channel receiver should be as close together as conveniently
possible, but no closer together than three feet.
4. The receiver antennas should be in the open and away from any metal.
5. Each transmitter-receiver pair must be set to the same frequency.
6. Only one transmitter on a given frequency should be “on” at a time.
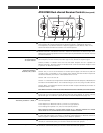
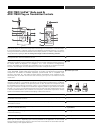
7. The power switch on the transmitter has four positions: “Ext.,” “Off”,“1” and “Both.”
8. If the “Out Level” of either receiver channel is set too high, it may over-drive the input of the
camera/mixer or clip the output of the receiver, causing distortion. Conversely, if the receiver
output is set too low, the overall signal-to-noise ratio of the system may be reduced.
9. You need to change channels 1) when a strong interference signal is received, 2) when the
channel breaks down, or 3) during multiple-system operation in order to select an interference-
free channel. Always turn the units off before changing frequencies.
10. Turn the receiver and transmitter off when not in use. Remove the batteries during long-term storage.
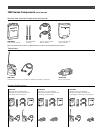
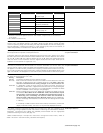
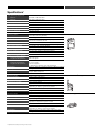
Available Accessories
AT829cW Cardioid condenser lavalier microphone
MT830cW Omnidirectional condenser lavalier microphone
MT830cW-TH“Theater” model, same as MT830cW except beige-color mic and cable
AT831cW Cardioid condenser lavalier microphone
AT889cW Headworn noise-cancelling condenser microphone
AT892cW MicroSet
®
headworn omnidirectional condenser microphone
AT892cW-CO Same as AT892cW except cocoa-color mic, earset and cable
AT892cW-TH “Theater” model, same as AT892cW except beige-color mic, earset and cable
AT898cW Subminiature cardioid condenser lavalier microphone
AT899cW Subminiature omnidirectional condenser lavalier microphone
AT899cW-TH “Theater” model, same as AT899cW except beige-color mic and cable
ATM350cW Cardioid condenser instrument microphone
ATM73cW Headworn cardioid condenser microphone
ATM75cW Headworn cardioid condenser microphone
PRO8HEcW Headworn hypercardioid dynamic microphone
PRO35cW Cardioid condenser instrument microphone
U851cW Cardioid condenser boundary microphone
U857ALcW Cardioid condenser gooseneck microphone
AT-GCW Hi-Z instrument/guitar cable with
1
/4" phone plug
XLRW Connecting cable for UniPak transmitter with an XLRF-type input connector,
for Lo-Z microphones with XLRM-type output terminations
RF Cables Low-loss design, 50 ohm impedance, with BNC-to-BNC connectors:
AC12 RG58-type cable (12')
AC25 RG8-type cable (25')
AC50 RG8-type cable (50')
AC100 RG8-type cable (100')
ATW-RMS1 Remote mute switch designed to be installed between a wireless microphone
using an HRS-type connector and its associated body-pack wireless transmitter
ATW-RCS1 Remote momentary-mute/cough switch designed to be installed between a
wireless microphone using an HRS-type connector and its associated body-pack
wireless transmitter
Visit www.audio-technica.com for detailed information on all of our wireless accessories.
14
Restore Default Settings
Wireless Essentials
®
Microphones and Cables
(all Wireless Essentials accessories are
terminated for use with UniPak™ transmitters)
Receiver Accessories
Transmitter Accessories